Introducción
Usa esta guía para reemplazar la batería de su iPad.
Si tu batería está hinchada, , toma las precauciones adecuadas..
Qué necesitas
-
-
Si el vidrio de tu pantalla está agrietado, mantenga contenidas las roturas adicionales y evita daños corporales durante la reparación pegando el vidrio con cinta adhesiva.
-
Coloca tiras superpuestas de cinta de embalaje transparente sobre la pantalla del iPad hasta cubrir toda la cara.
-
Haz todo lo posible por seguir el resto de la guía como se describe. Sin embargo, una vez que se rompa el vidrio, es probable que continúe agrietándose mientras trabajas, y es posible que debas usar una herramienta de palanca de metal para sacar el vidrio.
-
-
-
Inserta un spudger de metal entre el borde derecho del ensamblaje de la pantalla y el ensamblaje del panel trasero.
-
Gira el spudger lejos de ti para soltar las pestañas a lo largo del borde superior de la pantalla.
Ok, a word of caution that can't be overstated. The off screen switch, the lock swith, and the volume switch can all be broken easily. I would stay away from this area completely. The bracket on the off switch is tack welded and can be broken. The volume/lock swith can be malformed to become unusable. So avoid the area and you will be better off.
Most of the spring clips mounted to the digitizer panel (sandwitched between the LCD display mount tabs and digitizer frame) are guaranteed to break. I recommend just purchasing a set (I found on one Amazon for less then $6). With that said, even though I broke most of mine while removing the glass panel/frame assembly, I was able to remount the glass. It seems fairly secure, but I'm going to put the iPad (3G/Wifi) in a case, anyway.
Pas besoin de pistolet a chaleur, il faut juste faire sauter les clips qui maintiennent l'ensemble écran et LCD. Bien commencer par la droite, car se sont juste des picots en plastique a faire sauter par dessus le rebord en alu, puis soulever la partie du bas en cassant les 4 clips ( pas moyen de les garder entier). Ensuite la partie gauche (avec 6 clips) se détachera facilement. La partie haute n'est pas éclipser mais retenus par un cable.
Yes, most of the clips break easily, but I was able to reassemble the iPad by putting the left side in first at an angle, and then snapping in the rest of it. Even though most of the clips break, it still holds together pretty tight.
not all clips break, and there are so many clips that despite breaking 2-3 clips it still fitted in nicely, if you do not have a metal spudger you can use any pack of screw drivers whose other end looks like the metal spudger, that’s about it, as far the instruction goes they are good for battery replacement.
-
-
-
Continúa haciendo palanca en el ensamblaje de la pantalla para separarlo del panel posterior a lo largo de los bordes inferior e izquierdo del iPad.
Be very careful as the left side has plastic pins that go into the cover, the right side and bottom have metal clips which break easily.
After unlocking the left side, pull away from the right side, as to save the metal clips.
During reassembly, it can be difficult to get the clips back into the body. I found that I had to put two (sturdy) metal spudgers on either side of the lower-right clip in order to gain enough space to get the clip into the body. Even then it required a fair amount of force (obviously not so much as to damage the display).
-
-
-
Levanta el ensamblaje de la pantalla para separarlo del ensamblaje del panel posterior por el borde inferior.
There are four black angle metal foil corner pieces that just fall out of the case. They are about 4 mm long and 2mm on each leg. Have no clue what they do or where they go.
That's probably broken Metal Display Clips. Easy to replace, but you'll need to purchase a set of new clips. Luckily, they're not expensive :-)
orb -
The display data cable may be glued into place along the right and top side of the right battery. You should use an iPod opening tool to pry it away from the adhesive. This will allow you to get a wider opening between the display and iPad body in order to access and remove other cables.
The photo above is the Wi-Fi version because the cellular communication board is missing in the photo. As I lifted the display, following the instructions, one of the cellular antennas snapped right out of the copper connector exposing bare wire. No big deal because it is an iPad 1 and no one would ever use cellular with an original iPad anyway. Not these days. But be very careful lifting the display because the antenna wires for the cellular board are very short and break easily.
-
-
-
Usa el extremo plano de un spudger para levantar el conector de antena más cercano a la parte inferior del iPad de su enchufe en la placa de comunicaciones.
The antenna cable is easily broken when separating the screen from body.
The whole antenna can be purchased for about $5 new on eBay.
Is there a tutorial? Mine broke and I did buy part. However, only thing I find is how to replace lcd. Just need how to replace 3G antenna.
I just need how to replace 3G antenna. Is there a tutorial? Mine broke and I did buy part. However, only thing that I find online is how to replace lcd.
-
-
-
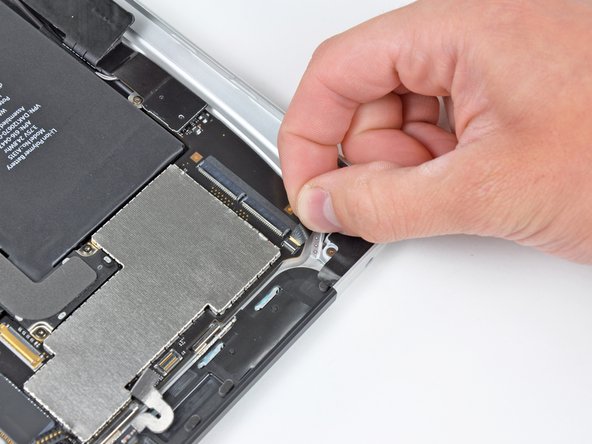
Desconecta el cable de datos de la pantalla de la placa principal levantando el retenedor de metal por su lengüeta de plástico negra.
-
Extrae el conector del cable de su zócalo.
For iPad Wifi Users, there is a ‘3D Antenna’’ cable that also needs to be removed. This is not covered in this tutorial. Here is a YouTube link to that covers this procedure. https://youtu.be/iD8kGSD5r0A
-
-
-
Utiliza el borde de una herramienta de apertura de iPod para levantar con cuidado el conector de antena restante de la placa de comunicaciones.
Replacing the communications board is a very delicate process. Be warned. I got to this point with only a bracket or two broken and when reseating the communications board, one of the connector wafers cracked. Hopefully it will still work but I suspect I will need to find a replacement.
-
-
-
-
Desvía el cable del botón de control a lo largo del borde superior de la placa de comunicaciones. Tira del cable de comunicaciones hacia arriba para levantar su conector y sacarlo del zócalo de la placa lógica.
-
Tira del cable de comunicaciones hacia arriba para levantar su conector y sacarlo del zócalo de la placa lógica.
-
-
-
Retira el único tornillo T5 Torx que sujeta la placa de comunicaciones a la carcasa trasera
-
-
-
Retire con cuidado el protector de goma EMI que cubre la toma de la antena GPS.
-
Use el borde de una herramienta de apertura de iPod para levantar la solapa de retención del cable plano del GPS unida al enchufe del cable del GPS en la placa lógica.
-
-
-
Usa una herramienta de apertura de iPod para levantar el conector de la placa SIM de su zócalo en la placa lógica.
Some iPads have a black tape that keeps the connector in place, you will have to remove it.
Cut the tape holding the SIM board connector to the logic board.
-
-
-
Usa el borde de una herramienta de apertura de iPod para liberar la placa SIM del adhesivo que la sujeta a la carcasa trasera.
-
Retira la placa SIM de su iPad.
-
-
-
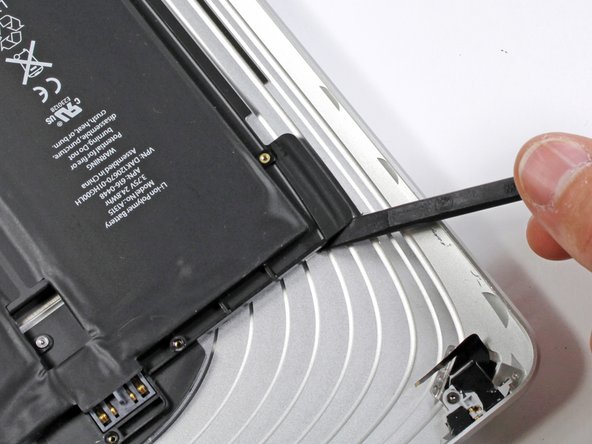
Usa el extremo plano de un spudger para levantar suavemente la batería de la carcasa inferior.
-
Continúa agrandando suavemente el espacio moviendo el spudger y pasándolo por el lado derecho de la batería.
-
Continúa haciendo palanca hasta que el lado derecho de la batería esté libre del panel trasero.
-


Para volver a montar tu dispositivo, sigue estas instrucciones en orden inverso.
Para volver a montar tu dispositivo, sigue estas instrucciones en orden inverso.
Cancelar: No complete esta guía.
92 personas más completaron esta guía.
Un agradecimiento especial a estos traductores:
100%

Estos traductores nos están ayudando a reparar el mundo! ¿Quieres contribuir?
Empezar a traducir ›

12 comentarios
Everything done, battery charges but screen not responsive to touch when trying to input password. It switches on/off fine and I'm able to swipe the lock button but can't input password. Any suggestions? Thanks.
Battery replacement of my son's 2011 iPad 1. Once more invaluable help from ifixit as with an earlier G5 Dual 2.5 and also an iMac 27.
After the battery replacement some non responsive areas on the touch screen. Review revealed I had not relocked the digizer cable and once I did this with yet more replacement clips applied then a return to perfect function. Thanks for the invaluable help. Steve Henderson, Perth, Australia.
Great tutorial.
One thing i am not sure how to do is the battery pack itself, Where will i find the adhesive ? Thank you.
Cedric H.
You don’t need adhesive with a new battery pack. It will hold in place with the existing adhesive and once the iPad is reassembled, it won’t fall apart.
I replaced the battery in my old iPad 1 Cellular model. What a PITA. You’ll break most of the clips, but it still holds together pretty well. There is a high risk of breaking the cellular antenna wires because the photo in this guide opening the display is for the Wi-Fi version, leaving out the location of the cellular board and the short length of the antenna wires. So one of the cellular wires broke the moment I raised the display, unaware that the wires were short. The wire pulled right out of the copper connector. No big deal. I replaced the battery just for fun to see if I could resurrect this old iPad that would no longer turn on. So I did it and it is back together and everything works except cell service, but I would never use cell service with it anyway. Wi-Fi works because the antenna is the Apple logo. Nice to boot up iOS 5.1.1, but it is worthless these days.
Hello! All went well until first power-up after reassembly. Screen looks fine, even got the right date/time but no touch response. What to do? Check digitizer cables?
I needed this guide so that I could access my Alchemy Synth app (which is now unavailable on the App Store). I ordered my battery, followed the instructions, and now I am on cloud nine! Thank you so much for this information.
If you prefer to watch a video of disassembly/reassembly, I have successfully completed the whole process ;) You can see it here:
.
Apple iPad 1st Gen No Power Fix - disassembly & battery replacement (https://www.youtube.com/watch?v=3eEbdCMr...)
.
So you can see screen removal and reattachment, motherboard removal, battery replacement etc. This even includes replacement for the infamous screen clips ;)
The clips WILL break, at least some of them, so don't stress about that. These are cheap to replace, but if you don't have somewhere to source it from you can usually get by with the remaining intact clips. You really don't need all of them to be in place! You may want to re-distribute the clips though, as often you will have one side with almost all clips intact, and one side where all clips are broken.