Introducción
Usa esta guía para reemplazar una batería gastada o muerta en tu Galaxy A50.
Si tu batería está hinchada , toma precauciones apropiadas.
Por tu seguridad, descarga la batería por debajo del 25% antes de desmontar el teléfono. Esto reduce el riesgo de un evento térmico peligroso si la batería se daña accidentalmente durante la reparación.
Necesitarás adhesivo de repuesto para volver a colocar los componentes cuando vuelva a montar el dispositivo.
Qué necesitas
-
-
Inserte una herramienta de expulsión de la tarjeta SIM, una punta de expulsión de la SIM o un clip de papel enderezado en el orificio de la bandeja de la SIM situado en el lado izquierdo del teléfono.
-
Insertar traducción aquí
-
Retira la bandeja de la tarjeta SIM.
-
-
-
Comienza por apagar el teléfono.
-
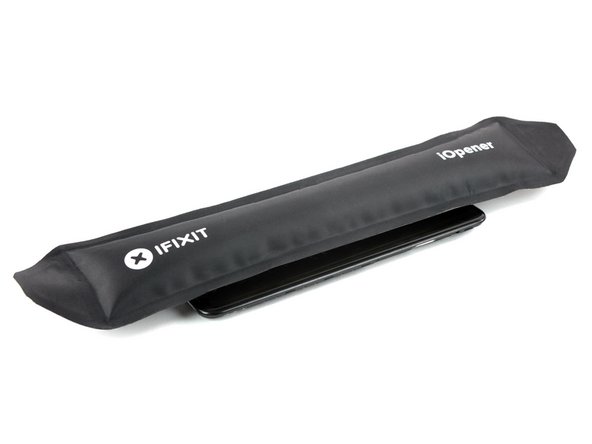
Calienta un iOpener y aplícalo a la tapa trasera para ablandar el adhesivo.
Überhitzen das Gerät nicht, das AMOLED-Display und der Akku sind sehr hitzeempfindlich.
Nur ein kleiner Tippfehler-Hinweis: (Überhitze das Gerät nicht)
OK, korrigiert. Das kann übrigens jeder machen, iFixit ist ein Wiki.
VauWeh -
how long should the heat pack be used for?
The heat pack is in the wrong position in photo - the glue that you are heating is actually all around the edge of the phone!
-
-
-
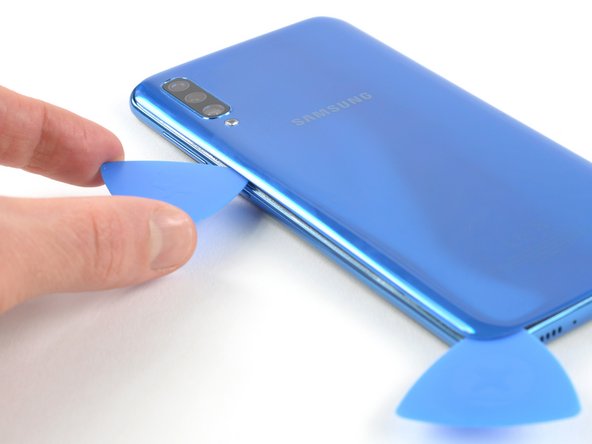
Inserta una púa de apertura en la parte inferior del teléfono, cerca del puerto USB-C.
-
Desliza la púa de apertura hasta la esquina inferior izquierda.
It would be much better to attempt the opening from the top of the phone as there is a delicate flex PCB antenna at the bottom just where you stick the pick in that can get damaged.
-
-
-
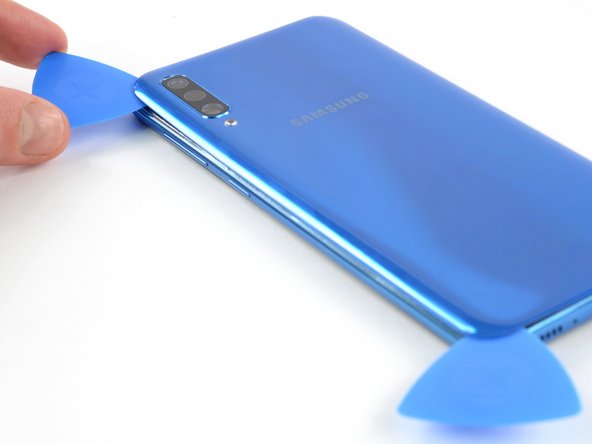
Inserta una cuarta púa de apertura debajo de la esquina derecha superior de la tapa trasera.
-
Desliza la punta de la púa de apertura a lo largo del lado del teléfono hasta la esquina inferior derecha para cortar el adhesivo.
-
Deja la pua de apertura en la esquina inferior derecha para evitar que el adhesivo se vuelva a sellar.
-
-
-
Remueve la tapa trasera.
Very straight forward and simple replacement to do with the right tools, I used my hot air gun work station so this might have been alot easier for me then someone without one? Hair dryers work too, just in case a hot airgun station is not available to you dont worry you can do this repair without, but some form of heat will make life alot simpler :)
-
-
-
-
Remueve los 13 tornillos Phillips #00 (4 mm de largo)
To separate the screen from the mid-frame a few pointers I picked up from a video
1. use a hard pry tool such as iFixit Opening Tool
2. start on a long side about quarter way down from corner
3. work around the frame careful not hook the button assembly -
-
-
Usa un spudger para desconectar la batería levantando el conector directamente de su zócalo.
-
-
-
Usa el extremo plano de un spudger para levantar y desconectar los cables flexibles de pantalla y de interconexión de la placa madre.
-
-
-
Aplica un poco de alcohol isopropílico bajo cada esquina de la batería y déjalo penetrar durante varios minutos para ayudar a debilitar el adhesivo.
-
Alternativamente, aplica un iOpener caliente iOpener a la pantalla directamente detrás de la batería durante dos minutos para ayudar a suavizar el adhesivo. Repita el proceso según sea necesario.
Pro tip. i Highly recommend that you decharge the battery 100% before you even try to touch the battery. Reason is these kind of batterys do not like to be bend og damaged at all. If the battery is charged and you bend it, it can burst into flames or even explode, if you hear a hissing sound or see smoke instant push the phone away from you.. in worst case it can send out a 30cm burning flame or maybe it just make smoke and nothing happen.. So always drain the telephone of power before you try to remove the battery… Example turn on wifi and make it stream a movie or something until it run out of power is an easy way to do this ;-) No matter what i recommend to use safety glasses just in case. PRO tip.. in general if you repair any machine with a battery disconnect it and make sure it has no power.. A car battery is safe, but the kind in some electronic devices are not.. so make sure battery has no power.!!!!
-
-
-
Inserta una tarjeta de plástico debajo del borde inferior de la batería y deslízala con cuidado por debajo de la batería.
-
Continúa deslizando la tarjeta plástica debajo de la batería para aflojar el adhesivo de la batería
Pro tip. i Highly recommend that you decharge the battery 100% before you even try to touch the battery. Reason is these kind of batterys do not like to be bend og damaged at all. If the battery is charged and you bend it, it can burst into flames or even explode, if you hear a hissing sound or see smoke instant push the phone away from you.. in worst case it can send out a 30cm burning flame or maybe it just make smoke and nothing happen.. So always drain the telephone of power before you try to remove the battery… Example turn on wifi and make it stream a movie or something until it run out of power is an easy way to do this ;-) No matter what i recommend to use safety glasses just in case. PRO tip.. in general if you repair any machine with a battery disconnect it and make sure it has no power.. A car battery is safe, but the kind in some electronic devices are not.. so make sure battery has no power.!!!!
-


Si es posible, enciende tu dispositivo y prueba tu reparación antes de instalar un nuevo adhesivo y volver a sellar.
Asegura la nueva batería con adhesivo precortado o cinta adhesiva de doble cara. Para posicionarla correctamente, aplica el nuevo adhesivo en el dispositivo en los lugares donde se encontraba el adhesivo antiguo, no directamente sobre la batería. Presiona la nueva batería con firmeza en su lugar.
Para volver a montar el dispositivo, sigue estas instrucciones en orden inverso. Aplica un nuevo adhesivo donde sea necesario después de limpiar las áreas relevantes con alcohol isopropílico (>90%).
Para un rendimiento óptimo, calibra la batería recién instalada: Cárgala al 100% y manténla cargada durante al menos 2 horas más. Luego usa tu dispositivo hasta que se apague debido a que la batería está baja. Finalmente, cárguela sin interrupción al 100%.
Lleva tus desechos electrónicos a un |centro de reciclaje certificado|new_window=true]].
¿La reparación no salió como planificaste? Intenta con soluciones de problemas básicos, o pide ayuda a nuestra comunidad de respuestas.
Cancelar: No complete esta guía.
40 personas más completaron esta guía.
Un agradecimiento especial a estos traductores:
100%


Estos traductores nos están ayudando a reparar el mundo! ¿Quieres contribuir?
Empezar a traducir ›


15 comentarios
Great guide.. One tip… ALWAYS make sure to decharge the battery so it have no power before you do anything… example turn on wifi and stream a movie and when phone is out of power you can remove the battery.. never bend it, use heat, use fluid to desolve the glue behind battery.. never cut/damage or bend the battery and use safety glasses just in case. Battery in a mobile phone is NOT a toy
Teşekkürler. Çok açıklayıcı ve anlaşılır biçimde hazırlanan değerli bir rehber olmuş. Gerçekten başarılı.
My a50 just got a black screen, I have tried the forced reboot for a couple of time it opened but returns to black screen, now I can't open it with force reboot, is this battery or something else
I have same problem in same time. On the screen, I only have a circle charging sign, but not a percentage of battery charge when it's charging normally. I think the battery's dead.
Hi Allan, It's difficult to remotely identify what's wrong with your A50. Let us know what the reason is if you can figure it out.
Perfecte handleiding! ik heb deze gevolgd en binnen een uurtje was mijn telefoon voorzien van een nieuwe batterij.
Kleine opmerking nog, bij de stappen 9-13 moet je de openingsplectrum wel een beetje schuin naar beneden houden zoals duidelijk te zien is in stap 9/ Als je hem iets vlakker houdt zoals ik eerst deed dan gaan de klemmetjes niet los.
Hi @Gertjan, we’re happy to hear that your smartphone is up and running again. Thanks for your feedback!
Can I use iPhone adhesive strips to hold down the new battery?
Sure, you can use them for your Samsung as well. Good luck with your repair :).
Clear and informative instructions that are well illustrated. They enabled me to make a successful replacement of the battery. Thank you!
الله يبارك ماشاء الله
i had the same problem too, i replace it with a new battery and now i got a new problem that give a temperature icon when i connect it to the charger ???
When refitting the back cover, what adhesive is used? Step 19 says to remove any remaining adhesive -- does that include whatever was used to hold the back cover on originally?
Yes, I bought pre-cut adhesive with the new battery. Removing old adhesive was really a pain in the a**. If anyone have any tips on how to remove old adhsive easily, I'd be happy to hear. i used IPA and lint free cloth, but it was a ton of scrapping and a lot of mess.