Introducción
Abrir el Huawei Mate 20 Pro dañará el sellado impermeable del dispositivo. Si no reemplazas los sellos adhesivos, tu teléfono funcionará normalmente pero perderá su protección contra el agua.
Si tu batería está hinchada, toma las precauciones adecuadas. Por tu seguridad, descarga la batería por debajo del 25% antes de desmontar el teléfono. Esto reduce el riesgo de un peligroso evento térmico si la batería se daña accidentalmente durante la reparación.
Aunque es posible extraer la batería sin necesidad de retirar el cable flexible principal con el puerto de carga, recomendamos hacerlo para evitar daños a los componentes circundantes.
Necesitarás adhesivo de repuesto para volver a colocar los componentes cuando vuelvas a montar el dispositivo.
Qué necesitas
-
-
Antes de empezar, apaga tu teléfono.
-
Aplica un iOpener caliente en la parte trasera del teléfono para aflojar el adhesivo que se encuentra debajo de la tapa trasera. Aplica el iOpener durante al menos dos minutos.
-
-
-
Asegura una ventosa en la parte inferior de la tapa trasera, tan cerca del borde como sea posible.
-
Levanta la tapa trasera con el asa de la ventosa para crear un pequeño espacio entre la tapa y el marco.
-
Inserta una púa de apertura en el hueco.
-
Desliza la púa de apertura hasta la esquina inferior derecha.
-
-
-
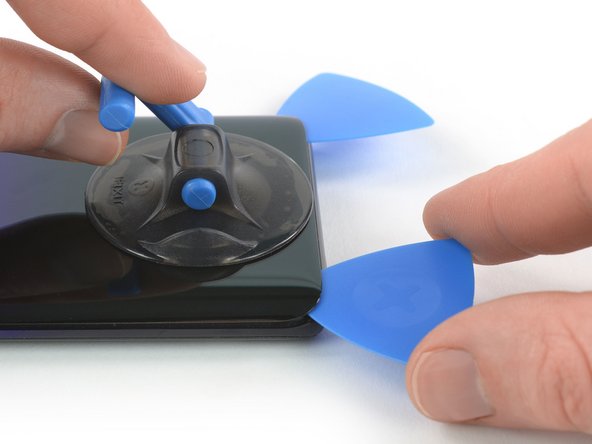
Inserta una tercera púa de apertura en la esquina inferior izquierda.
-
Desliza la punta de la púa de apertura en la esquina inferior izquierda a lo largo del lateral del teléfono para cortar el adhesivo.
-
Deja la púa de apertura en su lugar en la esquina inferior superior para prevenir que el adhesivo se vuelva a sellar.
-
-
-
Si el adhesivo se vuelve difícil de cortar, lo más probable es que se haya enfriado. Usa tu iOpener para recalentarlo.
-
Inserta una cuarta púa de apertura bajo la esquina superior izquierda de la tapa trasera.
-
Desliza la púa de apertura a lo largo del borde superior del teléfono para cortar el adhesivo.
-
Deja la púa de apertura en la esquina superior derecha para evitar que el adhesivo se vuelva a sellar.
-
-
-
Remueve los ocho tornillos de Phillips #00 (4.3 mm de largo)
Hallo, es sind nur 7 Kreuzschlitzschrauben à 4.3mm. Eine (die zweite von unten links nach rechts) ist massiv kürzer und silbern.Gruss Jörg
-
-
-
-
Usa un spudger para levantar y desconectar el conector de la batería.
-
-
-
Remueve los tres tornillos Phillips #00 (4.3 mm de largo)
-
Si quieres quitar o reemplazar el altavoz, la placa secundaria, la batería o la pantalla OLED, quita los cuatro tornillos Phillips #00 (4.3 mm de longitud) que sujetan el ensamblaje del altavoz.
-
-
-
Usa un spudger para levantar y desconectar el cable flexible de interconexión de la placa hija.
-
-
-
Desliza una púa de apertura debajo de la esquina superior izquierda de la cubierta del altavoz.
-
Usa la púa de apertura para levantar el ensamblaje del altavoz y la placa hija.
This part is difficult to remove, does not come out easily.
Turns out that you have to remove the 4 orange screws of step 14.
Not sure why there is a IF statement on this step.
-
-
-
Usa un spudger para levantar y desconectar el cable flexible principal de la placa madre.
-
-
-
Despega la tira adhesiva naranja etiquetada con un 1 de la batería. La cinta adhesiva naranja se rasgará a lo largo de una pequeña línea perforada.
-


Para volver a montar el dispositivo, sigue estas instrucciones en orden inverso. Aplica un nuevo adhesivo donde sea necesario después de limpiar las áreas relevantes con alcohol isopropílico (>90%).
Para un rendimiento óptimo, 'calibra tu batería recién instalada: Cárgala al 100%, y sigue cargándola durante al menos dos horas más. Luego, úsala hasta que se apague debido a que la batería está baja. Finalmente, cárguela ininterrumpidamente al 100%
Lleva tus desechos electrónicos a un centro de reciclaje certificado.
¿La reparación no salió como estaba previsto? Consulta nuestra comunidad de respuestas para obtener ayuda en la resolución de problemas.
Cancelar: No complete esta guía.
12 personas más completaron esta guía.
Un agradecimiento especial a estos traductores:
100%

¡ Mariana Roca nos está ayudando a reparar el mundo! ¿Quieres contribuir?
Empezar a traducir ›


17 comentarios
I have tried this with two new batteries now. I believe the device was water damaged by plugging the charger in while there was moisture in the port. The existing battery works but doesn't fast charge and gets very hot when charging, the battery also drains extremely quickly. Everytime insert a new battery the phone just get stuck in a boot loop, bringing up the Huawei powered by android screen before restarting, I have also replaced the charging port in hopes that may of been damaged and was causing the issue but this didn't work either. Any suggestion?
Excellent Step by step guide thank you
Sorry what do you mean by “reusing the board at the base of the battery body”?
Hi, I had the same issue that the phone did not accept the new battery. Luckily I found a workaround in a German newsgroup: 1) Boot up the device using the original Battery 2) connect an USB charger to the mobile 3) Disconnect the original batery and connect the new one ( you have to be quite fast, if the phone shuts down during the change you have to go back to step 1) 4) charge the phone for about 10 minutes and check if the batteryindicator moves up. 5) restart the phone and double check that the new battery is accepted. I’ve tested this method and it worked for me.
You saved my life, I saw it in the German website but it was not that easy explained
Please show us or explain a bit better how to do this?? I tried it but the phone dies immediately if you remove the battery plug
Oh my gosh! After I tried out every suggestion I found on the internet, this eventually worked for me too! But I put a spin on it. To reduce energy consumption and keep it alive during the switch, I unplugged the screen! Beforehand, my phone died the moment I took off the battery cable. But having the screen not attached, it worked. So happy. By the way, the screen is the yellow/reddish cable that comes from underneath the battery and attaches below the lower-left camera. Having tried out the other methods suggested online, I must say that I also left my phone charging for some hours while it continuously rebooted, and I did a factory reset beforehand. But I don't think that was necessary
axeld.90 -
How did you do it the phone dies
Could you maybe post a link of the original website showing how to do this?
I changed the battery without any problems but the phone gets stuck in bootlooping as I feared... When I let the phone bootlooping while being charged, it eventually starts but it can take a while… And then if I shut down the phone, or let the battery discharged totally, I have to do the whole thing again. Is there a way with a booted phone to change the battery ID so that the phone thinks it’s the old battery inside to prevent bootlooping? Also, can someone elaborate the hardware fix “I solved it by reusing the board at the base of the battery body” ?
Thank you for your help
Yeah I tried and just gave up, old battery still works fine with about 2/3 capacity so I popped it back in. I highly suspect that with the new HarmonyOS the trick they posted about in 2021 is patched. This is a known issue, I guess it's time to change brands for the next phone oh well.
What I tried was following all the steps outlined by the other person, while it seems to work at first the phone refuses to boot after the flashlight is plugged back in and the metal cover plate is installed on top of the motherboard.
More complicated instructions in Chinese, really feel like ifixit needs to put a warning at the top of this tutorial...