Introducción
Esta guía de reparación fue creada por el personal de iFixit y no ha sido respaldada por Google. Obtén más información sobre nuestras guías de reparación [enlace|Ensuring Quality Repair Information on iFixit|aquí |nueva_ventana=verdadero].
Usa esta guía para quitar o reemplazar una batería gastada en el Google Pixel 4. Si tu batería está hinchada, [toma las precauciones adecuadas.
Para tu seguridad, descarga la batería por debajo del 25% antes de desmontar el teléfono. Esto reduce el riesgo de un peligroso evento térmico si la batería se daña accidentalmente durante la reparación.
Para un rendimiento óptimo, calibra tu batería recién instalada después de completar esta guía.
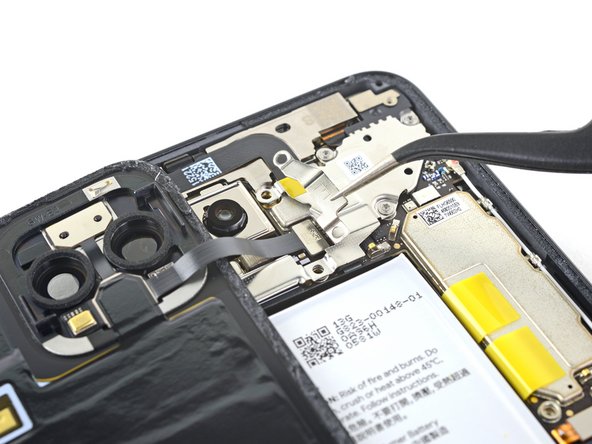
Precaución: Google advierte que el desmontaje del conjunto de láser frontal podría resultar en una exposición peligrosa a las emisiones de láser infrarrojo invisible. Lee sus advertencias de seguridad aquí.
Qué necesitas
-
-
Prepara un iOpener y aplícalo al borde inferior del panel trasero durante un minuto.
-
También se puede utilizar un secador de pelo, una pistola de calor o una placa calefactora, pero hay que tener cuidado de no sobrecalentar el teléfono, ya que tanto la pantalla como la batería interna son susceptibles de sufrir daños por el calor.
-
-
-
Aplica una ventosa al borde calienta del panel trasero presionándolo para crear succión, lo más cerca posible del borde.
-
-
-
Tira hacia arriba de la ventosa con una fuerza fuerte y constante para crear un hueco entre el panel trasero y el marco.
-
Inserta la punta de una púa de apertura en al ranura.
-
-
-
Desliza la púa de apertura por la parte inferior hacia la esquina izquierda para cortar el adhesivo.
-
Con la púa aún insertada, deslízala desde la esquina inferior izquierda hacia la esquina inferior derecha para cortar completamente el adhesivo del lado inferior.
-
Deje la púa insertada en la esquina inferior derecha para evitar que el adhesivo vuelva a sellarse.
-
-
-
Prepara un iOpener y aplícalo al borde izquierdo del teléfono durante un minuto.
-
-
-
Prepara un iOpener y aplícalo en el lado derecho del teléfono durante un minuto.
-
-
-
-
Con las dos primeras púas de apertura todavía en su lugar, inserta un tercer púa en la parte inferior del lado derecho.
-
Desliza la púa de apertura hacia la parte superior del teléfono, cortando el adhesivo del lado derecho.
-
Detente cuando llegues a la esquina superior derecha, y deja la púa insertada.
-
-
-
Desliza la tercer púa de apertura por la esquina superior derecha y por la parte superior del teléfono, cortando la última tira de adhesivo.
-
-
-
Una vez que hayas cortado el perímetro del teléfono, levanta cuidadosamente el borde derecho de la cubierta trasera, abriéndola como un libro.
-
No intentes sacar el panel del todo todavía, ya que todavía está conectado al teléfono.
-
-
-
Continúa abriendo el panel trasero hasta que puedas apoyarlo en el borde izquierdo del teléfono, teniendo cuidado de no poner ningún tipo de tensión en el cable plano adjunto
At this point I suggest taking a photo of what you're seeing in there. This way you can make sure you put it all back the way it was when you're done.
-
-
-
Remueve los cinco tornillos T3 Torx que sujetan el escudo del conector de la batería:
-
Cuatro tornillos de 4.0 mm
-
Un tornillo de 2.1 mm
Does anyone know where I can get a replacement T3 - 2.1mm screw (the one circled in orange)? I lost this screw during the battery replacement. Had it, dogs fought, had to get up to break it up, and couldn’t find it. I swore I put it on the mat, but I couldn’t find it when I got back to the table. :(
-
-
-
Usa un destornillador Torx T3 para quitar los dos tornillos de 4 mm que aseguran la cubierta del conector del panel trasero.
-
-
-
Remueve el panel trasero
Why does the kit not come with the back panel adhesive?
It's not cheap to get the full kit, and it seems like it's such a small thing to include.
I ended up re-using the existing back panel adhesive and now a bit worried that it's not as strong and I will have issues with water or moisture getting into the device more easily.
-
-
-
Tira de la lengüeta amarilla en un ángulo poco profundo con una fuerza constante.
-
Continúa tirando firmemente hacia arriba de la tira adhesiva con una fuerza constante. Si utilizas un spudger, gíralo de vez en cuando para mantener la sección expuesta de la lengüeta de tiro lo más corta posible.
-
Continúa este proceso para cada una de las tres lengüetas, hasta que todas estén fuera o se hayan partido por la mitad.
These are basically like command adhesive strips. If you don't get them off by pulling the tab you can pry them up but it is not easy. This is three strips of strong adhesive.
I pulled the adhesive strips upwards and they just torn leaving most of the adhesive beneath the battery. Battery is impossible to remove now.
I too have experienced something like that. In this case I followed step 22 below to push the opening pick in and force it away from the adhesive. Some strength will be required. The key is to apply balanced force to prevent the battery from being deformed and damaged.
-
-
-
Si las lengüetas de la batería se rompieron durante la extracción, inserta una púa de apertura en el borde superior derecho de la batería, cortando el adhesivo por debajo.
The grip sensor cable picture here is incorrect for my pixel 4; on mine it runs straight from the connector on the right to the left edge of the case, then makes a 90° turn downward to where it connects to the sensor. The result was that I tore the cable because I was using the picture as a guide. I've taken a picture of the alternative placement on mine and I'll send it to the iFixit people to update this guide.
At the bottom end of the battery there is a thin white antenna cable, somewhat hidden between battery and speaker / charging unit. It is also a bad idea to use a pick on the lower adhesive strip. In my case the cable glued to the rest of the strip and I damaged it when lifting the battery.
-
-
-
Levanta la batería y retírala del teléfono para quitarla. Es posible que debas quitar la batería de las pestañas adhesivas sobrantes
-
Si estás utilizando adhesivo de liberación por estiramiento, aplícalo en la batería. De lo contrario, aplica cinta adhesiva de doble cara o tiras adhesivas precortadas en el receptáculo de la batería del teléfono, con cuidado de no cubrir el cable flexible del puerto de carga. Retira los revestimientos de cinta para exponer el adhesivo.
-
Vuelve a conectar temporalmente el conector de la batería a la toma de la placa madre. Esto asegura que la batería esté bien colocada.
-
Coloca la batería sobre el adhesivo y presiona firmemente.
-
Desconecta el conector de la batería del zócalo de la placa madre y vuelve a montarla.
There is a better guide for applying the back adhesive. Search out the guide for the pixel 4 back adhesive on this website. It sucks that they didn't include it here, and I messed it up by trying to decipher these generic instructions.
Thanks for this @joegaughran - saved me a problem. For others, the guide can be found here: Cómo reemplazar el adhesivo del panel posterior en su Google Pixel 4
phzdw -
-


Para un rendimiento óptimo, calibra tu batería recién instalada después de completar esta guía.
Compara la nueva pieza de repuesto con la original. Es posible que tengas que transferir los componentes restantes o retirar los respaldos adhesivos de la nueva pieza antes de instalarla.
Para volver a montar el dispositivo, sigue los pasos anteriores en orden inverso.
Lleva tus desechos electrónicos a un centro de reciclaje certificado.
¿La reparación no salió como planeaste? Echa un vistazo a nuestra comunidad de respuestas para ayuda en la resolución de problemas.
Cancelar: No complete esta guía.
54 personas más completaron esta guía.
Un agradecimiento especial a estos traductores:
100%


Estos traductores nos están ayudando a reparar el mundo! ¿Quieres contribuir?
Empezar a traducir ›


26 comentarios
If you are gonna sell me your tool kit at least supply a *!&$!&$^ T3 Tork bit to complete the job.
Hi Nicholas,
The iFixit kit should definitely have a T3 bit. Please contact our customer support and we will get the issue resolved!
Hey Keith,
When putting the phone back together and reinstalling the back panel, we recommend removing the old adhesive and installing new adhesive. The Pixel 4’s back panel adhesive can be found here, and a guide on how to install it can be found here!
If you’d like to reuse your old adhesive, try removing any large uneven chunks, reheat the adhesive, and press the back panel back into place.
Does the kit include replacement battery adhesive strips? I don’t recall seeing it in mine.
Hey Nikki!
The kit should come with a pre-cut adhesive card. You can pull strips from the card to adhere your battery to the frame.
@arthurshi Thanks, I figured as much. However, I thought it would be nice if they included this instead of the pre-cut adhesive card. This way the battery can still be removed the Google factory way. [producto vinculado inexistente o deshabilitado: IF356-191]
That’s a great idea! We got the battery strips recently and haven’t had a chance to incorporate them into the kit. We’ll definitely do that.
After putting in the new battery the phone doesn’t turn on. If I plug in a charger I get the splash screen and then the battery icon indicating the charge level (85%). What am I missing here?
For anyone who may find this later - my issue was the side button connector ribbon cable came loose in the process of removing the old battery. I had to remove the cover for that and then re-seat the connector. I put it all back together and it’s working great now.
Bryan P -
After replacing the battery and putting it back together, the WIFI is no longer working. It only works when the phone is on top of the WIFI router now.
I cleaned the contacts for the WIFI on the back cover, but still nothing. I reformed the contacts on the board and that didn’t help either.
Anyone else have WIFI issues after replacing the battery?
Great tutorial and I followed step by step successfully. But I did (and recommend to do) steps 17 - 20 first, and 13 - 16 afterwards. If you remove the back panel first, it is easier to unconnect the battery than vice versa.
I have successfully completed this repair guide twice. Thanks a lot for providing the guide!
One thing: One of the iFixit batteries had a charge level of 1%, so it was about to be completely discharged. If you have other rechargeable batteries in stock, you should charge them from time to time, otherwise they may get destroyed.
Very good guide and the fixit kit is awesome.
All went well and battery works like the first day!
I recently replaced the battery on my pixel 4 and it was a simple fix with this kit. However, my back panel is not remaining stuck down. Particularly the corner around the camera starts to separate when my phone gets hot. This was the first indication that my old battery was bulging, and I'm hoping that's not the case again so soon. (It's only been 3 days!).
It could also be that I didn't properly seal the back. I have been unable to find good instructions for using the supplied back panel adhesive. I had to basically make it up.
Did I need to heat it? Clamp it? How to properly close the back? Yesterday I tried applying the iOpener again, then clamping the back closed and putting the phone in the fridge for 5 min. Doesn't seem like it worked.
Any tips? I could buy another back panel adhesive ($8 cdn) but maybe I can still fix this?
This guide is great. After reading it, I'm confident enough to buy the parts to fix my phone myself!
I just changed the battery of my pixel 4 and it was the easiest phone repair I’ve ever done, all thanks to this guide and the kit available. Thanks!
Ugh! My camera has spots all over it now! I guess my battery is ok though.
It took me approximately 2 hours to complete this guide including the significant amount of time cleaning the previous adhesives off the phone. In my case I may not have needed to be so thorough but am happy with the results - resealing the back cover had zero issues.
A pretty reasonable repair for someone with steady hands. I am happy to see a significant performance increase from the replaced battery compared to the 4 y/o one.
Das Auseinandernehmen des Gerätes mit Hilfe des "Wärmekissens" und der Plektren war kein Problem, ebenso wie der Ausbau des Akkus. Das nervigste an der ganzen Reparatur war das Entfernen der Klebereste der Gehäusedichtung. Trotz der Zuhilfenahme von Q-Tips mit Klebstoff-Löser hat mich dieser Schritt ganze 2 Stunden gekostet!
Nach dem Einbau des Akkus dann für einen kurzen Moment Herzrasen, als das Gerät nach dem Einschalten mit einem roten Akku-Symbol sofort wieder ausging. WT...?? Dann Ladekabel angeschlossen und Erleichterung genossen: das Gerät begann bei 1% zu laden! Anscheinend wird der Akku im entladenen Zustand geliefert. Ich hoffe nur, er war nicht tiefentladen!
Beim Hantieren mit der neuen Gehäusedichtung sollte man vorsichtig und sehr behutsam vorgehen, um sie nicht verkehrt anzusetzen. Das war ein Moment, in dem ich mir mein altes S3 zurückwünschte: Rückwand ab, Akkus wechseln, Rückwand wieder anstecken, fertig! Kein Kleber, keine Schrauben. Früher war manches doch besser als heute...
English version:
Taking the device apart using the "heat pad" and picks was easy, as was removing the battery itself.
The most annoying part of the whole procedure was the removing of the adhesive residue from the housing seal. Despite using q-tips and glue remover, this step took me 2 hours!
After installing the new battery, there was a brief moment of palpitations when the device immediately switched off again with a red battery symbol on the screen. WT...?? Then I connected the charging cable and relief was felt: the device started charging at 1%! Apparently the battery is delivered in a discharged state. I just hope it wasn't deeply discharged!
When handling the new housing gasket, you should be careful not to put it on incorrectly. That was a moment when I was mourning for my old S3: removing the back panel, changing the battery, reconnecting the back panel, done! No glue, no screws!
Some things used to be better than today...
The fitting kit and the instructions were fantastic. First time stripping down a phone and after this it won’t be my last. The kit contains everything you need. Check all the boxes as I thought my triangular openers were missing but I found them at the bottom of the heater pack. To remove the old seal from around the edge of the phone use the heater pad to warm the old seal first then use a sharp blade to remove it with ease. Thank you.
it helps to have a partner when installing the first pick at the bottom. I had to heat my bottom edge 4 times and then hold the front while pulling on the suction cup. My partner was able to get the first pick in and then I could proceed with the rest of the instructions. I agree with the person above that getting the old battery out was a pain. My bottom tab broke right away but my dual side tabs stretched without breaking and I was able to get a pick under the upper right quarter and then use a pry pick to get it the rest of the way.
0 Experience here. Followed the instructions, checked some youtube tutorials too, and managed to replace the battery easily. The adhesive strips on the original battery were somewhat hard to remove but as clumsy as I am, managed to take out the battery without destroying other parts. 10/10.