Esta traducción podría no reflejar los cambios más recientes añadidos a la guía de referencia. Ayúdanos a actualizar la traducción o revisa la guía original.
Introducción
Usa esta guía para reemplazar una batería muerta o gastada en tu Fitbit Ionic. .
Si tu batería está hinchada, , toma precauciones apropiadas.
Por su seguridad, descarga su batería por debajo del 25% antes de desmontar tu Fitbit Ionic. Esto reduce el riesgo de un peligroso evento térmico si la batería se daña accidentalmente durante la reparación.
Qué necesitas
-
-
Antes de empezar, quita tu Fitbit Ionic del cargador y apágalo.
-
-
-
Calienta un iOpener y aplícalo en la pantalla durante al menos dos minutos para ablandar el adhesivo que hay debajo.
Hair dryer on low took about 25 minutes directly blasting on the device, then used the ifixit metal spudger blade with rubber handle in the velcro kit pack
Thanks for sharing your experience!
-
-
-
Usa el extremo plano de un spudger para aflojar y levantar la antena NFC ligeramente pegada.
-
Dobla cuidadosamente la antena NFC en dirección al borde inferior del reloj.
Il semble qu'il y ait confusion : <vers bord “superieur" > et non "inférieur” .
Plusieurs cas relevés
Bonjour Bernard ! Merci pour vos différentes remarques ! Vous êtes un lecteur attentif et éclairé. Nous avons adapté le texte d’origine et/ou les traductions en français. iFixit étant un wiki modifiable par tous, n’hésitez pas à modifier vous-même la prochaine fois que vous remarquez quelque chose.
-
-
-
-
Dobla cuidadosamente el ensamblaje de la pantalla en la parte superior del reloj.
Plutôt que “replier" il vaudrait mieux dire “basculer vers le haut" puis ajouter <en soulevant délicatement la nappe de connection de l'écran qui reste connectée (qui est maintenant libérée) >
-
-
-
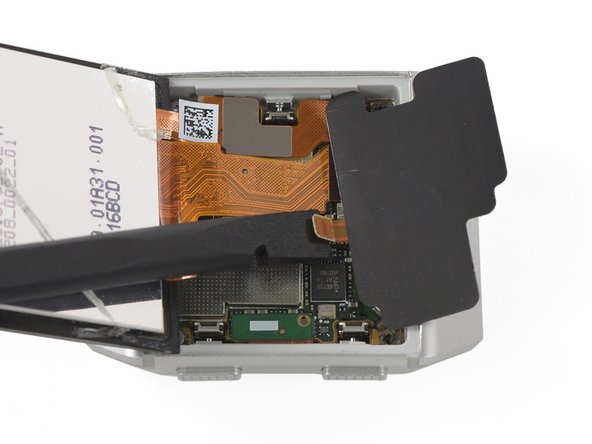
Usa un par de pinzas para remover el escudo de metal que cubre el cable flexible de la batería.
The pointy tweezers in the ifixit kit are easier to work with the shield than the ones pictured here.
-
-
-
Dobla el ensamblaje de la pantalla a su posición original.
Plutôt “basculer” l'ensemble écran dans la position précédente, en bas.
-
-
-
Usa un par de pinzas para remover la tapa de metal.
Theres a lip on the right side that goes under the frame, and another lip that goes under the nfc antenna where you need to slightly turn the nfc antenna a bit to get the left side of the shield away.
-
-
-
Remueve el ensamblaje de pantalla.
The comment “turn on your Fitbit…” is out of sequence at best - battery is out, etc. However the “Remove the display assembly” is correct.
When reassembling and prior to gluing the screen, turn the device on with all components attached. Verify screen function, button function, nfc function, and HR monitor function.
-
-
-
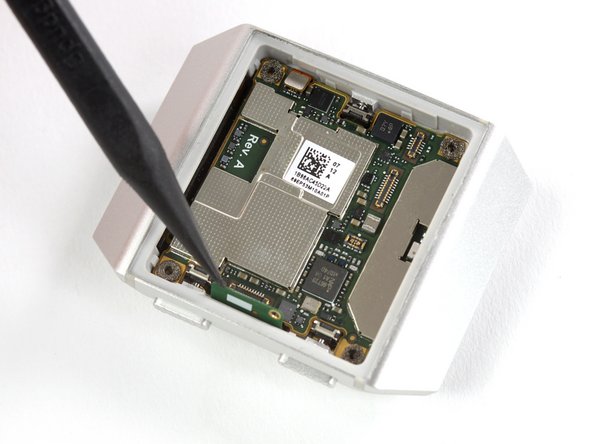
Remueve el tornillo Torx T2 (3.65 mm de largo).
-


Para volver a montar tu Fitbit, sigue estas instrucciones al revés.
Si es posible, enciende tu dispositivo y prueba la reparación antes de instalar un nuevo adhesivo y volver a sellar.
Para un rendimiento óptimo, calibra tu batería recién instalada: Cárgala al 100% y sigue cargándola durante al menos 2 horas más. Luego usa tu dispositivo hasta que se apague debido a la baja batería. Finalmente, cárgala ininterrumpidamente al 100%.
Lleva tus desechos electrónicos a un centro de reciclaje certificado.
¿La reparación no salió como se planeó? Intenta con soluciones a problemas básicos, o pide ayuda a nuestra comunidad de respuestas.
Cancelar: No complete esta guía.
7 personas más completaron esta guía.
Un agradecimiento especial a estos traductores:
90%

¡ Mariana Roca nos está ayudando a reparar el mundo! ¿Quieres contribuir?
Empezar a traducir ›


14 comentarios
This guide is very detailed and pretty accurate. Thank you for posting it!
Does anyone know how crucial the ‘Calibration’ procedure noted at the end article is?
I replaced my battery and it drains so quickly - during the course of a few hours.
But I didn’t try leaving it on the charger for 2 hours after 100% is reached. Trying that now.
The battery drains so quickly - just like the old battery that I am replacing.
It charges up to 100% but then loses about 1% every 5 minutes. Could there be a short circuit somewhere?
This was all sealed up by factory until I needed a new battery.
Hi @monte87 unfortunately I’m overwhelmed with this problem. Maybe you can contact the troubleshooting website of Fitbit directly. I hope someone there can tell you more about your problem.
ONE SOLUTION -
I examined my Ionic case under high magnification and discovered that the bottom has a clear plastic lens covering the sensors. Over time, this lens layer has worn thin and actually cracked enough to allow water or sweat to infiltrate the bottom of the pebble.
This must have caused a short or damaged the sensors because every new battery I tried drained quickly.
I have put all of my parts (Screen, battery, Main board, shield, etc.) into a new case complete with sensor array and now I am seeing excellent battery life!
Thanks for helping resurrect my Ionic!
Amazing guide! I was able to replace my ionic’s battery and it’s working again, thanks!
The symptoms my ionic had: the watch worked only when it was plugged into the charging cable. As soon as I remove the charging cable it shut down. Ionic did show that it’s charging when it was connected to the charger but it failed to charge even after I left it charging for more then a day. I tried soft/hard factory resets, replacing charger, replacing battery and nothing helped. So I decide to buy a battery and replace it myself and it finally resurrected my watch :)
Because fitibit didn’t have the battery available, I ordered HSABAT IONIC 500mah from ali. I’ll try to leave a comment after I use it for some time. At least my ionic is holding a charge right now :)
A couple of tips:
- You DO need a technician's razor with a flat! I’ve tried multiple plastic tools and even a knife - I couldn’t detach the screen. Partially, because the gap is so narrow. It’s very easy with a flat blade!
- (DO IT AT YOUR OWN RISK) I didn’t have an iOpener so I put my watch in a ziplock, put it in a cup, poured hot water (~100C) and left it for ~3 minutes. It was very easy to detach the screen with the technician's razor with a flat, and it simply popped out! my screen is still working and there no cracks :)
Andrii -
Thank you for your feedback and sharing your experience! I'm glad your repair went well.
Is there anybody who would provide the service to post out to them fix and resend back , I have a spare watch in excellent condition with a good screen and good battery I would like to swap them over to my original Fitbit Ionic looking for somebody who could do this for me ,07703190950. ozzy64@btopenworld.com