Introducción
Sigue esta guía para reemplazar una batería desgastada y deteriorada en el Nintendo Switch Lite.
La Nintendo Switch Lite utiliza tornillos JIS, pero puedes usar un destornillador de cruz (Philips) si no tienes opción. Ten mucho cuidad de no barrer los tornillos. Los desarmadores de iFixit están diseñados para ser compatibles con ambos tornillos.
Para tu seguridad, descarga la batería por debajo del 25% antes de desarmar tu Switch. Esto reduce el riesgo de un evento térmico peligroso si la batería se daña accidentalmente durante la reparación. Si tu batería está hinchada, toma las precauciones adecuadas.
Nota: Este procedimiento requiere quitar la placa de protección, que está pegada al disipador de calor con pasta térmica. La pasta térmica tendrá que ser limpiada y aplicada de nuevo antes de reinstalar la placa de protección.
Qué necesitas
-
-
Usa un destornillador Y00 para quitar los cuatro tornillos de 6.3 mm de largo que aseguran el panel trasero.
-
-
-
Usa un destornillador JIS 000 o un Phillips 000 para remover los siguientes tornillos que sujetan el panel trasero.
-
Dos tornillos de 3.6 mm en la parte superior del dispositivo.
-
Dos tornillos de 3.6 mm en la parte inferior del dispositivo.
I accidentally stripped the back screw and now I can't open it. I removed all the other screws. What should I do?
-
-
-
Inserta una herramienta de apertura en la rejilla del altavoz izquierdo en la parte inferior del dispositivo.
-
Gira la herramienta de apertura para liberar los clips que aseguran el panel trasero.
-
-
-
Desliza la herramienta de apertura por la esquina inferior izquierda para liberar los clips del lado izquierdo del dispositivo.
-
-
-
Inserta la herramienta de apertura en la rejilla del altavoz derecho en la parte inferior en el dispositivo.
-
Gira la herramienta de apertura para liberar los clips.
-
-
-
Desliza y empuja la herramienta de apertura por la esquina inferior derecha para liberar los clips del lado derecho del dispositivo.
-
-
-
-
Levanta el borde inferior del panel trasero abriéndolo como un libro.
-
Remueve el panel trasero.
-
-
-
Usa un destornillador JIS 000 o un Phillips (de cruz) 000 para remover los cuatro tornillos siguientes:
-
Tres tornillos de 3.1 mm
-
Un tornillo de 4.5 mm
There are four screws instead of three mentioned
With how easy it seems to be to do serious damage with the next few steps, I figured I'd say that realistically you can skip steps 9-13 when doing this repair. While they provide a bit of extra security by disconnecting the battery, the left stick is completely accessible and replaceable without touching the heat shield or anything underneath (And steps 17 and 18 disconnect power from the daughter board regardless).
i stripped a &&^&^$^ screw
Well I actually removed the screw right next to the 4.5 screw. I did not realize it till my son showed me why the plate wouldn't release. Ha ha, it's funny now but yeah not a big deal. I could have bent it badly assuming I took all screws out though. For anyone reading this before going in. 👍
-
-
-
Utiliza una herramienta de apertura o tu uña para levantar la pequeña tapa de cierre con bisagra del conector ZIF del cable de interconexión de la placa madre.
The clip broke off when trying to remove this cable. Audio only works through headphones and the display now won’t turn on after the clip broke. Does anyone know where I could get a clip or how I could fix it without it?
Mi è successa la stessa cosa è non so come ripararla! Chissà se c’è un modo!
-
-
-
Usa un par de pinzas para sacar el cable de interconexión de su conector en la placa madre.
I turned the unit off beforehand, I used tweezers just like the instructions said (ifixit branded) , my device sparked and now it won’t turn back on
The flap came off is it important or is there a way t fix it?
We're you able to get it working without the white flap? My screen is not working after putting it back together and i noticed this white flap was falling off
Did you get it working without the white flap? Everything on the switch works fine except for audio going through headphones and the display not turning on.
do not use metal sharp pointed tweezers! you will rip your ribbon cable. Use the inside of a Bic type pen or something else dull and plastic to pull the cable away by putting the pen part where the first bend is.
-
-
-
Usa la punta de un spudger para levantar el conector de la batería de su zócalo en la placa madre.
Caution the connector may not be properly soldered onto the motherboard. For me it snapped off the pins and now have to find a place to get that fixed if even possible. may have bricked it.
Yup, broke the connector right off the motherboard. Thanks, ifixit -_-
I backed out when I reached this point. I couldn't risk damaging it. Do u just need to pull it up? Did you mean that it might have been soldered shut below?
You should just need to pull straight up, but make sure you’re pulling on the wires or the gray plug—do not pull on the black socket or it can snap off of the motherboard.
With how easy it seems to be to do serious damage at this point, I figured I'd say that realistically you can skip steps 9-13 when doing this repair. While they provide a bit of extra security by disconnecting the battery, the left stick is completely accessible and replaceable without touching the heat shield or anything underneath (And steps 17 and 18 disconnect power from the daughter board regardless).
just broke my connector... ifixit PLEASE put a warning on how fragile the solder on this connector is.
Note for this step, you do not need to apply a lot of force. I used two tools here: small screwdriver to hold down the black base, and one side of fine-tipped tweezers to get under all 3 wires. Gently, push down on the tweezers to push the wires upwards, which should force the gray connector up and off the base. It did not take a lot of force. Take your time and it will be fine. Again, like others have said, do NOT pull or pry up the black base.
-
-
-
Aplica unas pocas gotas de removedor de adhesivo o alcohol isopropílico de alta concentración (90% o más) dentro del espacio de la batería a lo largo del borde superior para debilitar el adhesivo.
-
-
-
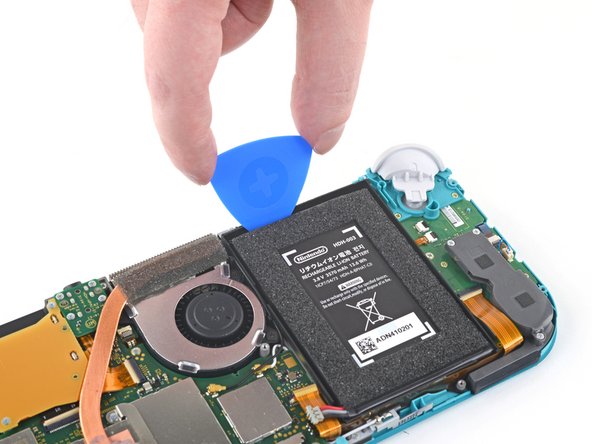
Inserta una púa en el hueco entre la batería y la pared del espacio de la batería.
-
Introduce con cuidado la punta de la púa debajo de la batería y deslízalo a lo largo del borde para empezar a cortar el adhesivo.
It is not mentioned in any of the steps, but in this picture you can see that the strip that has the Volume & Power buttons is removed. I ended up tearing mine while trying to pry the battery out, so I recommend using the opening tool to release the clamp on it and to remove the piece until reassembly.
-
-
-
Deja la púa de apertura en su lugar y aplica unas gotas más de removedor de adhesivos o alcohol isopropílico dentro del espacio de la batería. Aplica solo unas gotas, o el liquido puede filtrarse a la pantalla.
-
Inclina el borde superior del dispositivo hacia arriba y espera 1-2 minutos para que el alcohol isopropílico debilite el adhesivo.
-
Continúa deslizando la púa a lo largo del borde superior de la batería, cortando más del adhesivo debajo.
Don't use isopropyl alcohol for this step! Too much will leak behind the battery well and damage the LCD screen, and 1-2 drops is NOT enough to loosen the adhesive here. Highly recommend getting specific adhesive remover, or using a hair dryer (cool to warm setting, no more than 60*F) to loosen the adhesive. Learn from my mistake!
Just want to second Ashley’s comment here. I spent a lot of time and elbow grease prying that pick in there with IPA to no avail. I’m glad I saw their comment because with the hair dryer on medium I got the thing off in 5 minutes. Fortunately, I didn’t have the same leaking into the screen experience with the many more than a couple drops of alcohol I put behind the battery.
I read the comments too late cus I just &&^&@@ up my screen with alcohol drops.
-
-
-
Una vez que haya suficiente espacio, inserta una tarjeta de plástico debajo de la batería y levanta lentamente la batería.
-
Remueve la batería.
-
-
-
Usa un removedor de adhesivos o alcohol isopropílico y un paño de microfibra para limpiar bien cualquier resto de adhesivo que haya quedado en la batería antes de instalar la nueva batería.
-
Si tu nueva batería no viene con el adhesivo preinstalado, sigue esta guía para instalar el adhesivo precortado en la parte inferior de la batería.
Now where do I get the new battery that actually fits?
It may be better to go through the screen replacement guide and remove the midframe assembly before trying to remove the battery. The amount of alcohol or acetone you will need to remove the battery will risk the screen and the plastic underneath. It's definitely more work, but the difficulty is the same if you're doing the battery replacement, just takes longer and needs more thermal paste.
I just want to add that removing this adhesive was a massive pain and it took me both nearly half a bottle of iFixit adhesive remover plus the hair drier trick (medium heat, about 5 min) to finally get it out. But it did finally come out.
Ripping the battery out is awful. Don't even risk it. You have to apply so much force just to get it to move half a mm. I used iso and the hairdryer. Finally got it out but punctured the old one while giving the last few heaves with a screwdriver. Do not recommend! . It got hot and started smoking. When I got the new battery in and hooked everything back up, my screen was dead. Top buttons also dead. It turns on but only by holding the home button. Must have damaged the ribbon cable during my fight with the battery. Just take it to a shop.
-


Para volver a montar el dispositivo, sigue estas instrucciones en orden inverso.
Para un rendimiento óptimo, calibra tu batería recién instalada después de completar esta guía.
Lleva tus desechos electrónicos a un R2 o reciclador certificado por e-Stewards.
¿La reparación no salió según lo planeado? Prueba con soluciones de problemas básicos, o pide ayuda a nuestra Comunidad de respuestas de Nintendo Switch Lite.
Cancelar: No complete esta guía.
35 personas más completaron esta guía.
Un agradecimiento especial a estos traductores:
100%


Estos traductores nos están ayudando a reparar el mundo! ¿Quieres contribuir?
Empezar a traducir ›

20 comentarios
Hello!
I am preparing to repair my daughters nintendo switch light. It has stopped charging out of no where. I have all the tools, I just can't find the battery anywhere. Where would you recommend buying it from?
If you are still looking Ifixit sells one themselves Nintendo Switch Lite Battery
Thanks for the guide. Battery replacement kits are now available on Amazon: https://www.amazon.com/Nintendo-HDH-001-... (they weren’t in November! I was also looking for this during that time)
Unfortunately, the battery was much harder to remove than I expected. I did use a lot of isopropyl alcohol, but the adhesive they use really was giving me a lot of trouble. I should’ve wisened up and googled other adhesive removal methods or tried a new approach other than prying with the spudgers.
Well, now the LCD now has what looks like pressure damage in the bottom left where I’d imagine a lot of the prying pressure went. It is much more noticeable when the screen goes all-white, and not too bad with darker colors.
I don’t blame iFixit for my mistake of course, and it is really disappointing that Nintendo used the amount of adhesive that they did. But I hope this comment can serve as a warning to others attempting this repair to be more gentle even if it’s refusing to come off.
Yikes! Sorry to hear this. How did you pry with the spudger exactly? If you kept it around the top edge of the battery well then I would assume it wouldn’t damage the screen, but if you inserted the end of the spudger deeper in the battery well and used that point as the fulcrum, then I could see that putting a lot of pressure on the back of the LCD.
@craiglloyd I did an embarrassing amount of spudger prying pretty much everywhere along the top/bottom of the battery, I actually broke a few spudger tips in the process so that might reveal something about my approach…
But, I’m starting to think it may not be LCD damage after all, but rather some isopropyl alcohol caught behind the screen– During my prying, the Switch case was getting pretty heavily warped, so maybe some of the alcohol (that I definitely used in excess) slipped in and got sandwiched under the screen? I started to notice this since the blotches seem like they’ve moved over time. Here’s an image of the screen now https://imgur.com/DjYmFnJ (and the dark gray blotch along the leftside isn’t a shadow, white spots in bottom left I thought were pressure damage)
It’s still very usable / not noticeable on black colors and thanks again for the guide! I can give the screen more time to see if it improves at all, or maybe try going back in and trying to see it is trapped alcohol that can be released
vmgm -
Have the marks faded over time? We have had the ame issue and believe it is the isopropyl alcohol :/ we didn't use loads but found there was a gap at the bottom of where the battery is held which clearly let some of the alcohol through. I'm really hoping it will evaporate over time but not sure :/
Sadly no, the marks are still there, and haven’t been motivated to try to fix yet. I’ve seen some videos online where people can coerce trapped isopropyl alcohol out without having to take a screen apart, but have been hesitant to try out some of the methods.
vmgm -
Thanks for the detailed procedure. I followed the guide closely except for the battery removal procedure. The battery module is wrapped in foil backed plastic. This is easy to slice around the battery edges with an exacto knife. Once it is free, I could lever the battery module out of the bay. Then, I was able to trim the foil outer wrap into strips with the knife and peel it away in pieces. Now I am ready to install my new battery as soon as it arrives.
Same problem here with the Isoproponol which has left my sons screen really discoloured.
Can I suggest you update this tear down as I have always relied on Ifixit for both tool kits and guides and it is a shame that this has left my sons switch damaged. I do expect a bit better of a company that sells parts and tools to do this stuff.
Thanks however for the brilliant Ifixit tool kits.
after changing the battery I have gotten the 2101-0001 error code, how do i fix this?
What kind of thermal paste are we to use?
réparation super facile, juste un peu de patience avec l'alcool isopropylique, mais sinon, rien de plus simple à remplacer :D
As other people have said, the alcohol got into my unit’s display. I was able to get rid of it by using a hair dryer until the screen got really hot. I then used a suction cup on the screen to push and pull. You can see the “bubbles” start to go away. You may need to place it in several areas of the display. It is a bit scary as you need a good amount of force, but eventually it worked itself out. The display now looks perfect. Note that I left the glass screen protector on while I did this.
Same problem here too. Isopropanol also discolored my screen. Along with some mild pulling I assume that's unfixable? (price for a new/refurbished one makes it not worth... for me anyway) The dark clouds have lessened over a few days, but the lighter area that might have has the additional pulling seems to be the same.
Discard and it felt and it wasn't my fault since the Nintendo switch. Just fell and it wasn't my fault.
The dark splotches on the screen, that result from all the isopropyl alcohol needed to dissolve the unreasonable amount of glue under the battery, are not worth the caution. Especially, considering that to replace the screen costs three times what the battery does. I disassembled the backlight and air dried the different layers; I had 5 out. But that did not help! They were already stained by the alcohol. I tried using Zeiss lens cleaner, but that did not help much. The splotches are not as dark now, but they are still there. I think there is still more alcohol trapped between other layers.
My recommendation is to fully discharge the battery, put on eye protection, and use a "jimmy" and plastic cards to remove the battery. By the looks of it, I think that is certainly what iFixit did in their teardown article.
One trick I found was to stack picks under the battery to help push the battery out and away from the housing. Once i ran out of picks, i was able to put the jimmy between two of the picks and pop the battery the rest of the way out.
That is actually a good idea - reducing friction and increasing pressure. When I did it, I only used a single card, which ended up deformed by the time the glue separated!
All my screws got stripped any ideas on how to remove?
Almost A Mammal - Contestar
A Y0 screwdriver seemed to work better for me.
Tommy Morrill - Contestar
What type of screw driver do I use to un screw the screws and which way
Luca Capito - Contestar
Y 0.6 was all I had but it seemed to fit perfectly
Trevor - Contestar