Introducción
Usa esta guía para remmplazar completamente tu mini disco duro. Para completar esta guía requieres adhesivo de goma para pegar el sensor térmico antiguo a tu nuevo disco duro.
Qué necesitas
-
-
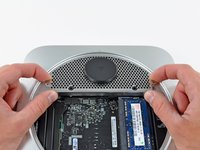
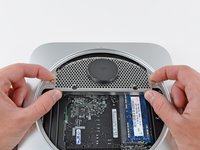
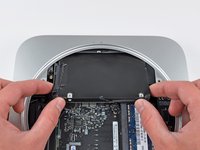
Coloca tus pulgares en los huecos en la cubierta inferior.
-
Rota la cubierta interior en sentido horario hasta que el punto blanco pintado en la cubierta inferior este alineado con el aro grabado en la cubierta exterior.
-
-
-
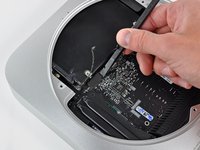
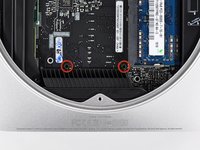
Remueve los dos tornillos T6 Torx de 11.3 mm que aseguran el ventilador a la tarjeta lógica cerca de la placa de la antena.
-
-
-
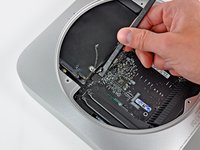
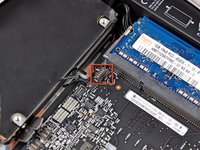
Remueve el único tornillo T6 Torx de 3.5 mm que asegura la cubierta a el disipador de calor.
-
-
-
Remueve los siguientes tornillos que aseguran la placa de antena a la mini.
-
Dos T8 o T9 tornillos Torx de 6.6 mm
-
Dos T8 tornillos hexagonales de 5.0 mm o de 2.0 mm (cualquiera funcionará).
-
-
-
-
Quita los siguentes tres tornillos
-
Un tornillo Hexagonal T8 Torx de 5.0 mm o de 2.0 mm (cualquiera fucionará)
-
Un tornillo T8 Torx de 16.2 mm
-
Un tornillo de separación T6 Torx de 26 mm
-
-
-
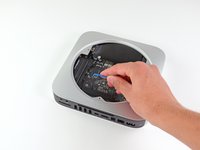
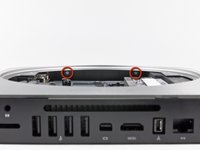
Inserte una herramienta Mac mIni para remover la tarjeta lógica en los dos agujeros remarcados en rojo. Asegúrese que hace contacto con la carcasa exterior debajo de la tarjeta lógica antes de proceder.
-
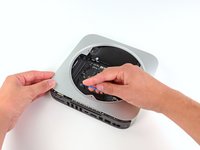
Con cuidado jala la herramienta hacia la tarjeta I/O. La tarjeta lógica y el conjunto de la tarjeta I/O deben salir ligeramente de la carcasa exterior.
-
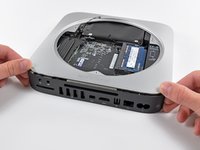
Deja de hacer palanca cuando la tarjeta I/O este visiblemente separada de la carcasa exterior. Remueve la herramienta Mac mini para remover la tarjeta.
-


Para reensamblar tu dispositivo, sigue las siguientes instrucciones en orden inverso.
Para reensamblar tu dispositivo, sigue las siguientes instrucciones en orden inverso.
Cancelar: No complete esta guía.
425 personas más completaron esta guía.
Un agradecimiento especial a estos traductores:
100%

¡ Fernando Salazar Garcia nos está ayudando a reparar el mundo! ¿Quieres contribuir?
Empezar a traducir ›

38 comentarios
These instructions and a little common sense can also be used to replace the lower hard drive in the server version of the Mac Mini. Luckily that was the drive that had failed in my case. Replacing the upper drive looks like a tougher proposition.
Fantastic guide, thank you very much Mr. Bookholt!
As with the above commenter, I accidentally mistook the fan's standoff for a screw and removed it while removing the fan. Also the top right fan screw's standoff came out along with it. I edited the guide with a note on this.
While replacing the antenna, it wasn't immediately clear why the screws weren't lining up, until I realized that two of the screws were in the (otherwise free-floating but for the back grommets) hard drive, I also added a note on that.
STEP 15: If you don't have the time to purchase the Mac Mini Logic Board Removal Tool, the round stock on a large binder clip is PERFECT for the job. It requires a little bending and cutting but it worked perfectly!!
And as jon jon stated, it works like a lever - not a pull. You can feel it kind of click in to the lever points below.
Bravo to ifixit.com for the easy to follow instruction!!
Hey, what about the 2nd harddrive? how does that come out?
This was a superb guide. Thank you very, very much.
Ok, just did here. 1 tera HD working fine. Thanks iFixit, for repacking my tools because the Brazilian mail lost them. So, for those who want to do the same, just have in mind that not ALL things happen just like the how-to. I have to figure out What to do with the logic board removal tool... And, no, I did not fuss with those initial thermal stuff, because they are impossible to unplug. I only fuss with the HD thermal.