Introducción
Este tutorial es para reemplazar el conector de carga femenino de la calculadora. ¡Reemplazar el conector de alimentación debe ser el último método! Si tienes problemas con la carga de la calculadora, intenta reemplazar la batería primero o conseguir un cable nuevo y fuente de alimentación. Si no puedes transferir datos, asegúrate que tu cable no este cargando-solamente.
Advertencia: ¡Los pasos de desarmado son diferentes para la Nspire CX II (CAS)!
Qué necesitas
-
-
-
Usa cable esmaltado u otro tipo de cable recubierto.
-
Pre-estaña los cables para que la soldadura se una más fácilmente al cobre. Haz esto añadiendo soldadura a la punta del cautín, después rozando en una de las puntas del cable de reemplazo.
-
Haz esto en ambos lados de los cables, estaña el frente y trasero de cada punta. El estaño no fluye automáticamente a ambos lados, así que estaña el frente, luego la parte trasera de un lado del cable.
-


Para reensamblar tu dispositivo, sigue estas instrucciones en orden inverso.
Para reensamblar tu dispositivo, sigue estas instrucciones en orden inverso.
Cancelar: No complete esta guía.
3 personas más completaron esta guía.
Un agradecimiento especial a estos traductores:
100%

¡ Fernando Salazar Garcia nos está ayudando a reparar el mundo! ¿Quieres contribuir?
Empezar a traducir ›
8 comentarios
Hi, nice layout and very clear thank you. Do you know where one can buy this usb charge port please??
That moment your recognize your colleague’s dog in the last photo.
P.S. You can buy spare mini USB ports from sites like Amazon or Ebay.
Hello, I was going to follow this guide, but I cannot find a 1mm clutch bit can you send me a link or tell me where to go to find one. Thank you.
I used an appropriately sized flathead from a electronics repair kit I owned. I also was not able to locate a suitable bit. I thought a tiny spanner ( 2 prongs) bit would do, but alas…
My most recent set had the flathead in (was also doing an imac repair and needed a larger variety of pentalobes):
https://www.amazon.com/Vastar-Magnetic-P...
It’s every bit as cheap as it looks, but since those blasted pentalobes die with each attempt on a repair pretty much, I am not looking for fancy. Stupid Apple.
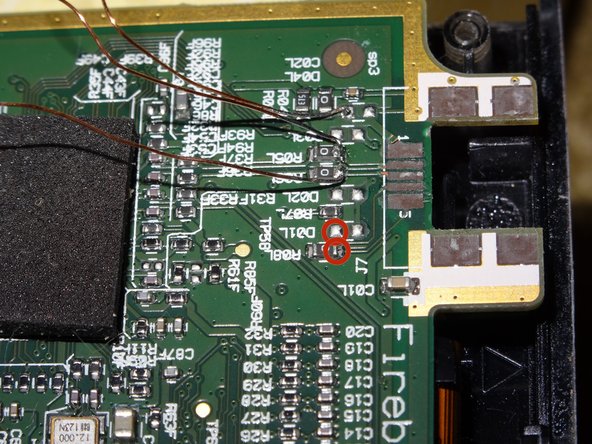
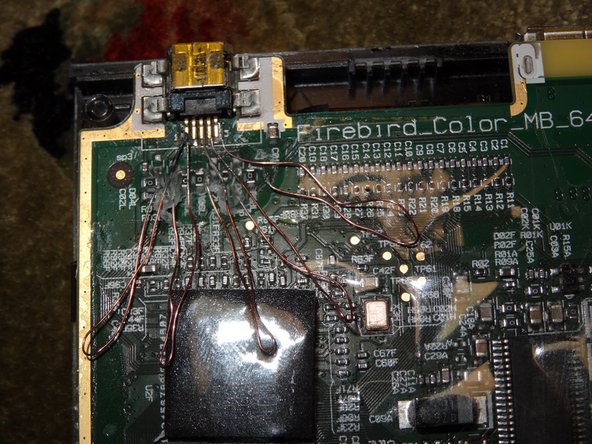
Hello all. I was able to complete this guide successfully however please do not solder like the Author did. I was able to get data working as well. The steps to getting the calculator open were awesome but after that please do not follow. I also found a small flathead will work for taking off the “clutch” screws. I was able to get a USB-C connector working with data transfer. I used insulated cables not thin strands of copper which have a high likely hood of shorting and no need to tape over anything. Also for those solders going to the bridge connectors, you can actually remove those bridge resistors as they are 0 ohms. Effectively doing nothing but acting as a bridge between pads. Texas Instruments must use this same PCB design for multiple things.