Introducción
Esta guía te llevará a través del proceso de apertura y reemplazo de la cámara.
Qué necesitas
-
-
Coloca la 3DS boca abajo. Retira la tarjeta de juego, los auriculares, el cable de carga, el lápiz óptico o cualquier otra cosa que pueda estar conectada al dispositivo.
-
-
-
Con un destornillador JIS #000, retira los seis tornillos de 6 mm alrededor de los bordes de la cubierta secundaria.
-
-
-
-
Con unas pinzas, extrae con cuidado las cinco cintas marcadas de los conectores ZIF situados a los lados de la placa base.
-
Tres de los conectores de cinta tienen solapas de sujeción de plástico que cubren la cinta para evitar que se deslice. Utiliza las pinzas para levantarlas antes de retirar la cinta.
-
-
-
Gira con cuidado la placa base 90 grados hacia las bisagras para descubrir otros dos conectores ZIF en la parte inferior de la placa base.
-
Ambos tienen pestillos que hay que subir. El pestillo izquierdo, más largo, es negro; el derecho, más corto, es blanco. Levanta los pestillos, desliza las cintas hacia fuera y retira la placa base.
-
-
-
Con una cabeza plana de 1,5, retira los cuatro adhesivos de goma rojos que se encuentran en el interior de la carcasa.
-
Debajo de la goma hay un adhesivo plateado
-
Con el destornillador PH00, retira los tornillos.
-
-
-
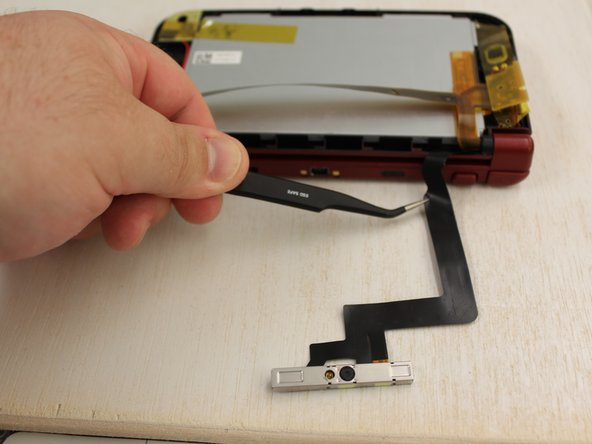
La cámara debe estar floja, solo levanta con cuidado.
-
EL cable que esta unido a esta, debe ser fácil de retirar de la parte inferior de la DS.
-


Para reensamblar tu dispositivo, sigue estas instrucciones en orden inverso.
Para reensamblar tu dispositivo, sigue estas instrucciones en orden inverso.
Cancelar: No complete esta guía.
Una persona más ha completado esta guía.
Un agradecimiento especial a estos traductores:
100%

¡ Fernando Salazar Garcia nos está ayudando a reparar el mundo! ¿Quieres contribuir?
Empezar a traducir ›

Equipo

iFixit, Team 1-1, Weber Winter 2016 Miembro de iFixit, Team 1-1, Weber Winter 2016
FIX-WEBER-W16S1G1
4 Miembros
37 Guías creadas
6 comentarios
This doesn't actually show how to get the new camera in, I managed to pull the cable of the old one out but I have no idea how to get the new one through the hinge cover wrapping surround the wires
In some youtube video I saw that guy rolled new camera ribbon cable and got it through the hinge cover.
A whole bunch of steps missing the end. First you have to release the hinge: Remove the circuit board that has the arrow keys (4 screws), remove two plastic pieces immediately above (one black square, when removed a transparent thin piece is visible.
Open hinge to near 180. Using probe or bent tweezers or stiff, thin item, push the hinge pin towards the middle through the narrow opening exposed when the plastic pieces were removed. When it touches the display it's far enough, you may have to slightly flex the hinge to release the pin.
You can now release the other side, with the flex cables going through it and the antenna cable. Feed the 3 flex cables into the slot in the plastic as you release the hinge; once it's clear you can pull them through.
Curl the camera cable (it was on top, and attached on the upper side of the corner of the mainboard) and pull it through the rung and hollow ring.
continues...
"missing at the end" :-)
jesup -
Now reverse with the new cable - curl it gently to get it into the hinge and through the ring, help pull through with tweezers. Now you can start reversing. Note that the hinge pin needs the screen to be open near 180 to slide back into place. Also be careful when reattaching ribbon cables - the display cable (bottom cable of the 3 in the hinge, the longest one) is easy to put in upside down. Take pictures when disassembling. (contacts for this one go down)