Introducción
Usa esta guía para reemplazar la batería recargable del Moto G4. Si tu batería está hinchada, toma precauciones apropiadas.
Antes de empezar, descarga la Rescue and Smart Assistant aplicación para hacer un respaldo de tu dispositivo y diagnosticar si el problema es de software o de hardware.
Para tu seguridad, descarga tu batería existente por debajo de 25% antes de desmontar tu teléfono. Esto reduce el riesgo de un evento térmico si la batería se daña accidentalmente durante la reparación.
Qué necesitas
-
-
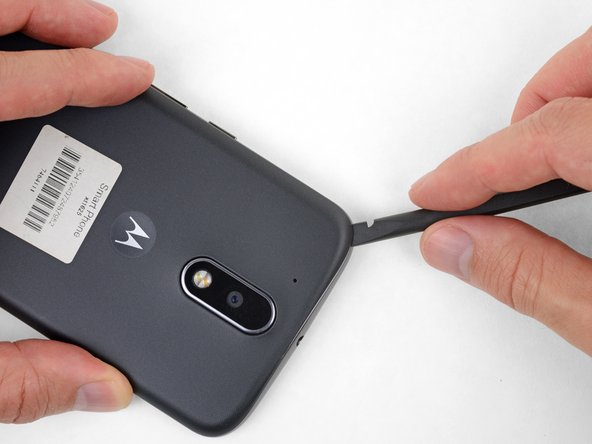
Inserta una uña o un spudger en el muesca en el borde inferior del teléfono cerca del puerto de carga.
-
Con cuidado tuerce o levanta para abrir un pequeño orificio entre la tapa trasera y el cuerpo del teléfono.
-
Mientras mantienes tu herramienta (o uña) insertada en el espacio libre entre la tapa trasera y el cuerpo del teléfono, deslízala alrededor de la esquina para comenzar a soltar los clips de plástico que sujetan la tapa en su lugar.
-
-
-
Presiona para expulsar y remover las tarjetas MicroSD y SIM (si están instaladas).
-
-
-
-
Usa un destornillador T3 Torx para remover los 19 tornillos idénticos de 3.1 mm que sujetan el marco medio.
In my kit, the T3 Torx bit came in the ‘repair part’ box, while a T5 Torx bit was in the ‘repair tools’ box.
my phone had t4, not t3
unable to remove 8 of the screws. any suggestions?
My T4 is the tool that fit. I can see why people strip these. They were dam tight for such little screws.
I also had a tough time getting them out of the socket once loose. Magnet in the tool was not very strong. I used my tweezers, and scratch the screw heads. That means they are real soft steel, and strip easy.
-
-
-
Inserta un spudger debajo del marco medio en la esquina izquierda superior y con cuidado tuerce para separarlo del cuerpo de teléfono.
I couldn’t get the spudger in, but had success with the opening pick instead.
-
-
-
Remueve el marco medio.
During the midframe removal, be careful and do not put too much torsional stress on the loudspeaker pickup wires (to the right of the main camera). It’s not that difficult to crush or shear the pickups there. Doing so will render your phone silent.
Exactly what happened to me. Both contacts broke off and if just loosely put where they were, they can't make proper contact anymore.
There should be a warning about this in the guide itself!
-
-
-
Despega y remueve cualquier cinta que conecte la batería con la placa base.
-
-
-
Inserta una herramienta delgada (como las puntas de una pinza) debajo de los cables rojo y negro de batería y deslízala por debajo del conector de batería.
-
Con cuidado haz palanca hacia arriba y desconecta la batería.
Before detaching the connector, you may want to take a photo to remember which way the red and black wires go. Mine were the same way as in this photo, but when looking at the tiny connector of the replacement battery it wasn’t easy to be sure which way to insert it.
What can you do if you break the socket??? Will anyone email me an idea, Or- is it simply ruined-??? My email address is jeffrey_f4@yahoo.com. THANKS in advance, IF- anyone will take the time to email me about this-!!!!!!!! :)
So you have bare copper wires and you’re sticking a metal tip tweezer in the vicinity.
And yes, the battery is discharged as far as you can, but,………
Maybe an idea to snip the wires somewhere further up before doing this ?
-
-
-
Despega la lengüeta negra en la parte superior de la batería y jala lentamente pero firmemente para separar la batería del adhesivo que la sujeta en su lugar.
-
Si se rompe la lengüeta, usa un spudger o una tarjeta de crédito vieja para hacer palanca con cuidado en los bordes de la batería hasta que se suelte.
-


Compara cuidadosamente tu parte nueva de reemplazo a la parte original. Remueve cualquier adhesivo antes de instalar tu batería nueva.
Para volver a ensamblar tu dispositivo, sigue los pasos arriba en orden inverso.
Luego de completar esta guía, calibra tu batería recién instalada.
Lleva tus residuos electrónicos a un centro de reciclaje certificado.
¿La reparación no salió como habías pensado? Fíjate en nuestra comunidad de respuestas para ayuda en resolución de problemas.
Cancelar: No complete esta guía.
45 personas más completaron esta guía.
Un agradecimiento especial a estos traductores:
100%


Estos traductores nos están ayudando a reparar el mundo! ¿Quieres contribuir?
Empezar a traducir ›


17 comentarios
Bought the battery from Ifixit because I’ve enjoyed your videos. I changed the battery, all seemed well, but now I get no sound out of the speakers! They are not mentioned on any of the topics. Help!?
See the comment on this step. Make sure the two little copper prongs on the back of the speaker make good contact with their respective pads on the back of the midframe. It’s okay to (very gently) bend them up slightly if needed.
bought battery and kit from ifixit. replacement went pretty well. Careful with those tiny little screws. They do not like to come out after loosening. I worked over a small tray and still had two get away from me. I also had some tape on the sim card side of battery not mentioned in instructions. I tore it pulling it back. Was concerned as it seemed to be foil faced on back side which sepperated when pulling up. All works though so no worries.
Bonjour,
Etes-vous sûr pour le modèle du tournevis ?
J’ai échoué avec le Torx T3, mais réussi avec le Torx T4
It definitely should be a T3, but not all driver kits are created equal. If a T4 works better for you, go with that ;)
Def T3, it’s the one not in “The Essentials” kit
I encountered two large adhesive pads affixing the battery to the metal frame. A couple drops of IPA weren’t enough. Gentle levering at the camera side of the battery and a slow injection of IPA with a syringe eventually did the trick. Take it slow and let the IPA do its thing.
What is “IPA” , mentioned as a lubricate ?
Lester -
my battery worked fine but after charging the phone the first time it wont turn on it has been plugged in for 12 and a half hours
At end of Moto G4 battery replacement instructions , it says “ After completing this guide, calibrate your newly-installed battery. “
Don’t see any furthur explanation of this reference or how to calibrate ?
lestertmurphy@gmail.com 3/21/2020
Bonjour,
Déjà à la lecture, le tuto est très clair, détaillé. Il met en confiance pour acquérir le kit de réparation. Les illustrations par photo sont très utiles. Un seul tout petit bémol, mais vraiment tout petit à l’étape 13, au remontage, le connecteur de la batterie (qui est vraiment très petit) est quand même assez contre-intuitif. D’un côté on aperçoit 2 petits trous où le cuivre apparaît et de l’autre côté, non. Et c’est ce côté, sans cuivre apparent qu’il faut clipser. J’ai effectué plusieurs tentatives du mauvais côté avant de consulter le tuto et surla photo très claire on voit bien dans quel sens il faut mettre le connecteur.
J’espère que la batterie tiendra mieux…
Merci.
I didn't find your instructions when I first opened the back cover. Followed an instruction on youtube that suggests T4 screwdriver. Now 5 screws were stripped. Can't take them out. Can you post the size of the screws? I may have to drill the screws. Thanks
Hi Ruby,
I’m sorry to hear this! From my experience, there has been quite a bit of variation and manufacturing tolerances with the screws Motorola uses, and as a result, T3 works for some and T4 works for others. I can’t tell you much about these screws other than that they are 3.1 mm long.