Qué necesitas
-
-
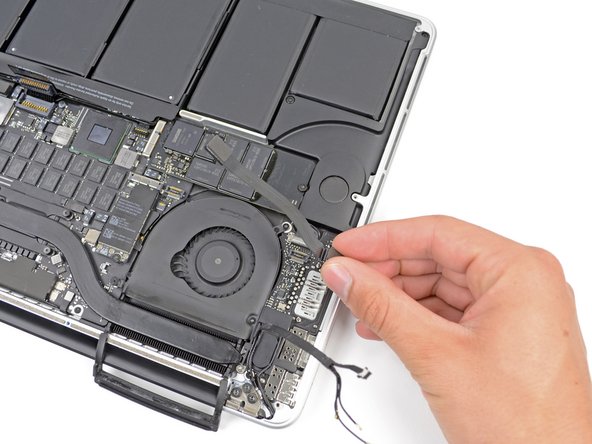
Utilizando el extremo plano de un spudger, haz palanca en el conector de la placa de E/S para sacarlo de su zócalo en la placa lógica.
-
De la misma manera, retira el conector del cable de la tarjeta de E/S de su zócalo en la tarjeta de E/S.
-
Retira el cable de la placa de E/S de MacBook Pro.
-
-
Para volver a ensamblar tu dispositivo, sigue estas instrucciones en orden inverso.
Para volver a ensamblar tu dispositivo, sigue estas instrucciones en orden inverso.
Cancelar: No complete esta guía.
Una persona más ha completado esta guía.
Un agradecimiento especial a estos traductores:
100%
Estos traductores nos están ayudando a reparar el mundo! ¿Quieres contribuir?
Empezar a traducir ›


Note that the Mac has been rotated 180º between steps 8 & 9
peteyx - Contestar
When reinstalling the io board cable make sure it is the correct way round as in the photo, it fits the wrong way round as well, which results in the MacBook not starting at all.
bitmat23 - Contestar
ABSOLUTELY ! I found out the hard way. I took a break, came back to me dead computer and wondered - if - this cable would fit the other way round - and voila ! I wish I had read this note first :-)
Simon Anthony -
i did exactly the same mistake! Same procedure as well: keep calm, and start again the tutorial.
every thing work find now
Guigui -
Sockets are ZIF with releasing levers on the top. If you pull up on the top padding, you will reveal silver lever handels facing the rear of the machine. Pry up on the LEVER to release the pressure, then pull the lever straight up to release the connector from the socket. DO NOT pry under the edge of the connector to remove these or you may damage the ZIF socket. They may have changed these connectors between models, otherwise I don’t know how this was overlooked in the guide.
hybrid - Contestar
Confirming, these are indeed zifs for me too. My padding has notches indicating location of lever needing to be raised. Obviously lever is tiny, look closely. If your padding is a clean rectangle as shown in guide, you may not have zif sockets here
hamiltont -
Confirmed; if the foam pieces are not perfectly rectangular, you should be able to pry back the side of the foam with the cut-away. It folds in half. You can see the lever under the foam. Lift the handle with the spudger, then when it’s pointing straight up (it flips up), you can lift up on the lever (straight up). This should be done for both ends.
Patryk -
Confirmed. These instructions (and photos) should definitely be added to the guide!
Nathan Lucy -
I just did this and there are no silver lever handles. The connectors just pop off when you pry on them.
edc - Contestar
While putting back the I/O cable, I assumed that it just connects back in place with pressure, kind of like Velcro. I just pushed the one on the left down first as instructed, and, while doing so, folded down the tiny wire lever under the padding (As someone stated earlier, the wire lever isn’t on all models) along with it. It seem to go back in place fairly easily if you’re careful to align the two sides (the part under the cable with the part on the logic board). A a novice, I think this warrants being addressed in more detail. Kinda had to do this intuitively.
Sam Bortnick - Contestar
There is adhesive under the cable. I twisted the cable parallel to the flat fan surface to break it without bending the cable.
Nathan Lucy - Contestar
Yeah, and a strong adhesive.
throughout all the repairs i have on my MacBook, I have put changing the right fam on the side, just because I was thinking there will be no way of removing the cable without damaging it.
Soufiane Ezzine -
I hope I didn't mess up (I'm still dismantling my MBP) but I didn't detach the cable from the fan housing. Disconnected from both ends, and it appeared contented to flop there in space. Fan was then removed without incident
Fredrick Mezger - Contestar
you need to lift one side of the rubber/foam cover to reveal the lock
Alex De Lara - Contestar