Introducción
Esta guía lo llevará a través del desmontaje más básico del teclado inalámbrico Apple (A1314);
Reemplazar el ensamblaje de la placa lógica y las baterías atascadas.
Qué necesitas
-
-
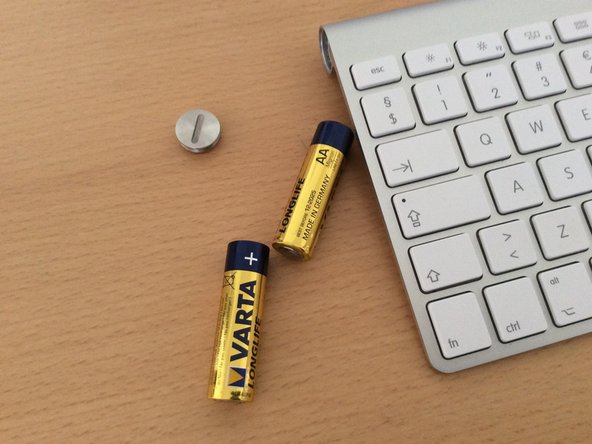
Gírelo abierto, en el sentido contrario a las agujas del reloj.
-
Si todavía es nuevo, debería poder hacer esto fácilmente con su miniatura. Si no, intente usar una moneda o un destornillador grande de cabeza plana.
-
Las baterías deberían deslizarse fácilmente. Si sus baterías están atascadas, puede dejarlas por el momento. Podrás tratar con ellos más tarde.
-
-
-
Ahora voltee el teclado para encontrar la cubierta de plástico de debajo.
-
Aprieta cada extremo de la cubierta de plástico, levantando un lado hacia arriba.
-
Tenga cuidado de no utilizar una fuerza excesiva aquí, o podría dañar la cubierta o la placa lógica debajo de ella.
Tolle Anleitung. Meine Batterien waren leider ausgelaufen und verklemmt. Das größte Problem war die mittlere Abdeckung zu entfernen. Aber mit Geduld und dieser Anleitung habe ich dann schließlich geschafft. Danke für die hilfreiche Anleitung !
-
-
-
-
Ahora retire ese pequeño tornillo Phillips, sosteniendo el ensamblaje de la placa lógica en su lugar.
whats the screw driver i need?
Very small Phillips screwdriver. You can see the screw head in the red circle. It’s a very unusual screw, dont lose it….
-
-
-
Levante la pequeña palanca de ajuste en el conector de cinta, y afloje con cuidado el cable de cinta frágil.
-
Tenga mucho cuidado con el cable de cinta. Es muy delgado y se daña fácilmente, si usa la fuerza.
The two keyboards I’ve done this to, the ribbon cable also has some sort of adhesive on it to keep it stuck to the logic board. Be careful!
-
-
-
Ahora (aún consciente de no dañar el cable de cinta), puede comenzar a empujar todo el conjunto, primero el botón de encendido. Marqué el botón de encendido, así sabrá a qué me refiero.
-
A medida que continúe tirando de él hasta el final, se atascará, y necesitará presionar un poco la parte inferior del plástico blanco para sacarlo por completo.
-
Si las baterías estaban atascadas, entonces es cuando podrás retirarlas. El espacio ahora está despejado, y puedes usar algo así como un destornillador largo, para hurgar en el cilindro y sacar las baterías atascadas. (Recomiendo empujarlos, de la misma manera que los pones, otra vez para evitar dañar el cable plano).
-
Ahí tienes. Ya terminaste
-


Para volver a armar su dispositivo, siga estas instrucciones en orden inverso.
Para volver a armar su dispositivo, siga estas instrucciones en orden inverso.
Cancelar: No complete esta guía.
57 personas más completaron esta guía.
Un agradecimiento especial a estos traductores:
100%


Estos traductores nos están ayudando a reparar el mundo! ¿Quieres contribuir?
Empezar a traducir ›

24 comentarios
My keyboard has the same model number as the unit described here, but the plastic cover is at the end near the power button. Although I could remove the cover and small screw inside, I was unable to remove the ribbon cable.
I tried banging the stuck battery out of the keyboard until I was sure it would be ruined. With only 1cm of progress, I decided to take the battery out by setting a screw and pulling it out like a fish on a hook. Here's what I did:
1. Poke a hole in the bottom of the stuck battery with an ice pick
2. Create a 'fish hook and line' by wrapping a coat hanger around the end of a big gnarly wood screw.
3. Carefully screw into the battery until it is most of the way in.
4. fit the coat hanger through a narrow gap (drill a hole in a board) and pull with all your might to drag the battery out of the keyboard.
5. Clean out the hole to get rid of the rotten battery debris
6. Pop in some new batteries, and Hey-Presto! it works.
I have a great picture of this if there is a way to upload one.
To remove the ribbon cable you have to first release the cable. The gray piece is actually a clip (of sorts) I you look closely you can see a seam in the grey piece. It slides up (in the direction of the cable) and will allow the cable to be removed easily.
I know this is old but maybe someone else has the same question.
Mo Ali -
My plastic cover is in the middle and I can't get at it any suggestions? Thanks
Use a pry tool like the ones used to remove screens. I thin flat screwdriver might work. It’s better to use a plastic pry tool (if you have one) they look like guitar picks and generally won’t scratch the surfaces.. Place it in the seem between the metal and plastic. I just squeezed it together really hard and then I saw a seam. I put a fingernail in the seam to open it up all the way.
Mo Ali -
THANK YOU SO MUCH!! I had the inner battery corrode and seal itself inside the keyboard battery panel, and I tried everything from freezing it and then exposing it to high heat to loosen the battery, to glueing the end of the batt to some wood to try to pull it out. Your method SAVED ME from buying a new one and I’m genuinely thankful for this instruction manual. Thanks again man!!!
Thank you! I am typing this on a freshly-restored A1314 that the antenna failed on ages ago. I ended up with a spare keyboard and this one sat disused and forgotten. Then my iMac was stolen last Thanksgiving, complete with keyboard, trackpad, and the MagicWand that bound them together.
Insurance bought me a new 2015 27” iMac, but I absolutely hate the new keyboard and trackpad. I recently came across the spare keyboard, but the sadly cheapass battery had exploded, welding the battery door shut. I followed these instructions, transplanted the circuit board, and resurrected the old keyboard! HAPPY HAPPY, JOY JOY!
For those having problems removing the plastic cover, I couldn’t squeeze one end and get it loose. I ended up squeezing from the long side against the other, and then it came loose easily. That might help you out. And it helps to have a needle nose tweezers, such as comes in iFixit’s tool kit, for dealing with the Philips screw in step 3, also good for dealing with the ribbon cable.
Hi
i have same keyboard but some keys don’t want to work any more?
Whut should i do?
Thanks for a great guide that was really easy and I was able to make the repair on the first try.
my problem here is .. all of the letters are not responding, BUT numbers do work all the way to delete button.. caps lock works and enter button (if you hit it hard enough) ! and arrow keys work.. but not letters of A-Z does not work, any tips? please?
My right shift isn't working fine. How can i solve the issue?
Bonjour j’aimerais avoir une info svp, on peut on acheter la pièce en plastique, étape 4 photo 2, le serre nappe ? d’avance merci
THANK YOU SO MUCH!! I had the inner battery corrode and seal itself inside the keyboard battery panel. Your method SAVED ME from buying a new one and I’m genuinely thankful for this instruction manual. Thanks again!!!
I’ve still got something in the way (probably residual battery acid) that requires I perform this process every time I replace my batteries. Is there a good method to smooth the bore of the battery compartment?
Yes, hold the keyboard vertical, battery cover down and wipe with vinegar on a small cloth wrapped and taped around a stick (chopstick) . wait for awhile (10-15 mins) to neutralize the corrosion then “wash” well with water then dry. Wrap very fine sandpaper around chopstick/whatever tape on and sand and rub till smooth. Sanding can be done first, doesn’t matter.
Philjj61 -
Thank you!! This helped fix my keyboard.
My Keyboard does not turn on and off and I want to inspect and clean the switch. I think a battery leaked and perhaps corrosion causes the round assembly to be stuck in the housing. Batteries come out easily - it is the circuit board assembly that is stuck. Does that assembly have to be rotated to remove it? I read that it was necessary to rotate the assembly 90deg to get it out? My assembly does not move in any direction….
Persistence pays off. Lots of WD40 (over several days!) and several minutes of hard push/pull action (not rotation) freed the bind. The assembly does require a 90 deg twist but not until the assembly is about 1” out of the barrel. Brown goop dissolved in water followed by a desiccating IPA rinse, and I’ve got a keyboard again!
Hey, I’m really sorry to say this but I think I may have permanently damaged the logic board screw (the screw you need to remove at Step 3). I frantically tried all the different screws in my Dad’s toolbox but none of them could get it to turn properly. It wasn’t until later I saw the specific type of screw recommended in this guide, so I bought it on Amazon and tested it… but I think the screw’s head is so worn and weathered I cannot get it to turn at all!
It really bothers me that I cannot unscrew that one screw–is there ANYTHING I can do to solve this problem?
I have same keyboard model and my problem is that the screw cap is badly stuck due to battery leak and getting stuck, underside of the screw cap itself. I can slide out the circuit board from the other end. However, I cant open the battery or open the screw cap. Any ideas please?
uhmm how to remove the batteries when they are stuck?
Still wishing i could purchase the logic board. The keys work fine. But nooo!! "Right to Repair isn't quite there" - rhyme intended.
And if its completely STUCK, because of oxides from the battery inside....??
Erik M - Contestar