Saltar al contenido principal

RYDIS H68 Pro Side Brush Motor Replacement

Qué necesitas

  1. RYDIS H68 Pro Side Brush Motor Replacement, Battery: paso 1, imagen 1 de 2 RYDIS H68 Pro Side Brush Motor Replacement, Battery: paso 1, imagen 2 de 2
    • Flip the vacuum over so that the wheels are facing you.

    • Use a Phillips #1 screwdriver to remove the four 10 mm screws that surround the battery cover.

  2. RYDIS H68 Pro Side Brush Motor Replacement: paso 2, imagen 1 de 1
    • Lift the battery cover up to reveal the battery.

    • Remove the battery.

  3. RYDIS H68 Pro Side Brush Motor Replacement, Bumper: paso 3, imagen 1 de 3 RYDIS H68 Pro Side Brush Motor Replacement, Bumper: paso 3, imagen 2 de 3 RYDIS H68 Pro Side Brush Motor Replacement, Bumper: paso 3, imagen 3 de 3
    • Remove the eight 10 mm Phillips #1 screws.

  4. RYDIS H68 Pro Side Brush Motor Replacement: paso 4, imagen 1 de 3 RYDIS H68 Pro Side Brush Motor Replacement: paso 4, imagen 2 de 3 RYDIS H68 Pro Side Brush Motor Replacement: paso 4, imagen 3 de 3
    • Hold the front bumper and pull it off.

    • It requires a lot of force to pull the bumper off.

  5. RYDIS H68 Pro Side Brush Motor Replacement: paso 5, imagen 1 de 3 RYDIS H68 Pro Side Brush Motor Replacement: paso 5, imagen 2 de 3 RYDIS H68 Pro Side Brush Motor Replacement: paso 5, imagen 3 de 3
    • Pry off the back bumper by going around the entire top of the bumper with the metal spudger.

  6. RYDIS H68 Pro Side Brush Motor Replacement, Side Brush Motor: paso 6, imagen 1 de 1
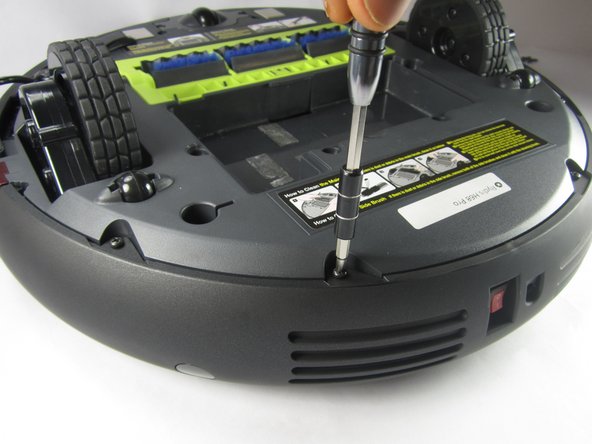
    • Begin by unscrewing the 2 10mm screws using a Phillips #1 screwdriver.

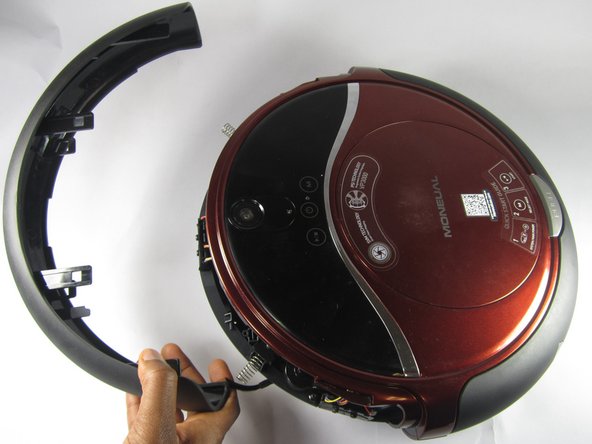
    • Unlatch the latches indicated. It can be easily done with your finger.

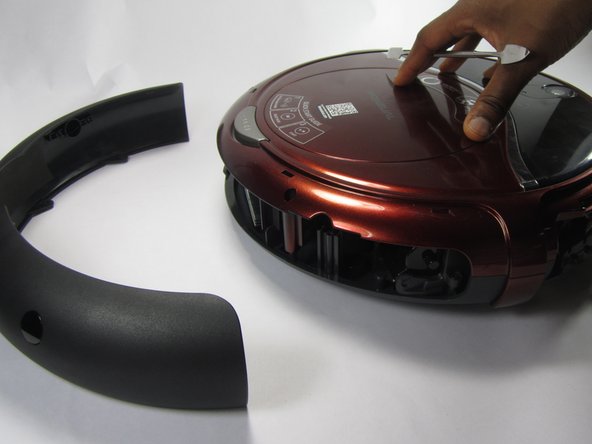
    • Once unsecured, the covering for the sensors can easily be removed allowing access to the sensors.

    • The reason for these first few steps is to avoid damaging the signal wires for the sensor.

  7. RYDIS H68 Pro Side Brush Motor Replacement: paso 7, imagen 1 de 1
    • This step just shows you how everything looks after the previous steps were completed.

    • There are sensors on both the left and right side. This can be done for either side.

  8. RYDIS H68 Pro Side Brush Motor Replacement: paso 8, imagen 1 de 1
    • Unscrew the five 10mm screws using a Phillips #1 screwdriver.

  9. RYDIS H68 Pro Side Brush Motor Replacement: paso 9, imagen 1 de 1
    • The side brush motor can now be removed by lifting it up.

Conclusión

To reassemble your device, follow these instructions in reverse order.

Una persona más ha completado esta guía.

jude auguste

Miembro Desde 02/15/17

108 Reputación

1 Guía escrita

Equipo

USFT-Lacy-S17S005G2 Miembro de USFT-Lacy-S17S005G2

Repair Café

4 Miembros

10 Guías creadas

0 comentarios

Agregar Comentario

Ver Estadísticas:

Ultimas 24 horas: 0

Ultimos 7 días: 0

Ultimos 30 días: 3

Todo El Tiempo: 584