Saltar al contenido principal

RCA 10 Viking Pro RCT6K03W13 Motherboard Replacement

Qué necesitas

  1. RCA 10 Viking Pro RCT6K03W13 Motherboard Replacement, Backplate: paso 1, imagen 1 de 3 RCA 10 Viking Pro RCT6K03W13 Motherboard Replacement, Backplate: paso 1, imagen 2 de 3 RCA 10 Viking Pro RCT6K03W13 Motherboard Replacement, Backplate: paso 1, imagen 3 de 3
    • Remove the three Phillips #00 screws at the bottom of the device.

  2. RCA 10 Viking Pro RCT6K03W13 Motherboard Replacement: paso 2, imagen 1 de 2 RCA 10 Viking Pro RCT6K03W13 Motherboard Replacement: paso 2, imagen 2 de 2
    • Remove the two Phillips #00 screws to the left and right of the keyboard connector.

  3. RCA 10 Viking Pro RCT6K03W13 Motherboard Replacement: paso 3, imagen 1 de 1
    • Pull on one of the bottom corners to begin to pull off the back plate.

  4. RCA 10 Viking Pro RCT6K03W13 Motherboard Replacement: paso 4, imagen 1 de 2 RCA 10 Viking Pro RCT6K03W13 Motherboard Replacement: paso 4, imagen 2 de 2
    • Work around the outside of the chassis, using the spudger to pry the backplate off.

    • After doing this for about half the device, the backplate should pop right off.

  5. RCA 10 Viking Pro RCT6K03W13 Motherboard Replacement, Battery: paso 5, imagen 1 de 1
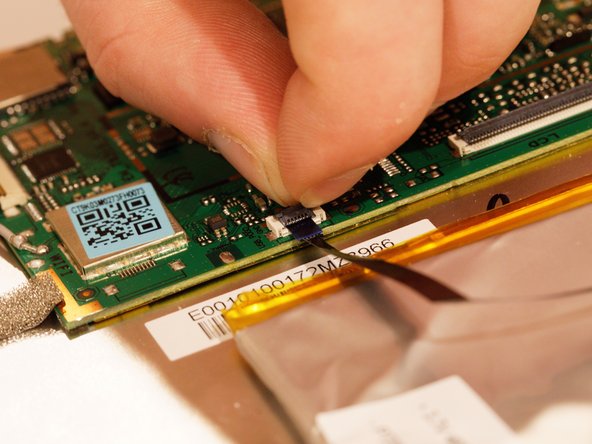
    • Remove the tape over the connectors on the motherboard and other side of the battery.

  6. RCA 10 Viking Pro RCT6K03W13 Motherboard Replacement: paso 6, imagen 1 de 1
    • Disconnect the red and black keyboard wires connecting the battery to the motherboard.

  7. RCA 10 Viking Pro RCT6K03W13 Motherboard Replacement: paso 7, imagen 1 de 1
    • Disconnect the black ribbon cable running over the battery. Flip up the black clamp and pull the cable out.

  8. RCA 10 Viking Pro RCT6K03W13 Motherboard Replacement: paso 8, imagen 1 de 2 RCA 10 Viking Pro RCT6K03W13 Motherboard Replacement: paso 8, imagen 2 de 2
    • Remove the cable over the battery connecting the motherboard and the power connector.

    • Flip up the black clamp and pull the cable out.

  9. RCA 10 Viking Pro RCT6K03W13 Motherboard Replacement: paso 9, imagen 1 de 2 RCA 10 Viking Pro RCT6K03W13 Motherboard Replacement: paso 9, imagen 2 de 2
    • Pull out battery. It is taped to the device so it is safe to pull out.

    • Look for damage to the battery. If damaged, make sure to not get any acid on your fingers.

  10. RCA 10 Viking Pro RCT6K03W13 Motherboard Replacement, Antenna: paso 10, imagen 1 de 1
    • Identify the grey wire on the right side of the device.

  11. RCA 10 Viking Pro RCT6K03W13 Motherboard Replacement: paso 11, imagen 1 de 1
    • Remove the orange ribbon cable over the wire.

  12. RCA 10 Viking Pro RCT6K03W13 Motherboard Replacement: paso 12, imagen 1 de 1
    • Remove the antenna using a soldering iron.

  13. RCA 10 Viking Pro RCT6K03W13 Motherboard Replacement, Motherboard: paso 13, imagen 1 de 1
    • Remove the blue and black wire from the top of the motherboard.

  14. RCA 10 Viking Pro RCT6K03W13 Motherboard Replacement: paso 14, imagen 1 de 1
    • Remove the screws from the motherboard.

  15. RCA 10 Viking Pro RCT6K03W13 Motherboard Replacement: paso 15, imagen 1 de 1
    • Remove the motherboard.

Conclusión

To reassemble your device, follow these instructions in reverse order.

Marcus Elysee

Miembro Desde 10/25/19

97 Reputación

1 Guía escrita

Equipo

Un comentario

Where can I buy this motherboard?

waymond everett - Contestar

Agregar Comentario

Ver Estadísticas:

Ultimas 24 horas: 2

Ultimos 7 días: 3

Ultimos 30 días: 33

Todo El Tiempo: 1,336