Saltar al contenido principal

Esta versión puede contener ediciones incorrectas. Cambiar a la última instantánea verificada.

Qué necesitas

  1. , Panel lateral: paso 1, imagen 1 de 1
    • Para evitar electrocutarse, apaga el ordenador. No abras el ordenador o intentar instalar algún dispositivo mientras el ordenador está encendido

    • Para evitar quemarse, espera al menos 10 minutos para dejar a los componentes del ordenador enfriar.

  2. : paso 2, imagen 1 de 1
    • Quita todos los cables, incluido los de alimentación antes de abrir la unidad.

  3. : paso 3, imagen 1 de 2 : paso 3, imagen 2 de 2
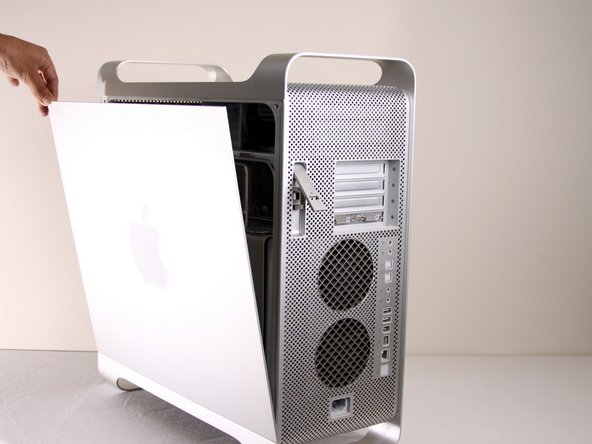
    • Levanta la palanca para desenganchar el panel lateral.

    • El panel caerá. Si el panel no cae por ella sola tira un poco de las esquinas.

  4. : paso 4, imagen 1 de 3 : paso 4, imagen 2 de 3 : paso 4, imagen 3 de 3
    • Quita el deflector de aire (el plastico transparente) tirando de la palanca.

  5. Este paso está sin traducir. Ayuda a traducirlo

    : paso 5, imagen 1 de 1
    • Locate the battery inside the desktop.

  6. Este paso está sin traducir. Ayuda a traducirlo

    : paso 6, imagen 1 de 3 : paso 6, imagen 2 de 3 : paso 6, imagen 3 de 3
    • Remove the battery by lifting the battery from the battery terminal.

    • Be careful to note which end is positive and which is negative. The positive end should be facing away from the PCI slots.

    • It is important to lift the battery as straight up as possible to avoid damage to battery or terminal.

    • The first photo shows the correct battery position. The last two photos show the battery facing the WRONG WAY! Remember, the positive end should be facing AWAY from the PCI slots, NOT towards them.

  7. Este paso está sin traducir. Ayuda a traducirlo

    : paso 7, imagen 1 de 1
    • The area should look like this after the battery is removed.

    • Be sure to properly dispose of the old battery after removal (take it to the nearest hazardous waste center).

    • Only insert LS1425OC 3.6V battery to prevent damage to the logic board.

Linea de Meta

35 personas más completaron esta guía.

Nolan

Miembro Desde 01/13/10

2,220 Reputación

2 Guías creadas

Equipo

Cal Poly, Team 5-8, Forte Winter 2010 Miembro de Cal Poly, Team 5-8, Forte Winter 2010

CPSU-FORTE-W10S5G8

7 Miembros

20 Guías creadas

7 comentarios

plz advise the type of battery, thx !

adrianchan - Contestar

Thank you, very very instructive - but why on Earth

does Apple not mark the battry holder on this model

with + and - ? ? Now, thanks to your close-up photo

I found out which way to turn the battery. (I hope)

Best regards

Torben, Denmark

Torben Hellborn -

Agreed - slot should be marked with + and – . . .

Thanks for the clear and sharp photos d;-)

Andrew Lawes - Contestar

This is not valid for the late 2005 model of G5…Model 11,2.

It uses a coin shaped Panasonic Lithium battery. I just ordered one from OWC.

($.88)

Sari - Contestar

Grazie, molto utile! Alberto da Venezia

favarettostudio - Contestar

Agregar Comentario

Ver Estadísticas:

Ultimas 24 horas: 4

Ultimos 7 días: 29

Ultimos 30 días: 139

Todo El Tiempo: 75,606