Esta versión puede contener ediciones incorrectas. Cambie a la última instantánea verificada.
Qué necesitas
-
Este paso está sin traducir. Ayuda a traducirlo
-
The handle to open your computer is located on top of the right side panel.
-
-
Este paso está sin traducir. Ayuda a traducirlo
-
The optical drive is in the top left corner of the case.
-
-
Este paso está sin traducir. Ayuda a traducirlo
-
There are four screws to be removed.
-
The first screw can be seen in the first picture.
-
The remaining three screws can be seen in the second picture.
-
-
Este paso está sin traducir. Ayuda a traducirlo
-
Remove the optical drive by pulling the drive away from the front of the computer and out.
-
-
-
Este paso está sin traducir. Ayuda a traducirlo
-
Detach the two cables attached to the back of the drive.
-
-
Este paso está sin traducir. Ayuda a traducirlo
-
The hard drive is located in the back right corner of the case.
-
-
Este paso está sin traducir. Ayuda a traducirlo
-
Remove the flat ribbon cable by pulling with substantial force.
-
-
Este paso está sin traducir. Ayuda a traducirlo
-
Remove the screw holding the hard drive to the computer.
-
-
Este paso está sin traducir. Ayuda a traducirlo
-
Remove the multicolored cable by grasping the plastic connector on either side and pulling with substantial force.
-
-
Este paso está sin traducir. Ayuda a traducirlo
-
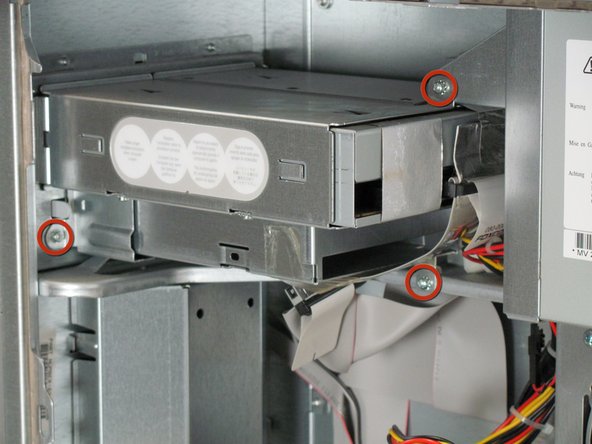
The power supply is in the upper right corner of the case.
-
-
Este paso está sin traducir. Ayuda a traducirlo
-
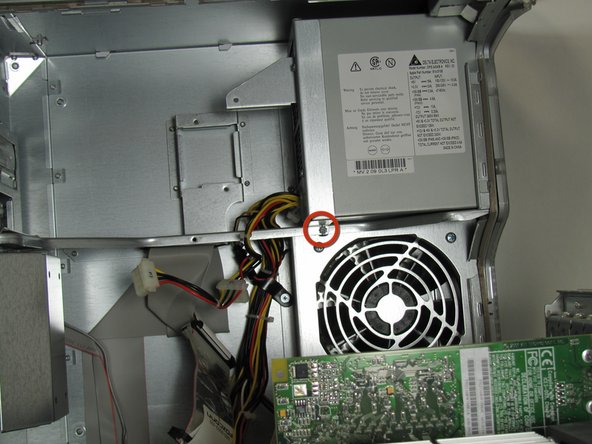
There is a total of four screws to be removed.
-
The first three can be seen in the first picture.
-
The final screw can be seen in the second picture.
-
-
Este paso está sin traducir. Ayuda a traducirlo
-
There are three 2.5mm hex bolts located in the back of the computer that also need to be removed.
-
A 3/32" Hex Key or Hex Driver, or a T10 Torx, are a bit small but may also work if gentle.
-
-
Este paso está sin traducir. Ayuda a traducirlo
-
Disconnect the power supply cables from the mother board by pressing in the tab on the back of the connector as shown.
-
-
Este paso está sin traducir. Ayuda a traducirlo
-
Before sliding out the power supply make sure to disconnect the cable to the big fan by pressing in the small black tab on the back of the black connector!
-
Slide the power supply away from the back of the computer and pull it out carefully stringing the cables through the hole in the metal support.
-
-
Este paso está sin traducir. Ayuda a traducirlo
-
Your power supply is now free from the enclosure and is ready to be replaced.
-


Cancelar: No complete esta guía.
24 personas más completaron esta guía.
Equipo

Cal Poly, Team 14-41, Regan Winter 2010 Miembro de Cal Poly, Team 14-41, Regan Winter 2010
CPSU-REGAN-W10S14G41
4 Miembros
17 Guías creadas
5 comentarios
I hate to say this, but that is not fixing the power supply but replacing the power supply with a new unit. i was hoping to fix it as mine blew and was hoping to revive it, but not luck on this end by the look of it. :(
Thanks for the clear instructions to replace the power supply. I got my part on eBay for $29 (other online stores are charging $100-200+ for it) to doctor up an old G4, and it works like a charm now.
Is it normal that after installing a replacement power supply for the PowerMac Quicksilver 733MHZ one of the fans is still running? Not sure which one, but once everything is shut down completely, I just pull the plug to avoid that fan from running for ever. Any feedback is appreciated. That unit still runs under OSX 10.4.11 and Classic.