Introducción
Usa esta guía para cambiar el sistema de ventilación en una PS4 Slim.
Qué necesitas
-
-
Localiza la pegatina de garantía que está al lado de los tres puertos en uno de los lados de la consola.
-
Retira la pegatina de garantía levantándola con ayuda de cualquier tipo de espátula de plástico.
-
-
-
Desatornilla y retira el ahora expuesto tornillo Torx de 5mm con un destornillador de seguridad Torx T8 girando en contra de las agujas del reloj.
T8 fits like a glove for me
Is there anything else you can use
A small flathead screwdriver will work
There is a small metal rod in the middle of the screw that isn’t allowing my t8 inside. Any insight on this?
Some T8 bits have a hole in the middle that will allow that rod to go through; some do not. If you have a set of multiple bits, check if there are any others labeled T8 or TR8 with that hole in the middle.
Nicholas -
There is a metal thing inside of the screw slot any insite on this?
-
-
-
Sitúa la PS4 boca abajo con el lado del tornillo que acabas de retirar mirando hacia ti.
-
Haz palanca con las manos hacia arriba (con cuidado)en las dos esquinas mas cercanas a ti.
-
Retira la tapa inferior arrastrándola hacia las esquinas inferiores y levantándola.
It says to place it upside down, but didn't you do so in the previous step? I've been trying to unscrew the screw with my screwdriver that I got from here and if I had to had the system right side up, I'm afraid I might've stripped the screw from all the force I tried to use to get the screw out that will NOT budge. It didn't even move the slightest after removing the warranty sticker.
There is a single clip on the left side about 5cms in, and another clip on the right side equidistant to the one on the other side. Jamming a spudger in there first, and lifting those clips helped, and then I had to slide down to lift a total of 4 clips on each side (each about 4cms apart). Then push the cover away from you, if that makes more sense than “sliding it towards the back corners”, since the back corners are technically facing you.
I saw many video and tried it my self, you have to remove the hard disc before removing any cover.
-
-
-
Coloca la Playstation 4 Slim con el lado derecho hacia arriba, con el logotipo de PS en la parte superior y el lado con las palabras "SONY" y "PS4" hacia ti.
-
Haz palanca con los dedos en las dos esquinas que están orientadas hacia usted.
-
Retira la tapa superior deslizándola hacia las esquinas traseras y levantándola.
-
-
-
Desenrosca y retira los dos tornillos (el izquierdo de 31,0 mm y el derecho de 24,0 mm) utilizando un destornillador T8 con un movimiento en sentido contrario a las agujas del reloj.
-
Desenrosca y retira el tornillo de 3,0 mm utilizando un destornillador Phillips nº 1 con un movimiento en sentido contrario a las agujas del reloj.
UK model seems to be different here. There's no Philips screw where there is on your image.
This regards EU models in general, i think. My danish version is the same.
-
-
-
Retira los cuatro tornillos Philips de 16 mm que sujetan la fuente de alimentación.
Only 2 Phillips actress here on my UK
Only 2 phillips screws on the US one as well.
I also only have two screws here in the US.
-
-
-
Retira la lámina metálica de la parte superior de la fuente de alimentación agarrando y levantando con las manos.
I think the metal sheet protects the rest of the console or something from heating too much.
-
-
-
Retira la antena de la parte superior de la fuente de alimentación guiando el cable con los dedos a través de las ranuras situadas debajo del panel metálico.
What does this mean for part do? This part is not present in my console nor is the space where it's supposed to reside as shown in the picture above.
Me neither, guess they are different models.
-
-
-
Voltea la Playstation 4 Slim sobre su parte trasera.
-
Desenrosca y retira el tornillo de 4,0 mm utilizando un destornillador Phillips nº 1 con un movimiento en sentido contrario a las agujas del reloj.
How do you get it when the screw is stripped
-
-
-
-
Desconecta el cable de conexión de la fuente de alimentación sujetándolo firmemente con los dedos o con unas pinzas y tirando de él.
-
Retira la fuente de alimentación completamente agarrando y levantando con las manos.
Your guide is good but detail. Could be alot better for a start you forgot to mention the screw on the other side that must also be removed to let the power supply out of ps4 slim
Could you replace a ps4 slim model CUH-211B with a N16-160P1A power supply
Just because I feel like this needs to be stated clearly, “Do no attempt to pull the plug out by the wires!”
Pull from the plastic, male end of the plug or you’re going to end up have a very bad day.
Literally no way I can do it by the plastic, the only way is wires. Gotta risk it I guess
Misha FV -
You are right, pulling the wires is entirely wrong. I used the small rectangular, thin blue plastic to push the cable back from the socket. It was too tight. From my experience of repairing, never pull wires. The consequences of damaging it are not worth it.
-
-
-
Desatornilla y remueve los tornillos de seguridad de 31.0 mm usando un destornillador T8 con movimiento contrario al reloj.
-
-
-
Localiza los dos cables conectados a la parte de abajo de la placa madre.
-
Remueve los cables agarrando firmemente los conectores de metal con tus dedos o pinzas y tirando hasta que se desconecten.
-
-
-
Voltea el dispositivo al lado de atrás.
-
Desatornilla y remueve los 14 tornillos negros de 4.0mm (19x CUH-21xx) usando un destornillador Phillips #1 en un movimiento en contra de las manecillas del reloj.
-
Desatornilla y remueve 8 tornillos plateados de 6.0mm (7x CUH-21xx) usando un destornillador Phillips #1 con movimiento en contra de las manecillas del reloj.
-
Desatornilla y remueve 4 tornillos plateados de 3.0 mm usando un destornillador Phillips #1 con movimiento en contra de las manecillas del reloj.
- There are 14x 4.0mm black screws, but the step only shows 13 of them circled in red. One of the 11 orange circles (near front of unit) is actually the 14th black screw. Photo: http://i.imgur.com/7G64egd.png
- As for the 6.0mm silver screws, there are only 8x of those. The two silver screws behind the IO ports on the back are 3.0mm fine-threaded screws. Photo: http://i.imgur.com/cQD6KQu.png
- Source: Have a PS4 Slim (CUH-2015A) right in front of me, doing this exact job. Hope this helps someone else down the road.
In my PS4 slim many of the screws shown in this step are melted plastic rivet type fasteners. I guess I’m supposed to just cut through them and hope the game stays together or is there a way to remove them and drill and tap holes for screws that will hold the board etc in place? My game is getting old and I would like to clean the fan and make sure the thermal paste or Liquid Metal is still working (“the perfect amount “). The fan in my game seems to run a quite a bit. Thanks!
By definition, "unscrew" is in a counter-clockwise motion. And, people who are taking apart a device like this will be able to tell when they try to turn the screw which way is correct.
In the second picture, there is a hard disk. In the first and third pictures, there is no hard disk. You might want to update these instructions to include hard disk drive removal.
In my experience with creating guides you use existing guides as stepping stones to build up new guides. That means sometimes pictures will show a procedure for one step where other steps may come before or after the one being described. The point is you should be looking at what's being described rather than nit-picking on things like is the hard drive there or not. Just assume if the instructions haven't told you to remove the hard drive, then you don't need it removed even if the picture shows it having been taken out.
With regard to the second picture in particular, I added that one when I was taking apart my grandson's CUH-21xx system only to find that the screws were substantially different than the ones in the original guide. My point was to document those differences and no, I didn't worry about whether the hard drive was there or not, so my picture has it in and the others don't.
-
-
-
Desatornilla y remueve los dos tornillos de 5.0 mm en el lado de la consola usando un destornillador Phillips #1 en un movimiento en contra de las manecillas del reloj.
-
Salta este paso para los CUH-21xx,, ya que esos tornillos fueron retirados en el paso anterior.
These are 3.0mm screws, not 5.0mm. This step could probably be condensed into the previous step.
These screws are not present on the US model
Yes, my US model doesn't have it either
-
-
-
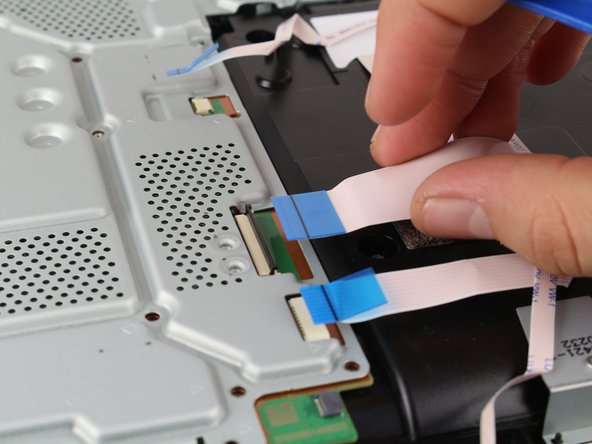
Localiza el cable blanco conectado en la esquina superior de la placa madre.
-
Desconecta el cable agarrándolo firmemente la conexión de metal con tus dedos o con pinzas y tirando de el hasta que se desconecte.
-
Despegue el cable de la cinta y muévelo a un lado usando pinzas o tus dedos.
-
-
-
Remueve la placa de metal agarrando dos lados de la placa y levantandola y lejos de ti.
This step would benefit from showing a picture of the black pads in question. Pic: http://i.imgur.com/zQnehtA.png
The US model has two black screws under the HDD
-
-
-
Desatornilla y remueve los dos tornillos de 10.0 mm (uno plateado y otro negro) usando un destornillador Phillips #1 en un movimiento en contra de las manecillas del reloj.
-
Remueve la placa pequeña agarrandola con tus dedos y levantandola.
Why is one silver and one black? I keep thinking they are different and try to keep track of where they go.
What's the name is the part with the two metal screws that is being taken off
both screws are black on the US version
-
-
-
Remueve este cable de conexión agarrándolo firmemente con pinzas y sacándolo.
Do not attempt to disconnect the plug by pulling on the wires! If you rip out the wires, you’re gonna have a very bad day. Wiggle the plug using the plastic on the male end of the connector while pulling out.
que pasa si se desolda esa parte como puedo volver a soldarlo o cuanto se cobra por solo soldar
this is plugged in WAY too hard. I've been wiggling it for 5 minutes. Not budging an inch. i learned that if you follow the cables of that, they are just held in place by a few plastic hooks. You can slide them out of there by flipping the ps4 over and then pull the motherboard out no problem, cable still attached.
Also, dont forget about the small plug in at the top of the motherboard. That is the fan power cable and needs to be off to remove the mobo as well.
I broke the cable by accident, where can i find a replacement?
-
-
-
Desatornilla y quita los seis tornillos de 4.00mm usando un destornillador PH00 con un movimiento a favor de las agujas de un reloj.
On my model, there are screws on the opposite side of the PS4 that are long and have their threads facing up into this plate. You have to unscrew them from the opposite side so they come off.
Also, you DEFINITELY need to reapply thermal paste when doing this step in reverse order after replacing the fan!! How is this not mentioned, its critical otherwise your CPU will overheat.
-


Para volver a montar el dispositivo, sigue esta guía en orden inverso.
Para volver a montar el dispositivo, sigue esta guía en orden inverso.
Cancelar: No complete esta guía.
64 personas más completaron esta guía.
Un agradecimiento especial a estos traductores:
100%


Estos traductores nos están ayudando a reparar el mundo! ¿Quieres contribuir?
Empezar a traducir ›
Equipo

Cal Poly, Team S19-G4, Livingston Winter 2018 Miembro de Cal Poly, Team S19-G4, Livingston Winter 2018
CPSU-LIVINGSTON-W18S19G4
4 Miembros
35 Guías creadas
5 comentarios
Thank you so much for this guide! It was very helpful!
Deine Schrauben großen machen gar kein Sinn du hast mehr verschiedene Schrauben als es gibt
My PS4 “Slim” is quite different internally than the one shown. But regardless, this guide is an excellent resource for us diy’ers. And don’t forget any parts when reassembling, like I did. Took four tries to get everything back where it belonged. And man, was it dusty in there! Regular cleaniings are a must.
My ps4 slim is different it has some extra parts, now I don’t know how to put it back, hahahahahhahaha
This guide gets you 90% of the way there. Some really important pieces are missing though, primarily:
- How you dont need to unplug the power supply cable from the motherboard, you can just unhook it from the plastic clips on the case.
- It never mentions cleaning the old Thermal Paste off the heatsink + cpu and replacing with a new dab.
Both of these are essential for a proper tear-down. If you dont replace the thermal paste, your PS4 is guaranteed to break down irreparably in the future. I had to know or discover them for myself. Please, please update this guide with that info.
Remove the screw directly to the left of that one in the picture as well. Should be silver.
Elizabeth Johnson - Contestar
ihr seid so ein scheiß haufen das stimmt über haubt nix
Toaster 95 - Contestar
einfach alles stimmt nicht
Toaster 95 - Contestar