Saltar al contenido principal

PlayStation 2 Slimline SCPH-7500x Fan Replacement

Qué necesitas

  1. Aviso: los pasos 1-7 provienen de una guía que está marcada como "En progreso".

    • Turn off the PlayStation 2 and carefully unplug it from the power source. Also, it is important to eject the CD from the console before flipping the it upside down.

  2. PlayStation 2 Slimline SCPH-7500x Fan Replacement: paso 2, imagen 1 de 1
    • Locate the six feet on the bottom of the PS2.

    • Five of these feet are in plain sight while the last foot is located under the black void sticker on the back of the device.

    • Some versions of the console, such as the PAL Version, may not have this sticker. In this case, the foot or the screw should be in plain sight.

  3. PlayStation 2 Slimline SCPH-7500x Fan Replacement: paso 3, imagen 1 de 3 PlayStation 2 Slimline SCPH-7500x Fan Replacement: paso 3, imagen 2 de 3 PlayStation 2 Slimline SCPH-7500x Fan Replacement: paso 3, imagen 3 de 3
    • Remove the five visible feet from the bottom of the device using a spudger.

  4. PlayStation 2 Slimline SCPH-7500x Fan Replacement: paso 4, imagen 1 de 2 PlayStation 2 Slimline SCPH-7500x Fan Replacement: paso 4, imagen 2 de 2
    • Remove the sticker and then remove the 6th foot.

  5. PlayStation 2 Slimline SCPH-7500x Fan Replacement: paso 5, imagen 1 de 3 PlayStation 2 Slimline SCPH-7500x Fan Replacement: paso 5, imagen 2 de 3 PlayStation 2 Slimline SCPH-7500x Fan Replacement: paso 5, imagen 3 de 3
    • After all of the feet have been removed, Use a Phillips #1 screwdriver to remove the six 4.0mm screws from the base of the PS2.

  6. PlayStation 2 Slimline SCPH-7500x Fan Replacement: paso 6, imagen 1 de 3 PlayStation 2 Slimline SCPH-7500x Fan Replacement: paso 6, imagen 2 de 3 PlayStation 2 Slimline SCPH-7500x Fan Replacement: paso 6, imagen 3 de 3
    • Once all of the screws have been removed, pry apart the plastic covers. Start by lifting the side containing the power cable and Ethernet port. Then, lift the opposite side to fully separate the two sides.

    • You may need to apply some gentle force to detach the covers. Be careful not to break the plastic screw pins.

  7. PlayStation 2 Slimline SCPH-7500x Fan Replacement: paso 7, imagen 1 de 1
    • If done correctly, you should have a fully detached plastic backing, revealing the electronic components of the PlayStation 2.

  8. PlayStation 2 Slimline SCPH-7500x Fan Replacement, Fan: paso 8, imagen 1 de 3 PlayStation 2 Slimline SCPH-7500x Fan Replacement, Fan: paso 8, imagen 2 de 3 PlayStation 2 Slimline SCPH-7500x Fan Replacement, Fan: paso 8, imagen 3 de 3
    Herramienta utilizada en este paso:
    Tweezers
    $4.99
    Comprar
    • Locate the fan component of the motherboard of the PS2.

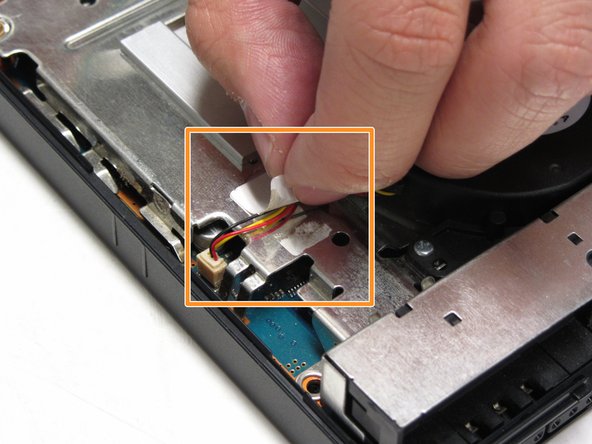
    • With your fingers or tweezers, peel off the sticker that holds down the fan's wiring.

  9. PlayStation 2 Slimline SCPH-7500x Fan Replacement: paso 9, imagen 1 de 2 PlayStation 2 Slimline SCPH-7500x Fan Replacement: paso 9, imagen 2 de 2
    • Detach the terminal (white covering) to the red and yellow cords from the motherboard to the fan with the use of tweezers.

  10. PlayStation 2 Slimline SCPH-7500x Fan Replacement: paso 10, imagen 1 de 2 PlayStation 2 Slimline SCPH-7500x Fan Replacement: paso 10, imagen 2 de 2
    • Locate and unscrew the three 1.6mm screws located next to the base of the fan.

    • They are located off the curved edge of the fan.

    • Once you have removed the three screws, you are able to remove the fan from the PS2.

Conclusión

To reassemble your device, follow these instructions in reverse order.

4 personas más completaron esta guía.

Jared Hirata

Miembro Desde 04/09/13

880 Reputación

7 Guías creadas

Equipo

Cal Poly, Team 17-4, Regan Spring 2013 Miembro de Cal Poly, Team 17-4, Regan Spring 2013

CPSU-REGAN-S13S17G4

3 Miembros

28 Guías creadas

0 comentarios

Agregar Comentario

Ver Estadísticas:

Ultimas 24 horas: 3

Ultimos 7 días: 20

Ultimos 30 días: 70

Todo El Tiempo: 3,898