Saltar al contenido principal

Philips Sonicare ProtectiveClean 6500 Battery Replacement

Qué necesitas

  1. Philips Sonicare ProtectiveClean 6500 Battery Replacement, Internal Assembly: paso 1, imagen 1 de 3 Philips Sonicare ProtectiveClean 6500 Battery Replacement, Internal Assembly: paso 1, imagen 2 de 3 Philips Sonicare ProtectiveClean 6500 Battery Replacement, Internal Assembly: paso 1, imagen 3 de 3
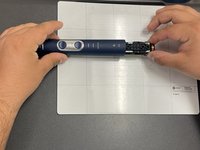
    • Pry the bottom cap away from the toothbrush body.

    • Pry the bottom cap away from the toothbrush body until it releases.

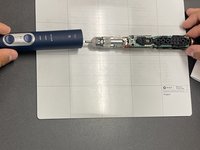
    • Remove the bottom cap by hand.

  2. Philips Sonicare ProtectiveClean 6500 Battery Replacement: paso 2, imagen 1 de 2 Philips Sonicare ProtectiveClean 6500 Battery Replacement: paso 2, imagen 2 de 2
    • Use a metal spudger to release the two retaining clips inside the device.

    • The clips release when pried inward.

  3. Philips Sonicare ProtectiveClean 6500 Battery Replacement: paso 3, imagen 1 de 2 Philips Sonicare ProtectiveClean 6500 Battery Replacement: paso 3, imagen 2 de 2
    • Slide the internal assembly out of the chassis.

  4. Philips Sonicare ProtectiveClean 6500 Battery Replacement, Battery: paso 4, imagen 1 de 1
    • Use an opening tool to gently pry up the battery.

    • Remove the battery.

Conclusión

To reassemble your device, follow these instructions in reverse order.

Liam Casto

Miembro Desde 04/01/24

354 Reputación

3 Guías creadas

Equipo

IUPUI, Team 1-4, Harley Spring 2024 Miembro de IUPUI, Team 1-4, Harley Spring 2024

IUPUI-HARLEY-S24S1G4

Miembros de 3

3 Guías creadas

2 comentarios

Hello, thanks for your tutorial!

Is there others Sonicare models like this one where you don't have to desold the battery ?

Julien CHAZAL - Contestar

It doesn’t appear you have to desolder the battery with this model. I think the diamond clean does require desoldering though.

Jacob Poole -

Agregar Comentario

Ver Estadísticas:

Ultimas 24 horas: 0

Ultimos 7 días: 2

Ultimos 30 días: 21

Todo El Tiempo: 258