Saltar al contenido principal

Panasonic Toughbook CF-29 Trackpad Board Replacement

Qué necesitas

  1. Panasonic Toughbook CF-29 Trackpad Board Replacement, Battery: paso 1, imagen 1 de 1
    • Locate the bay door for the battery on the left side of the laptop.

  2. Panasonic Toughbook CF-29 Trackpad Board Replacement: paso 2, imagen 1 de 2 Panasonic Toughbook CF-29 Trackpad Board Replacement: paso 2, imagen 2 de 2
    • Slide the latch to the right and then down to unlock it.

    • Pull out the battery.

  3. Panasonic Toughbook CF-29 Trackpad Board Replacement, Hard Drive: paso 3, imagen 1 de 1
    • Locate the door for the hard drive on the right side of the laptop

  4. Panasonic Toughbook CF-29 Trackpad Board Replacement: paso 4, imagen 1 de 2 Panasonic Toughbook CF-29 Trackpad Board Replacement: paso 4, imagen 2 de 2
    • Push and slide the latch up to open the hard drive door.

    • Pull out the hard drive.

  5. Panasonic Toughbook CF-29 Trackpad Board Replacement, Optical Drive: paso 5, imagen 1 de 1
    • Flip the device upside down with the handle facing away from you.

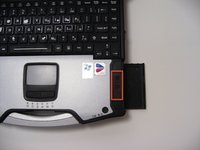
    • Open the optical drive bay by sliding its latch to the right.

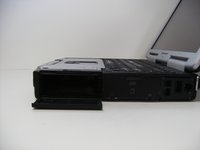
    • Locate optical drive release mechanism on the bottom of the laptop.

  6. Panasonic Toughbook CF-29 Trackpad Board Replacement: paso 6, imagen 1 de 1
    • Slide the latch cover to the right.

  7. Panasonic Toughbook CF-29 Trackpad Board Replacement: paso 7, imagen 1 de 2 Panasonic Toughbook CF-29 Trackpad Board Replacement: paso 7, imagen 2 de 2
    • Push the exposed switch to the left to eject the optical drive.

  8. Panasonic Toughbook CF-29 Trackpad Board Replacement, Back Cover: paso 8, imagen 1 de 1
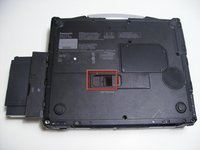
    • Begin by turning the laptop upside down with the handle towards you.

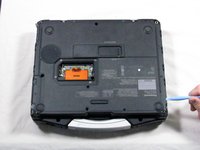
    • Use a Phillips size 0 screwdriver to remove the 4 screws holding down the ram cover.

  9. Panasonic Toughbook CF-29 Trackpad Board Replacement: paso 9, imagen 1 de 1
    • Remove the panel and set it aside.

    • Use a Phillips size 0 screwdriver to remove these 8 small screws.

  10. Panasonic Toughbook CF-29 Trackpad Board Replacement: paso 10, imagen 1 de 1
    • Use a Phillips size 1 screwdriver to remove the remaining 8 screws.

  11. Panasonic Toughbook CF-29 Trackpad Board Replacement: paso 11, imagen 1 de 2 Panasonic Toughbook CF-29 Trackpad Board Replacement: paso 11, imagen 2 de 2
    • Use a plastic opening tool to release, but NOT remove, the back cover because it is sealed with adhesive.

  12. Panasonic Toughbook CF-29 Trackpad Board Replacement: paso 12, imagen 1 de 1
    • Be careful when lifting the cover as you may damage some connections.

    • Slowly lift the cover so that you can disconnect the red and white wires connecting the speaker to the sound card.

  13. Panasonic Toughbook CF-29 Trackpad Board Replacement: paso 13, imagen 1 de 1
    • Now the back cover should be off and you can access the inside of the casing.

  14. Panasonic Toughbook CF-29 Trackpad Board Replacement, Trackpad Board: paso 14, imagen 1 de 1
    • Locate the track pad chip near the handle.

    • Remove the upper right screw.

  15. Panasonic Toughbook CF-29 Trackpad Board Replacement: paso 15, imagen 1 de 1
    • Use a pry bar to detach the white ribbon cable shown.

    • Push the brown tab to release the cable

  16. Panasonic Toughbook CF-29 Trackpad Board Replacement: paso 16, imagen 1 de 1
    • Remove the screw that was previously concealed under the now removed ribbon cable.

  17. Panasonic Toughbook CF-29 Trackpad Board Replacement: paso 17, imagen 1 de 1
    • Remove the rightmost ribbon cable

    • Pry up the brown clip

    • Tug the cable out

  18. Panasonic Toughbook CF-29 Trackpad Board Replacement: paso 18, imagen 1 de 1
    • Pull the track pad slightly up and to the right.

    • Do not completely remove the circuit board because it is still attached.

  19. Panasonic Toughbook CF-29 Trackpad Board Replacement: paso 19, imagen 1 de 1
    • Remove the last ribbon cable.

    • Pry up on the brown part to release the ribbon cable.

  20. Panasonic Toughbook CF-29 Trackpad Board Replacement: paso 20, imagen 1 de 1
    • You have successfully removed the track pad board.

Conclusión

To reassemble your device, follow these instructions in reverse order.

Una persona más ha completado esta guía.

Dylan Bloom

Miembro Desde 04/12/10

373 Reputación

4 Guías creadas

Equipo

Cal Poly, Team 27-93, Amido Spring 2010 Miembro de Cal Poly, Team 27-93, Amido Spring 2010

CPSU-AMIDO-S10S27G93

4 Miembros

26 Guías creadas

0 comentarios

Agregar Comentario

Ver Estadísticas:

Ultimas 24 horas: 0

Ultimos 7 días: 2

Ultimos 30 días: 6

Todo El Tiempo: 5,805