Saltar al contenido principal

Panasonic Lumix DMC-ZS25 Flash Replacement

Qué necesitas

  1. Panasonic Lumix DMC-ZS25 Flash Replacement, Flash: paso 1, imagen 1 de 2 Panasonic Lumix DMC-ZS25 Flash Replacement, Flash: paso 1, imagen 2 de 2
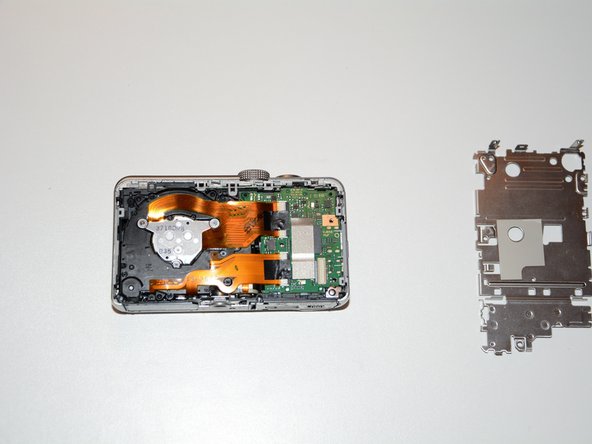
    • Using a small screwdriver, remove the four 3.4mm screws from the right and left sides of your Panasonic Lumix Camera.

  2. Panasonic Lumix DMC-ZS25 Flash Replacement: paso 2, imagen 1 de 1
    • Using a small screwdriver, remove the two 2.6mm screws located next to the battery, on the outer casing.

  3. Panasonic Lumix DMC-ZS25 Flash Replacement: paso 3, imagen 1 de 1
    • Using the plastic opening tool, open the outer cover of your device.

    • The easiest way to open your device is by placing the tool in the HDMI port.

  4. Panasonic Lumix DMC-ZS25 Flash Replacement: paso 4, imagen 1 de 3 Panasonic Lumix DMC-ZS25 Flash Replacement: paso 4, imagen 2 de 3 Panasonic Lumix DMC-ZS25 Flash Replacement: paso 4, imagen 3 de 3
    • Using the spudger, pull upward on the screen cable to release it.

  5. Panasonic Lumix DMC-ZS25 Flash Replacement: paso 5, imagen 1 de 1
    • Using the plastic opening tool, lift the button board until it clicks.

  6. Panasonic Lumix DMC-ZS25 Flash Replacement: paso 6, imagen 1 de 2 Panasonic Lumix DMC-ZS25 Flash Replacement: paso 6, imagen 2 de 2
    • Using the plastic opening tool, lift the screen until it clicks.

  7. Panasonic Lumix DMC-ZS25 Flash Replacement: paso 7, imagen 1 de 1
    • Using a small screwdriver, remove the two 4.2mm screws located on the corner of the inner cover, under the screen.

  8. Panasonic Lumix DMC-ZS25 Flash Replacement: paso 8, imagen 1 de 1
    • Using the plastic opening tool, remove the inner cover.

  9. Panasonic Lumix DMC-ZS25 Flash Replacement: paso 9, imagen 1 de 2 Panasonic Lumix DMC-ZS25 Flash Replacement: paso 9, imagen 2 de 2
    • Using your hands or the opening tool, separate the device into two pieces, as shown.

  10. Panasonic Lumix DMC-ZS25 Flash Replacement: paso 10, imagen 1 de 2 Panasonic Lumix DMC-ZS25 Flash Replacement: paso 10, imagen 2 de 2
    • Using the spudger, remove the black side cover.

  11. Panasonic Lumix DMC-ZS25 Flash Replacement: paso 11, imagen 1 de 1
    • Using your hands, remove the front cover.

  12. Panasonic Lumix DMC-ZS25 Flash Replacement: paso 12, imagen 1 de 3 Panasonic Lumix DMC-ZS25 Flash Replacement: paso 12, imagen 2 de 3 Panasonic Lumix DMC-ZS25 Flash Replacement: paso 12, imagen 3 de 3
    • Using the spudger, unlock the screen cables from the circuit board.

    • Lift up the black clip to release the cables.

  13. Panasonic Lumix DMC-ZS25 Flash Replacement: paso 13, imagen 1 de 1
    • Using your hands, remove the lens.

  14. Panasonic Lumix DMC-ZS25 Flash Replacement: paso 14, imagen 1 de 1
    • Using the plastic opening tool, pull up on the edge of the circuit board until it clicks.

    • Remove the board.

  15. Panasonic Lumix DMC-ZS25 Flash Replacement: paso 15, imagen 1 de 1
    • Using a small screwdriver, remove the 3.7 mm screw near the green chip inside the camera, as shown. This will release the top of the camera.

  16. Panasonic Lumix DMC-ZS25 Flash Replacement: paso 16, imagen 1 de 3 Panasonic Lumix DMC-ZS25 Flash Replacement: paso 16, imagen 2 de 3 Panasonic Lumix DMC-ZS25 Flash Replacement: paso 16, imagen 3 de 3
    • Using the opening tool, pull up on the edge of the top cover to unlock it.

  17. Panasonic Lumix DMC-ZS25 Flash Replacement: paso 17, imagen 1 de 2 Panasonic Lumix DMC-ZS25 Flash Replacement: paso 17, imagen 2 de 2
    • Using the opening tool, remove the top board.

  18. Panasonic Lumix DMC-ZS25 Flash Replacement: paso 18, imagen 1 de 2 Panasonic Lumix DMC-ZS25 Flash Replacement: paso 18, imagen 2 de 2
    • Place the tip of the spudger at the edge of the top board, and work around three sides to loosen it.

    • Using the opening tool, lift up the top board. Now you will be able to safely remove the flash.

  19. Panasonic Lumix DMC-ZS25 Flash Replacement: paso 20, imagen 1 de 1
    • Remove the old flash, and put in the replacement.

Conclusión

To reassemble your device, follow these instructions in reverse order.

Abbas Khan

Miembro Desde 01/21/15

482 Reputación

4 Guías creadas

Equipo

USF Tampa, Team 9-5, Brown Winter 2015 Miembro de USF Tampa, Team 9-5, Brown Winter 2015

USFT-BROWN-W15S9G5

3 Miembros

7 Guías creadas

0 comentarios

Agregar Comentario

Ver Estadísticas:

Ultimas 24 horas: 0

Ultimos 7 días: 0

Ultimos 30 días: 0

Todo El Tiempo: 400