Saltar al contenido principal

Palm Pre Antenna Replacement

Guía Archivada
Esta guía se mantiene únicamente para fines históricos. Utiliza la última versión de la guía para llevar a cabo tu reparación.

Qué necesitas

  1. Palm Pre Antenna Replacement, Antenna: paso 1, imagen 1 de 2 Palm Pre Antenna Replacement, Antenna: paso 1, imagen 2 de 2
    • First the back panel must be removed to reveal the battery.

    • Remove the battery pack.

  2. Palm Pre Antenna Replacement: paso 2, imagen 1 de 2 Palm Pre Antenna Replacement: paso 2, imagen 2 de 2
    • Remove the six T5 screws necessary to separate the backplate from the phone.

    • There is one screw in the upper right that is concealed by a small sticker labeled "Palm."

    • Additionally, there are interlocking tabs securing the back plate around the edges.

    • Use the opening tool to carefully go around the phone releasing these tabs.

  3. Palm Pre Antenna Replacement: paso 3, imagen 1 de 2 Palm Pre Antenna Replacement: paso 3, imagen 2 de 2
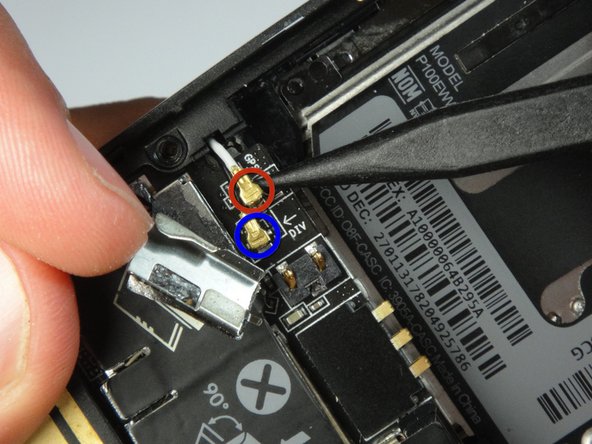
    • Lift the metal flap marked in red to reveal the antenna connectors.

    • Carefully pry these the antennas from their connections, this can be done quite easily.

    • Take note of which colored wire is attached to each connection. The white wire corresponds to GPS, while the black wire corresponds to DIV, or diversity antenna.

Conclusión

To reassemble your device, follow these instructions in reverse order.

iDeleted

Miembro Desde 07/07/10

2,101 Reputación

39 Guías creadas

0 comentarios

Agregar Comentario

Ver Estadísticas:

Ultimas 24 horas: 0

Ultimos 7 días: 0

Ultimos 30 días: 0

Todo El Tiempo: 342