Saltar al contenido principal

Packard Bell ms-Hera c Disassembly

Qué necesitas

  1. Packard Bell ms-Hera c Disassembly, Unscrew the lid: paso 1, imagen 1 de 3 Packard Bell ms-Hera c Disassembly, Unscrew the lid: paso 1, imagen 2 de 3 Packard Bell ms-Hera c Disassembly, Unscrew the lid: paso 1, imagen 3 de 3
    • Remove the battery.

    • Unscrew the red marked screws with a Phillips screwdriver.

    • Remove the DVD reader.

  2. Packard Bell ms-Hera c Disassembly, Disconnect the keyboard: paso 2, imagen 1 de 3 Packard Bell ms-Hera c Disassembly, Disconnect the keyboard: paso 2, imagen 2 de 3 Packard Bell ms-Hera c Disassembly, Disconnect the keyboard: paso 2, imagen 3 de 3
    • Pry in the red marked spots to release the keyboard

    • Unplug the keyboard connector.

  3. Packard Bell ms-Hera c Disassembly, Unplug the cables: paso 3, imagen 1 de 3 Packard Bell ms-Hera c Disassembly, Unplug the cables: paso 3, imagen 2 de 3 Packard Bell ms-Hera c Disassembly, Unplug the cables: paso 3, imagen 3 de 3
    • Unplug the 3 connectors on the motherboard

    • Remove the 2 screws holding the display in place

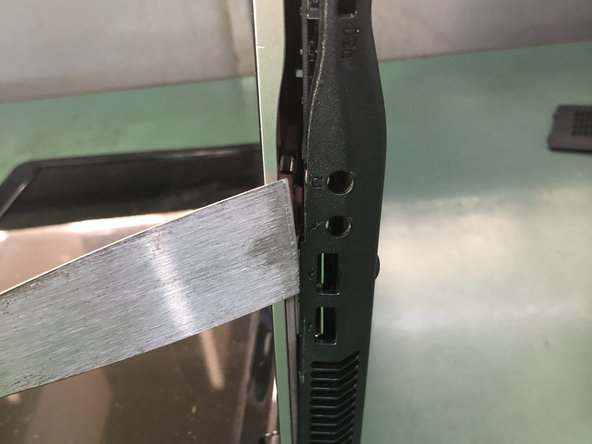
    • Use a thin tool to pry up the back cover of the laptop on the side

  4. Packard Bell ms-Hera c Disassembly, Unscrew the motherboard: paso 4, imagen 1 de 3 Packard Bell ms-Hera c Disassembly, Unscrew the motherboard: paso 4, imagen 2 de 3 Packard Bell ms-Hera c Disassembly, Unscrew the motherboard: paso 4, imagen 3 de 3
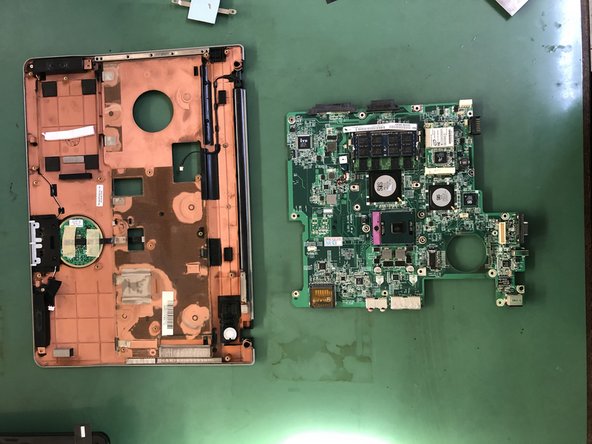
    • Remove the back cover.

    • Remove the HDD.

    • Remove the screws that hold the motherboard.

  5. Packard Bell ms-Hera c Disassembly, Remove the display: paso 5, imagen 1 de 3 Packard Bell ms-Hera c Disassembly, Remove the display: paso 5, imagen 2 de 3 Packard Bell ms-Hera c Disassembly, Remove the display: paso 5, imagen 3 de 3
    • Remove the marked screws and connectors.

    • Disconnect the display connector.

    • Remove the display.

  6. Packard Bell ms-Hera c Disassembly, Remove the heatsink: paso 6, imagen 1 de 3 Packard Bell ms-Hera c Disassembly, Remove the heatsink: paso 6, imagen 2 de 3 Packard Bell ms-Hera c Disassembly, Remove the heatsink: paso 6, imagen 3 de 3
    • Remove the cooling fan.

    • Remove the heatsink.

    • Remove the screws on the connector.

  7. Packard Bell ms-Hera c Disassembly, Remove the motherboard: paso 7, imagen 1 de 2 Packard Bell ms-Hera c Disassembly, Remove the motherboard: paso 7, imagen 2 de 2
    • Remove the screws to remove the motherboard.

Conclusión

To reassemble your device, follow these instructions in reverse order.

Una persona más ha completado esta guía.

Un agradecimiento especial a estos traductores:

it en

100%

Estos traductores nos están ayudando a reparar el mundo! ¿Quieres contribuir?
Empezar a traducir ›

Smilzo

Miembro Desde 11/09/13

11,276 Reputación

39 Guías creadas

0 comentarios

Agregar Comentario

Ver Estadísticas:

Ultimas 24 horas: 1

Ultimos 7 días: 7

Ultimos 30 días: 39

Todo El Tiempo: 1,085