Saltar al contenido principal

Esta versión puede contener ediciones incorrectas. Cambie a la última instantánea verificada.

Qué necesitas

  1. , Batería: paso 1, imagen 1 de 3 , Batería: paso 1, imagen 2 de 3 , Batería: paso 1, imagen 3 de 3
    • Coloca la PSP boca abajo y localiza la tapa de la batería en el lado izquierdo del dispositivo.

    • Levante y retire la tapa de la batería para revelar la batería.

    • Retire la batería.

  2. , Caja: paso 2, imagen 1 de 1
    • Retire la etiqueta de garantía que está detrás de la batería con un spudger o con la uña.

  3. : paso 3, imagen 1 de 2 : paso 3, imagen 2 de 2
    • Desatornille los cuatro tornillos de la parte posterior de la PSP con el destornillador Phillips #00.

    • Dos están ubicados detrás de la etiqueta de garantía de la batería.

    • Dos están ubicados en el lado derecho de la PSP.

  4. : paso 4, imagen 1 de 1
    • A continuación, desatornilla los dos tornillos ubicados en la parte superior de la PSP.

  5. : paso 5, imagen 1 de 1
    • Luego, quite el único tornillo del borde inferior de la PSP (que se coloca al lado del código de barras).

  6. : paso 6, imagen 1 de 2 : paso 6, imagen 2 de 2
    • Desliza el spudger entre la carcasa exterior de la PSP, comenzando en el botón del hombro "R" y levanta suavemente la carcasa.

    • Retire la carcasa frontal por completo.

  7. , Pantalla LCD: paso 7, imagen 1 de 2 , Pantalla LCD: paso 7, imagen 2 de 2
    • Empuje la barra de inicio hacia la derecha para liberar la pestaña ubicada en el lado derecho de la pantalla LCD.

    • NO retire completamente la barra de inicio, ya que todavía está conectada por cables planos.

  8. : paso 8, imagen 1 de 3 : paso 8, imagen 2 de 3 : paso 8, imagen 3 de 3
    • Levanta lentamente la pantalla LCD de la PSP comenzando por la esquina del borde superior.

    • Una vez más, la pantalla LCD está unida por cables de cinta, así que no la quite por completo.

    • La orientación de PSP está volteada en la foto.

  9. : paso 9, imagen 1 de 2 : paso 9, imagen 2 de 2
    • Voltee los pequeños bloqueos marrones en los cuatro conectores del cable plano con un spudger o una uña.

    • Saque los cuatro cables planos.

    • Ahora quita la pantalla LCD y la barra de inicio de la PSP.

  10. : paso 10, imagen 1 de 1
    • Retire la pestaña de metal que se encuentra sobre la pantalla LCD.

    • Al volver a ensamblar, tenga en cuenta que las letras estampadas miran hacia abajo y que la lengüeta grande se ajusta justo encima de la placa base al lado derecho del gatillo izquierdo.

  11. Este paso está sin traducir. Ayuda a traducirlo

    : paso 11, imagen 1 de 1
    • Remove the screw securing 'L' trigger to the PSP.

  12. Este paso está sin traducir. Ayuda a traducirlo

    : paso 12, imagen 1 de 1
    • Remove the white plastic piece that holds the 'L' trigger in place.

  13. Este paso está sin traducir. Ayuda a traducirlo

    : paso 13, imagen 1 de 1
    • Remove the 'L' trigger from the PSP.

  14. Este paso está sin traducir. Ayuda a traducirlo

    : paso 14, imagen 1 de 1
    • Remove the screw securing the 'R' trigger.

  15. Este paso está sin traducir. Ayuda a traducirlo

    : paso 15, imagen 1 de 1
    • Remove the white plastic piece that holds the 'R' trigger in place.

  16. Este paso está sin traducir. Ayuda a traducirlo

    : paso 16, imagen 1 de 1
    • Remove the 'R' trigger from the PSP.

  17. Este paso está sin traducir. Ayuda a traducirlo

    : paso 17, imagen 1 de 1
    • Remove the screw from the bottom left edge of the PSP.

  18. Este paso está sin traducir. Ayuda a traducirlo

    : paso 18, imagen 1 de 1
    • Being careful not to break the ribbon cable, use the spudger to peel the adhesive button of the the 'L' trigger off the PSP.

  19. Este paso está sin traducir. Ayuda a traducirlo

    : paso 19, imagen 1 de 2 : paso 19, imagen 2 de 2
    • Using a fingernail or spudger, flip up the retaining bracket on the d-pad and 'L' trigger ribbon cable.

    • Lift the black plastic bracket along with the d-pad contact pad, disconnecting the ribbon cable as you lift.

  20. Este paso está sin traducir. Ayuda a traducirlo

    : paso 20, imagen 1 de 1
    • Remove the cable from the connector and remove the entire black piece from the PSP.

  21. Este paso está sin traducir. Ayuda a traducirlo

    : paso 21, imagen 1 de 1
    • Remove the screw holding the analog stick in place.

  22. Este paso está sin traducir. Ayuda a traducirlo

    : paso 22, imagen 1 de 2 : paso 22, imagen 2 de 2
    • Flip up the lock on the analog sticks ribbon cable.

    • Remove the analog stick from the PSP.

  23. , Almohadilla de botones: paso 23, imagen 1 de 1
    • Después de quitar la pantalla LCD, el panel de botones debe ser fácil de quitar.

  24. Este paso está sin traducir. Ayuda a traducirlo

    : paso 24, imagen 1 de 1
    • Flip up the lock and detach the ribbon cable above the power jack.

  25. Este paso está sin traducir. Ayuda a traducirlo

    : paso 25, imagen 1 de 1
    • Remove the screw from the power jack.

  26. Este paso está sin traducir. Ayuda a traducirlo

    : paso 26, imagen 1 de 1
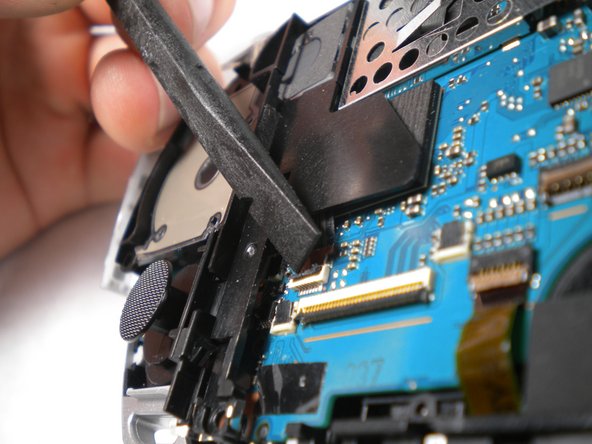
    • Carefully bend back the black tab holding the power jack in place and start pulling the jack up to release it from this clip.

  27. Este paso está sin traducir. Ayuda a traducirlo

    : paso 27, imagen 1 de 1
    • Pull the plug connecting the power jack to the motherboard.

    • Remove the power jack.

  28. Este paso está sin traducir. Ayuda a traducirlo

    : paso 28, imagen 1 de 2 : paso 28, imagen 2 de 2
    • Push the black tab at the bottom of the speaker to pop the speaker out of place, and remove the speaker.

    • The speaker is spring loaded, so be sure to keep an eye on it in case it starts doing flips into the air when you push the tab. Be careful not to lose or damage it!

    • Make sure the new/replacement speaker does not spring out during reassembly.

  29. Este paso está sin traducir. Ayuda a traducirlo

    : paso 29, imagen 1 de 1
    • Remove the cable carefully by lifting upwards from port attached to the motherboard .

  30. Este paso está sin traducir. Ayuda a traducirlo

    : paso 30, imagen 1 de 1
    • Flip up both of the locks and remove both cables as shown

  31. Este paso está sin traducir. Ayuda a traducirlo

    : paso 31, imagen 1 de 1
    • Flip up the lock and remove the ribbon cable located at the bottom edge of the PSP.

  32. Este paso está sin traducir. Ayuda a traducirlo

    : paso 32, imagen 1 de 1
    • Use a Phillips #00 screwdriver to remove the bottom left screw attached to the PSP

  33. Este paso está sin traducir. Ayuda a traducirlo

    : paso 33, imagen 1 de 3 : paso 33, imagen 2 de 3 : paso 33, imagen 3 de 3
    • Remove the screw located at the top of the power switch panel.

    • Gently lift and remove the panel from the switch side

  34. Este paso está sin traducir. Ayuda a traducirlo

    : paso 34, imagen 1 de 1
    • Remove the silver rim on the right side of the PSP.

  35. Este paso está sin traducir. Ayuda a traducirlo

    : paso 35, imagen 1 de 1
    • Remove the silver rim on the left side of the PSP.

  36. Este paso está sin traducir. Ayuda a traducirlo

    : paso 36, imagen 1 de 2 : paso 36, imagen 2 de 2
    • Remove the motherboard from the PSP

Linea de Meta

15 personas más completaron esta guía.

mbnewsom

Miembro Desde 10/28/09

3,118 Reputación

11 Guías creadas

0 comentarios

Agregar Comentario

Ver Estadísticas:

Ultimas 24 horas: 13

Ultimos 7 días: 77

Ultimos 30 días: 344

Todo El Tiempo: 43,763