Saltar al contenido principal

PSP 1000 Motherboard Replacement

Qué necesitas

  1. PSP 1000 Motherboard Replacement, Motherboard: paso 1, imagen 1 de 2 PSP 1000 Motherboard Replacement, Motherboard: paso 1, imagen 2 de 2
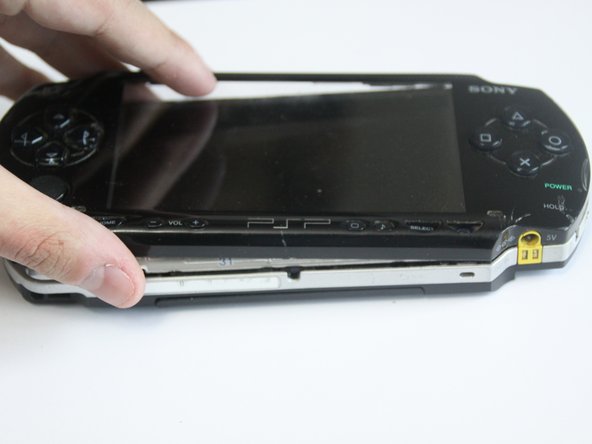
    • Remove any external cables from the device and place the device face down on a flat surface.

  2. PSP 1000 Motherboard Replacement: paso 2, imagen 1 de 2 PSP 1000 Motherboard Replacement: paso 2, imagen 2 de 2
    • Remove the battery door cover located on the left hand side.

    • Remove the battery from the device.

  3. PSP 1000 Motherboard Replacement: paso 3, imagen 1 de 1
    • Using a flat tool, remove the warranty sticker. Removing this sticker will expose two screws.

  4. PSP 1000 Motherboard Replacement: paso 4, imagen 1 de 3 PSP 1000 Motherboard Replacement: paso 4, imagen 2 de 3 PSP 1000 Motherboard Replacement: paso 4, imagen 3 de 3
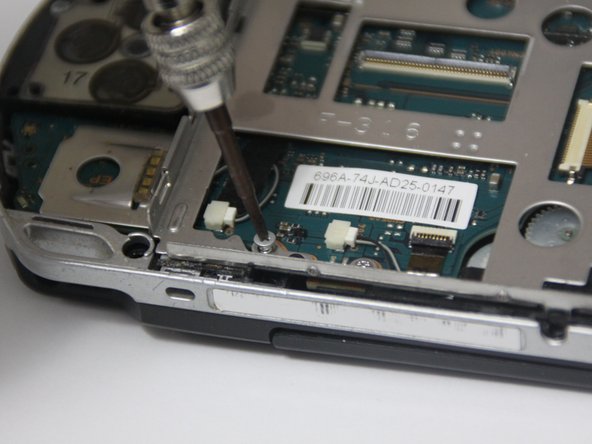
    • Using a Phillips #00 screwdriver, remove the two black 5.2 mm screws marked in red.

    • Remove the two silver 2.4 mm screws marked in orange.

    • Remove the silver 4.4 mm screw marked in yellow at the bottom of the case.

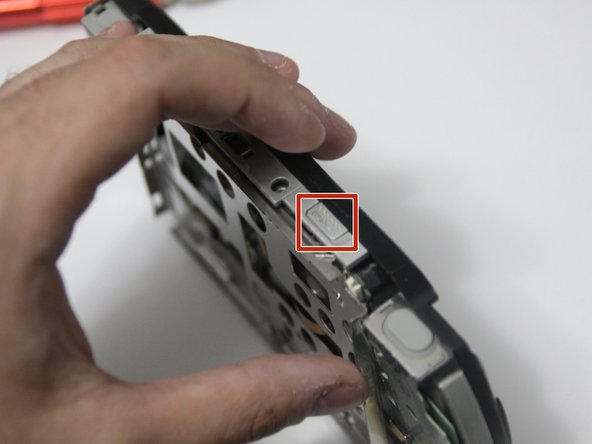
    • Remove the two black 5.4 mm screws marked in green on the back of the case.

  5. PSP 1000 Motherboard Replacement: paso 5, imagen 1 de 3 PSP 1000 Motherboard Replacement: paso 5, imagen 2 de 3 PSP 1000 Motherboard Replacement: paso 5, imagen 3 de 3
    • Use a plastic opening tool to gently pry the face plate off of the device.

    • Be gentle when prying the face plate as you do not want to crack or scratch it.

  6. PSP 1000 Motherboard Replacement: paso 6, imagen 1 de 3 PSP 1000 Motherboard Replacement: paso 6, imagen 2 de 3 PSP 1000 Motherboard Replacement: paso 6, imagen 3 de 3
    • Remove the top left and right trigger buttons by simply pulling them out.

  7. PSP 1000 Motherboard Replacement: paso 7, imagen 1 de 2 PSP 1000 Motherboard Replacement: paso 7, imagen 2 de 2
    • Using a plastic opening tool, lift the left side of the bottom circuit that includes the home, start, pause, and volume buttons.

  8. PSP 1000 Motherboard Replacement: paso 8, imagen 1 de 1
    • Disconnect the zero-insertion force (ZIF) connector by unlocking the locking tab with a plastic opening tool.

  9. PSP 1000 Motherboard Replacement: paso 9, imagen 1 de 3 PSP 1000 Motherboard Replacement: paso 9, imagen 2 de 3 PSP 1000 Motherboard Replacement: paso 9, imagen 3 de 3
    • Using a plastic opening tool, lift the LCD screen from in between the metal brackets.

    • Start at the bottom of the screen for an efficient removal.

    • Be very careful as the screen is very fragile.

  10. PSP 1000 Motherboard Replacement: paso 10, imagen 1 de 3 PSP 1000 Motherboard Replacement: paso 10, imagen 2 de 3 PSP 1000 Motherboard Replacement: paso 10, imagen 3 de 3
    • Use the plastic opening tool to unlock all the ribbon cables attached from the LCD screen to the motherboard.

  11. PSP 1000 Motherboard Replacement: paso 11, imagen 1 de 3 PSP 1000 Motherboard Replacement: paso 11, imagen 2 de 3 PSP 1000 Motherboard Replacement: paso 11, imagen 3 de 3
    • Using the Phillips #00 screwdriver, remove the two silver 4.2mm screws marked in red.

    • Remove the three silver 3mm screws marked in orange.

    • Remove the black 4.2mm screw marked in yellow.

  12. PSP 1000 Motherboard Replacement: paso 12, imagen 1 de 2 PSP 1000 Motherboard Replacement: paso 12, imagen 2 de 2
    • Once all screws are removed, gently lift the metal cage from the bottom.

    • If there is resistance, slide the open button on top of the device as it may be latched to the cage.

  13. PSP 1000 Motherboard Replacement: paso 13, imagen 1 de 3 PSP 1000 Motherboard Replacement: paso 13, imagen 2 de 3 PSP 1000 Motherboard Replacement: paso 13, imagen 3 de 3
    • Remove the single 4.4mm screw that holds the D-Pad in place using the Phillips #00 screwdriver.

    • Underneath the D-Pad, unlock the ZIF connector holding the ribbon cable in place using the plastic opening tool.

  14. PSP 1000 Motherboard Replacement: paso 14, imagen 1 de 3 PSP 1000 Motherboard Replacement: paso 14, imagen 2 de 3 PSP 1000 Motherboard Replacement: paso 14, imagen 3 de 3
    • Using a plastic opening tool, unlock the small black clip that is located underneath the circuit board.

  15. PSP 1000 Motherboard Replacement: paso 15, imagen 1 de 3 PSP 1000 Motherboard Replacement: paso 15, imagen 2 de 3 PSP 1000 Motherboard Replacement: paso 15, imagen 3 de 3
    • Using a plastic opening tool, remove the steel bracket under the right trigger.

  16. PSP 1000 Motherboard Replacement: paso 16, imagen 1 de 2 PSP 1000 Motherboard Replacement: paso 16, imagen 2 de 2
    • Use the plastic opening tool to unlock all of the ZIF connectors and disconnect all cables from the motherboard.

  17. PSP 1000 Motherboard Replacement: paso 17, imagen 1 de 3 PSP 1000 Motherboard Replacement: paso 17, imagen 2 de 3 PSP 1000 Motherboard Replacement: paso 17, imagen 3 de 3
    • Using a plastic opening tool, unclip the cable from the circuit and begin to remove any tape securing any cables.

    • Remove the single 1.5 mm screw on the bottom right of the power input using the Phillips #00 screwdriver to remove the cable.

  18. PSP 1000 Motherboard Replacement: paso 18, imagen 1 de 3 PSP 1000 Motherboard Replacement: paso 18, imagen 2 de 3 PSP 1000 Motherboard Replacement: paso 18, imagen 3 de 3
    • Above the charging input cable is the wireless antenna. Gently lift and place the wireless antenna on the left-hand side as it cannot be completely removed.

  19. PSP 1000 Motherboard Replacement: paso 19, imagen 1 de 3 PSP 1000 Motherboard Replacement: paso 19, imagen 2 de 3 PSP 1000 Motherboard Replacement: paso 19, imagen 3 de 3
    • Remove the speaker cables highlighted on the bottom middle by removing any tape.

    • Using a flat tool unclip the cables from the motherboard along with the ribbon cable on the right.

  20. PSP 1000 Motherboard Replacement: paso 20, imagen 1 de 3 PSP 1000 Motherboard Replacement: paso 20, imagen 2 de 3 PSP 1000 Motherboard Replacement: paso 20, imagen 3 de 3
    • Using your fingers or a plastic opening tool, slide the UMD drive ribbon cable from the lock to release it.

  21. PSP 1000 Motherboard Replacement: paso 21, imagen 1 de 3 PSP 1000 Motherboard Replacement: paso 21, imagen 2 de 3 PSP 1000 Motherboard Replacement: paso 21, imagen 3 de 3
    • Using the Phillips #00 screwdriver, remove the single 4.4 mm screw located on the top right of the motherboard.

  22. PSP 1000 Motherboard Replacement: paso 22, imagen 1 de 3 PSP 1000 Motherboard Replacement: paso 22, imagen 2 de 3 PSP 1000 Motherboard Replacement: paso 22, imagen 3 de 3
    • Gently lift the motherboard up and away to remove it from the device.

    • Carefully and slowly remove the motherboard as you do not want to damage anything caught onto the board.

Conclusión

To reassemble your device, follow these instructions in reverse order.

5 personas más completaron esta guía.

0 comentarios

Agregar Comentario

Ver Estadísticas:

Ultimas 24 horas: 8

Ultimos 7 días: 81

Ultimos 30 días: 370

Todo El Tiempo: 8,634