Saltar al contenido principal

OnePlus One Front Facing Camera Replacement

Qué necesitas

  1. OnePlus One Front Facing Camera Replacement, Battery: paso 1, imagen 1 de 3 OnePlus One Front Facing Camera Replacement, Battery: paso 1, imagen 2 de 3 OnePlus One Front Facing Camera Replacement, Battery: paso 1, imagen 3 de 3
    • Remove the SIM tray.

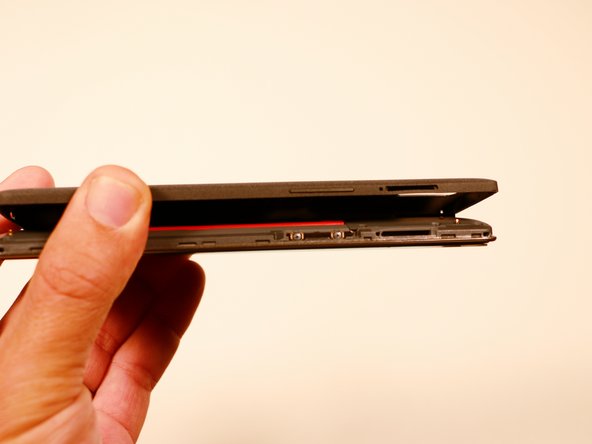
    • Using a plastic opening tool, carefully separate the back panel from the main body assembly of the phone. Be extra careful around the SIM slot or other weak areas.

    • You may encounter some resistance due to hidden locking clips around the inside edge of the phone. Not to worry; just move in one consistent direction around the phone as opposed to jumping from spot to spot!

    • Top to bottom, left to right, clockwise or counter clockwise, once we make it about half way around the device, the panel is easily removable by hand.

    • It is of utmost importance that you do not attempt to free the battery from the device at this point without proceeding to the following step! This is an integrated battery that can easily be damaged or destroyed if the proper steps are are not taken.

  2. OnePlus One Front Facing Camera Replacement: paso 2, imagen 1 de 3 OnePlus One Front Facing Camera Replacement: paso 2, imagen 2 de 3 OnePlus One Front Facing Camera Replacement: paso 2, imagen 3 de 3
    • Using a pair of tweezers, remove the plastic plugs.

    • Once the hidden screws are revealed, use a PH #00 screwdriver to remove the three 3.175mm screws.

    • Use the PH #00 screwdriver to remove the remaining six 3.175 screws.

  3. OnePlus One Front Facing Camera Replacement: paso 3, imagen 1 de 1
    • Using a plastic opening tool, gently pry up the black plastic cover and remove it from the device.

  4. OnePlus One Front Facing Camera Replacement: paso 4, imagen 1 de 3 OnePlus One Front Facing Camera Replacement: paso 4, imagen 2 de 3 OnePlus One Front Facing Camera Replacement: paso 4, imagen 3 de 3
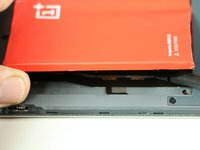
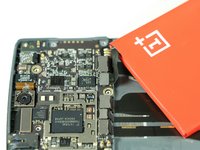
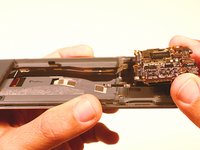
    • After we have removed the motherboard cover, we notice that the battery is intact and has a black ribbon attached to it, which is mounted on the logic board.

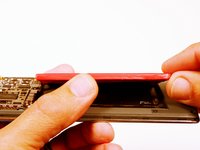
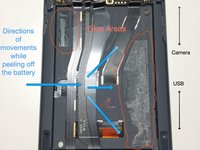
    • Using the spudger, carefully begin to lift the the battery up from the side opposite the ribbon. Be aware that there is high-grade adhesive holding the battery in its bay, so proceed with caution.

    • This battery is not encased in a hard shell so it is soft and malleable. Caution must be taken during removal so as not to cause permanent damage.

  5. OnePlus One Front Facing Camera Replacement: paso 5, imagen 1 de 3 OnePlus One Front Facing Camera Replacement: paso 5, imagen 2 de 3 OnePlus One Front Facing Camera Replacement: paso 5, imagen 3 de 3
    • Once the battery has been freed, we use the ever handy black spudger to pry up and free the battery ribbon from its dock.

    • You can disconnect the battery before freeing it to make removal easier.

  6. OnePlus One Front Facing Camera Replacement, Removal of Ribbons: paso 6, imagen 1 de 3 OnePlus One Front Facing Camera Replacement, Removal of Ribbons: paso 6, imagen 2 de 3 OnePlus One Front Facing Camera Replacement, Removal of Ribbons: paso 6, imagen 3 de 3
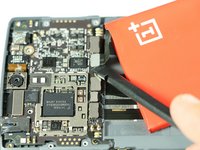
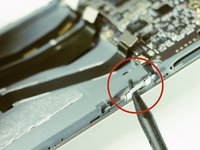
    • After the battery has been removed, use the spudger to disconnect the remaining ribbons.

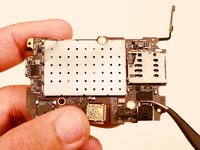
    • Notice that there are two side ribbons, one on each side (volume up/down and power), and a top ribbon as well as those from the battery compartment.

  7. OnePlus One Front Facing Camera Replacement, Removal of Motherboard: paso 7, imagen 1 de 3 OnePlus One Front Facing Camera Replacement, Removal of Motherboard: paso 7, imagen 2 de 3 OnePlus One Front Facing Camera Replacement, Removal of Motherboard: paso 7, imagen 3 de 3
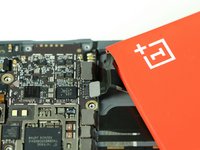
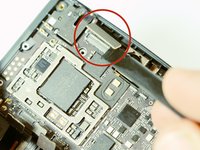
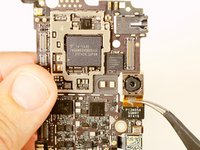
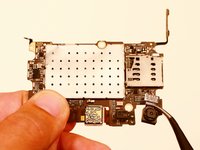
    • After removal of the ribbons, there is one final screw. Once you have removed this, the motherboard easily pries out with spudger.

    • This is the only screw that differs in size. This screw is a philips 00, 3.00 mm. in length.

  8. OnePlus One Front Facing Camera Replacement, Removal of Rear Facing Camera: paso 8, imagen 1 de 2 OnePlus One Front Facing Camera Replacement, Removal of Rear Facing Camera: paso 8, imagen 2 de 2
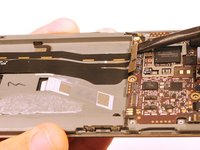
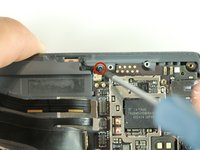
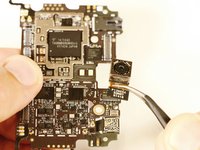
    • Once the motherboard has been removed simply pry off the rear facing camera with a spudger or angled tweezers.

  9. OnePlus One Front Facing Camera Replacement, Removal of Front Facing Camera: paso 9, imagen 1 de 2 OnePlus One Front Facing Camera Replacement, Removal of Front Facing Camera: paso 9, imagen 2 de 2
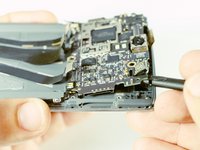
    • Once the motherboard has been removed simply pry the front facing camera off of its connector with a spudger or angled tweezers.

Conclusión

To reassemble your device, follow these instructions in reverse order.

4 personas más completaron esta guía.

Chad Jackson

Miembro Desde 09/22/14

5,347 Reputación

2 Guías creadas

Equipo

USF Tampa, Team 3-3, Brown Fall 2014 Miembro de USF Tampa, Team 3-3, Brown Fall 2014

USFT-BROWN-F14S3G3

3 Miembros

20 Guías creadas

0 comentarios

Agregar Comentario

Ver Estadísticas:

Ultimas 24 horas: 1

Ultimos 7 días: 2

Ultimos 30 días: 9

Todo El Tiempo: 4,708