Saltar al contenido principal

Olympus D590 Motherboard Replacement

Qué necesitas

  1. Olympus D590 Motherboard Replacement, Face Plate: paso 1, imagen 1 de 1
    • Remove five baseplate screws using a Phillips #00 screwdriver.

  2. Olympus D590 Motherboard Replacement: paso 2, imagen 1 de 1
    • Press and slide the battery cover retainer clip to the left. Use tweezers to lift the battery cover away.

  3. Olympus D590 Motherboard Replacement: paso 3, imagen 1 de 1
    • Remove the single screw from the battery housing using a Phillips #00 screwdriver.

  4. Olympus D590 Motherboard Replacement: paso 4, imagen 1 de 1
    • Using tweezers, lift the rubber plate to expose the ports.

  5. Olympus D590 Motherboard Replacement: paso 5, imagen 1 de 1
    • Remove two screws from the ports using a Phillips #00 screwdriver.

  6. Olympus D590 Motherboard Replacement: paso 6, imagen 1 de 1
    • Use a spudger to pry the faceplate away from the rest of the camera.

  7. Olympus D590 Motherboard Replacement: paso 7, imagen 1 de 1
    • To avoid disconnection of the connector line to the motherboard, use caution when pulling faceplate away from camera case.

    • Damage to the connector line will prevent the on/off power switch's operational function.

  8. Olympus D590 Motherboard Replacement, Motherboard: paso 8, imagen 1 de 1
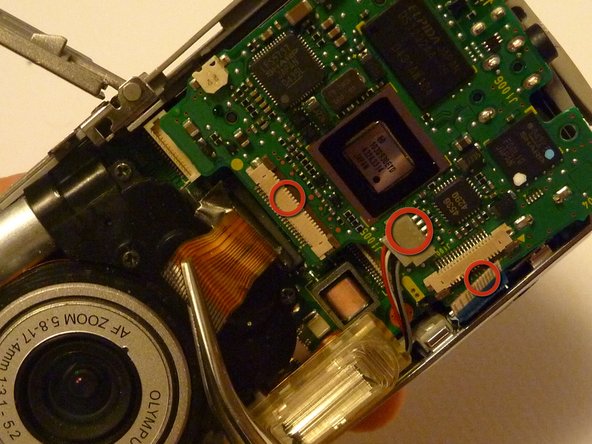
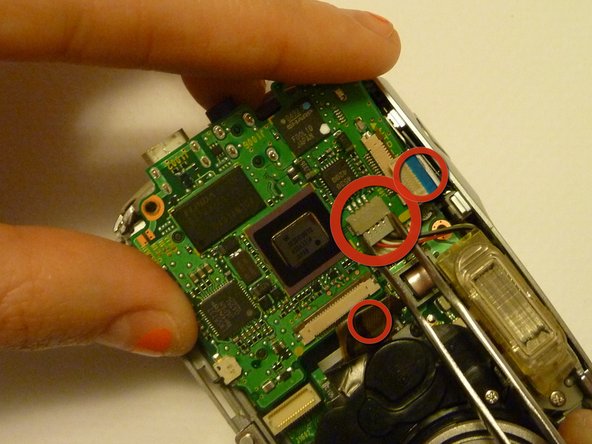
    • Remove four screws holding the motherboard to the internal housing component using a Phillips #1 screwdriver.

  9. Olympus D590 Motherboard Replacement: paso 9, imagen 1 de 1
    • Be cautious of the wires attached to the motherboard.

    • Remove the motherboard from the internal housing component.

    • Do not completely lift the motherboard out with the wiring connected. The wires must be disconnected before proceeding. The next step will demonstrate disconnection process.

  10. Olympus D590 Motherboard Replacement: paso 10, imagen 1 de 3 Olympus D590 Motherboard Replacement: paso 10, imagen 2 de 3 Olympus D590 Motherboard Replacement: paso 10, imagen 3 de 3
    • Use rounded tweezers to disconnect the three wiring strips from the motherboard.

    • Using sharp tweezers may tear wiring tape and wires.

    • Use gentle force when wiggling or pulling wiring tape and wires to disconnect from the motherboard.

Conclusión

To reassemble your device, follow these instructions in reverse order.

2 personas más completaron esta guía.

Sara

Miembro Desde 04/15/10

84 Reputación

2 Guías creadas

Equipo

Cal Poly, Team 28-23, Regan Spring 2010 Miembro de Cal Poly, Team 28-23, Regan Spring 2010

CPSU-REGAN-S10S28G23

4 Miembros

14 Guías creadas

0 comentarios

Agregar Comentario

Ver Estadísticas:

Ultimas 24 horas: 0

Ultimos 7 días: 0

Ultimos 30 días: 2

Todo El Tiempo: 1,767