Introducción
This guide will offer moderately basic steps in disassembling and replacing the charging port on the Nokia 7.1 device. Follow the steps carefully to ensure no unintended consequences arise.
Qué necesitas
-
-
Heat the back of the phone along the bottom edge. Once the adhesive is sufficiently warm, insert a pick or pry tool inbetween the seam of the back glass and the body of the phone.
-
Use the pick/pry tool to separate the back glass from the adhesive, starting at the bottom edge. Slowly move your tool around all edges of the phone, ensuring you don't insert too deep and sever any cables. It will likely be necessary to re-heat the other edges of the back glass as you are prying around the phone.
-
-
-
Once all the adhesive has separated, slowly rotate the back glass up and off the phone to the right, being careful of the ribbon cables still attached to the phone.
-
Do your best to ensure no unnecessary strain/tension is placed on any attached ribbon cables before proceeding. It may be best to set the back glass against something to hold it up while continuing.
-
-
-
-
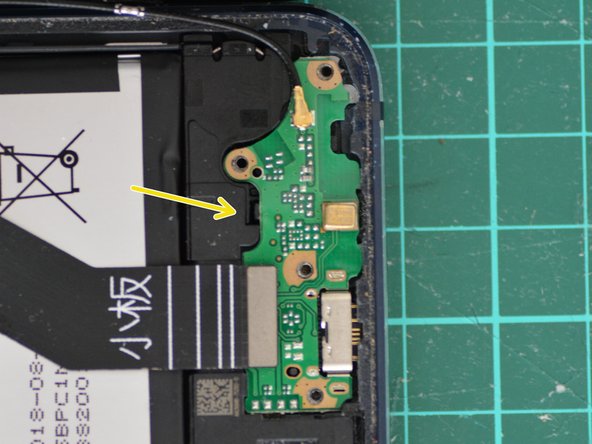
Unscrew the charging port cover at the bottom of the device. Ensure you keep track of which screws went in each specific location.
-
Red Markers - Phillips #00
-
Yellow markers - T5 Torx
-


To reassemble the device, follow these instructions in reverse.
To reassemble the device, follow these instructions in reverse.
Cancelar: No complete esta guía.
12 personas más completaron esta guía.

10 comentarios
One has to be very careful not to break the backside glass (I wasn’t that lucky). Other than that, very easy replacement
Thank you for sharing this. Where to buy a new “charging port”?
Did you find a good reseller?
Thanks
Greetings
Sorry for the delay, I bought mine form Telebit.pt
But depending from where you are i would recommend you look at local/country specific stores.
Otherwise you could always go to ebay, but you need to be more warry of parts numbers and origins.
Goat -
Hi same question where to buy the charging port ?
Thanks.
Bonjour,
Même question où avez vous acheter le port de chargement?.
Merci.
Greetings
Sorry for the delay, I bought mine form Telebit.pt
But depending from where you are i would recommend you look at local/country specific stores.
Otherwise you could always go to ebay, but you need to be more warry of parts numbers and origins.
.
Goat -
Thanks for this guide. I was able to get a replacement board from ebay. Unfortunately my back casing already had a hairline crack, which grew in the process of removing the back. I found the back to be so close-fitting I had to use an heavy duty suction cup to open up a gap in which to insert a pick. Other than that, it was just like the guide said. Thanks!
Si jamais vous voulez remplacer le port de chargement parce qu'il y a du jeu entre le câble et le port de chargement, essayez d'abord cette technique :
-démontez le module de chargement comme l'indique les étapes de ce tutoriel
-munissez-vous d'une petite pince et resserrez légèrement les parties métalliques de la prise femelle (vous pouvez tester le jeu en y branchant un câble non alimenté)
-remettez le module de chargement en place et remontez le téléphone.
Pour moi cette astuce a très bien marché et m'a évité d'acheter un module de chargement neuf.
Thanks for this detailed instruction, I managed it, but take your time - it's easy to damage if you have not got the patience and rush.
I got the charging port and tools, plus the fixing glue on E bay. Before you order check on your phone the model and hard where numbers. Settings / about phone / TA number.
Works very well. Much easier than expected (after removing the backside glass). Instead of fixing glue, I used double-sided tape, which makes future disassembling easier.