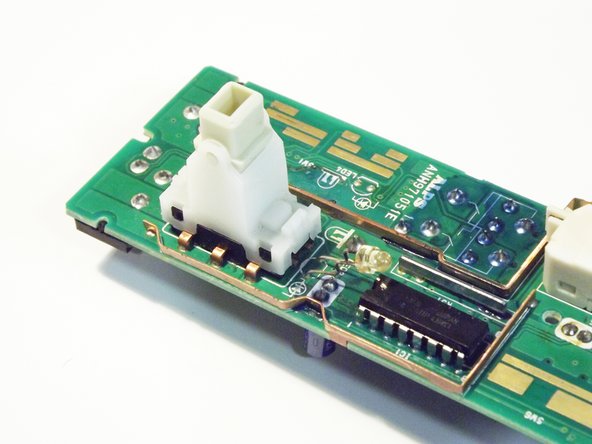
Saltar al contenido principal

Nissan Frontier 2004-2015 Faulty Power Window Switch Fix

Qué necesitas

  1. Nissan Frontier 2004-2015 Faulty Power Window Switch Fix, Nissan Frontier 2004-2015 Faulty Power Window Switch Fix: paso 1, imagen 1 de 3 Nissan Frontier 2004-2015 Faulty Power Window Switch Fix, Nissan Frontier 2004-2015 Faulty Power Window Switch Fix: paso 1, imagen 2 de 3 Nissan Frontier 2004-2015 Faulty Power Window Switch Fix, Nissan Frontier 2004-2015 Faulty Power Window Switch Fix: paso 1, imagen 3 de 3
    • Approach driver-side door controls.

    • Insert the first trim tool on the right side of the button molding.

    • Insert the second trim tool on the left, and shimmy it open.

  2. Nissan Frontier 2004-2015 Faulty Power Window Switch Fix: paso 2, imagen 1 de 3 Nissan Frontier 2004-2015 Faulty Power Window Switch Fix: paso 2, imagen 2 de 3 Nissan Frontier 2004-2015 Faulty Power Window Switch Fix: paso 2, imagen 3 de 3
    • Unplug the assembly from the door.

  3. Nissan Frontier 2004-2015 Faulty Power Window Switch Fix: paso 3, imagen 1 de 3 Nissan Frontier 2004-2015 Faulty Power Window Switch Fix: paso 3, imagen 2 de 3 Nissan Frontier 2004-2015 Faulty Power Window Switch Fix: paso 3, imagen 3 de 3
    • Pry the marked latches off on both sides to remove the molding around the button assembly.

  4. Nissan Frontier 2004-2015 Faulty Power Window Switch Fix: paso 4, imagen 1 de 3 Nissan Frontier 2004-2015 Faulty Power Window Switch Fix: paso 4, imagen 2 de 3 Nissan Frontier 2004-2015 Faulty Power Window Switch Fix: paso 4, imagen 3 de 3
    • Remove the window lock toggle by pulling it off.

  5. Nissan Frontier 2004-2015 Faulty Power Window Switch Fix: paso 5, imagen 1 de 3 Nissan Frontier 2004-2015 Faulty Power Window Switch Fix: paso 5, imagen 2 de 3 Nissan Frontier 2004-2015 Faulty Power Window Switch Fix: paso 5, imagen 3 de 3
    • Insert the U-shaped trim tool under the right latch.

    • Insert the narrow-ended trim tool between the two latches on the left.

    • Shimmy it open and repeat the process for the other side, separating the black housing from the rear casing and exposing the circuit board.

  6. Nissan Frontier 2004-2015 Faulty Power Window Switch Fix: paso 6, imagen 1 de 2 Nissan Frontier 2004-2015 Faulty Power Window Switch Fix: paso 6, imagen 2 de 2
    • Once open, three small pieces will fall out of the black housing. These are moving contacts and contact guides that are essential for the switches function. Be sure to save them.

  7. Nissan Frontier 2004-2015 Faulty Power Window Switch Fix: paso 7, imagen 1 de 2 Nissan Frontier 2004-2015 Faulty Power Window Switch Fix: paso 7, imagen 2 de 2
    • There is a white lever on the circuit board, and next to it there is an LED.

    • Bend this LED back to allow for the removal of the lever.

    • Remember to bend this back into place during reassembly.

  8. Nissan Frontier 2004-2015 Faulty Power Window Switch Fix: paso 8, imagen 1 de 3 Nissan Frontier 2004-2015 Faulty Power Window Switch Fix: paso 8, imagen 2 de 3 Nissan Frontier 2004-2015 Faulty Power Window Switch Fix: paso 8, imagen 3 de 3
    • Using a thin spudger, carefully pry these two latches off of the lever.

    • Do not pry against the copper rail marked red. Only pry against the area marked green.

    • Carefully wiggle the lever off, and remove the small metal parts from under the lever. These parts are moving electrical contacts.

    • These moving electrical contacts may fly out upon removal of the lever. Be sure to clear the area to avoid losing them.

  9. Nissan Frontier 2004-2015 Faulty Power Window Switch Fix: paso 9, imagen 1 de 2 Nissan Frontier 2004-2015 Faulty Power Window Switch Fix: paso 9, imagen 2 de 2
    • Clean each of the six contacts shown with cotton-swabs soaked in isopropyl alcohol.

    • Do not over soak the board.

    • Be sure to wear gloves.

    • After cleaning the board, let it dry for 5 minutes

  10. Nissan Frontier 2004-2015 Faulty Power Window Switch Fix: paso 10, imagen 1 de 2 Nissan Frontier 2004-2015 Faulty Power Window Switch Fix: paso 10, imagen 2 de 2
    • This step is optional, but recommended.

    • Clean the other contacts for the:

    • Driver-window power switch

    • Vehicle lock switch

  11. Nissan Frontier 2004-2015 Faulty Power Window Switch Fix: paso 11, imagen 1 de 3 Nissan Frontier 2004-2015 Faulty Power Window Switch Fix: paso 11, imagen 2 de 3 Nissan Frontier 2004-2015 Faulty Power Window Switch Fix: paso 11, imagen 3 de 3
    • Place the moving electrical contacts back into its housing as shown.

    • Snap the lever back onto its housing.

  12. Nissan Frontier 2004-2015 Faulty Power Window Switch Fix: paso 12, imagen 1 de 2 Nissan Frontier 2004-2015 Faulty Power Window Switch Fix: paso 12, imagen 2 de 2
    • Place this moving electrical contact onto the vehicle lock lever.

    • Ensure this nub sticks out this way.

    • These parts will be fastened to the driver window lever.

  13. Nissan Frontier 2004-2015 Faulty Power Window Switch Fix: paso 13, imagen 1 de 3 Nissan Frontier 2004-2015 Faulty Power Window Switch Fix: paso 13, imagen 2 de 3 Nissan Frontier 2004-2015 Faulty Power Window Switch Fix: paso 13, imagen 3 de 3
    • Press the guide (the bigger part) onto the driver-window lever as shown.

    • Position the moving contacts onto the guide as shown.

    • Ensure the assembly works by carefully pushing and pulling the buttons. It should move like this.

  14. Nissan Frontier 2004-2015 Faulty Power Window Switch Fix: paso 15, imagen 1 de 3 Nissan Frontier 2004-2015 Faulty Power Window Switch Fix: paso 15, imagen 2 de 3 Nissan Frontier 2004-2015 Faulty Power Window Switch Fix: paso 15, imagen 3 de 3
    • Ensure all LEDs on the board are positioned correctly.

    • Position the circuit board over the housing, as shown.

    • Lower the circuit board and press it down.

  15. Nissan Frontier 2004-2015 Faulty Power Window Switch Fix: paso 16, imagen 1 de 3 Nissan Frontier 2004-2015 Faulty Power Window Switch Fix: paso 16, imagen 2 de 3 Nissan Frontier 2004-2015 Faulty Power Window Switch Fix: paso 16, imagen 3 de 3
    • Snap the Rear Shielding back into place, as shown.

    • Test all the buttons, make sure that they are not jammed.

    • If they are jammed, redo the previous 5 steps.

Conclusión

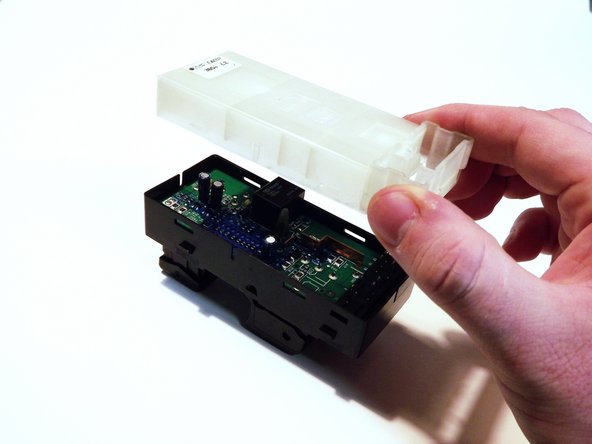
Once the power window switch assembly has been rebuilt, simply use steps 3 to 1 to help you reinstall the switches.

5 personas más completaron esta guía.

6 comentarios

Nice guide, I was able to fix a window and lock issue with a simple cleaning thanks to these well-done instructions. Thanks

Jim Vanecek - Contestar

very helpful. thank you

darryl.minsky - Contestar

I cleaned my entire assembly and my window is still stuck in my door. Switches won't work. Any chance there's a fix for the regulator wiring? I know it isn't broken. My window works just not how it's supposed to. Somehow it's doing opposite day while pressing it to go up? Highly confused?

Luke Savadyga - Contestar

big help thank you very much

kalin Mal - Contestar

Big help thank you very much

kalin Mal - Contestar

Agregar Comentario

Ver Estadísticas:

Ultimas 24 horas: 0

Ultimos 7 días: 44

Ultimos 30 días: 197

Todo El Tiempo: 11,594