Introducción
Si tienes una unidad que no gira el disco o expulsa correctamente o "come" los discos, es posible que tengas uno o dos fusibles quemados en la PCB de la unidad. ¡Esta guía te mostrará cómo probar y reemplazar esos fusibles!
Qué necesitas
-
-
Usa un spudger de metal para quitar las tapas de plástico blancas de los tornillos pegadas a la caja inferior cerca del frontal de la Wii.
-
-
-
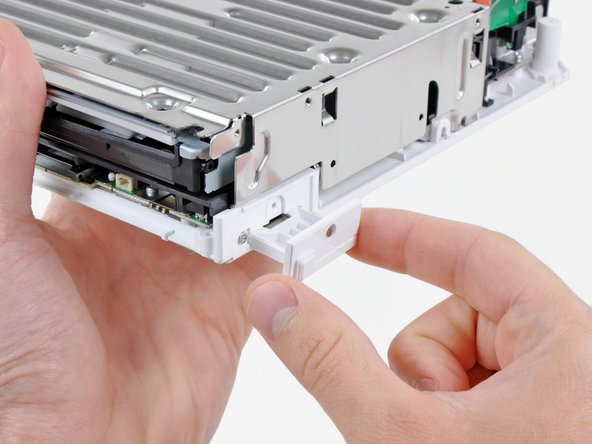
Abre la cubierta del puerto de los mandos hasta que esté en perpendicular con el engaste del puerto de mandos negro.
-
Tira de la cubierta del puerto de los mandos hacia arriba para soltarlo de la carcasa exterior.
-
-
-
-
Quita el pequeño tornillo Phillips que sujeta la puerta de la batería al panel inferior.
-
Saca la puerta de la batería de la Wii.
-
-
-
Mide a través de cada fusible con un medidor de continuidad.
-
Si alguno de los fusibles está abierto, deberás reemplazarlo con un fusible 0603; si no hay uno disponible, puedes usar una resistencia de 0 ohmios o un cable de puente para fines de prueba.
-


Para volver a armar tu dispositivo, sigue estas instrucciones en sentido inverso.
Para volver a armar tu dispositivo, sigue estas instrucciones en sentido inverso.
Cancelar: No complete esta guía.
15 personas más completaron esta guía.
Un agradecimiento especial a estos traductores:
100%

¡ Francisco Javier Saiz Esteban nos está ayudando a reparar el mundo! ¿Quieres contribuir?
Empezar a traducir ›

4 comentarios
Soldering jumpers on those fuses is easier said than done. The left-hand fuse follows the same trace all the way to the larger solder pad above, so don't worry about bridging. But it looks like there's a cap or diode along the trace of the right-hand fuse, so solder carefully! This worked great, and got my Wii drive back to spinning without spending $80 on a new drive.
If anyone could give specifications for the fuses needed, it would be very much appreciated... 0603 Fuses come in different amp ratings. I saw one person suggest elsewhere that after research he found that the ones used in this repair are 2A 0603 fuses, can anyone confirm this please before I get the wrong ones?
Thanks in advance,
James @ Retro Gaming Repair UK
I found a datasheet for littelfuse which labels the fuse as 2A. The datasheet can be found here
http://www.littelfuse.com/data/en/data_s....
Hope this helps.
Another tip for after you know the fuse is blown instead of removing the fuse and jumpering it add a little solder on both sides of the fuse then use a lead from a resister heating up the solder and push the lead from a resistor into it then do the same for the other side.
this guide assumes you have one revision of the board....i have another revision and can only find one of the resistors