Introducción
Reemplazar el panel inferior requiere la eliminación de todos los componentes dentro de la Wii.
Qué necesitas
-
-
Usa un spudger de metal para quitar las tapas de plástico blancas de los tornillos pegadas a la caja inferior cerca del frontal de la Wii.
-
-
-
Quita los dos tornillos Tri-Wing de 8.3 mm ocultos debajo de las cubiertas que acabas de quitar.
1/16 x 1 craftsman Phillips mini screwdriver works for this if you don’t have the tri-wing driver
I am using a 18ct empty egg carton to hold the screws/parts removed in the steps.
Larry’s idea about the bins was great and helpful.
Robots is right- you NEED a Y1. Just buy the thing with the drive. I didn’t, tried many other options, none worked. Had to order the thing separately with shipping. Mistake….
-
-
-
Usa un spudger de metal para quitar el pata de goma pegada al costado de la Wii cerca de la abertura de la unidad de DVD.
All of the rubber feet on my very old Wii had literally melted into a gooey mess and just needed to be scraper off and cleaned with alcohol.
-
-
-
Quita el único tornillo Phillips de 5.9 mm escondido debajo de la pata que acabas de quitar.
please help! my lil sis got a disc stuck in my wii while it was off!!! please help fast!!!
does it turn on?
-
-
-
Quita con cuidado la placa frontal del frontal de la Wii.
-
Usa un par de pinzas para desconectar el conector de plástico del cable LED de la placa base.
-
Quita la placa frontal.
surprisingly, this was the trickiest step for me. I almost completely mangled the wires when my tweezers slipped as I was attempting to remove the connector.
I removed it with a spudger, gently lift from each side until it pops out.
For those reassembling
line up the pins push it in with your spudger gently until it's in. Then line up the front plate, push gently, confirm everything is where it should be and push firmly, I found it needed a strong push to sit flush with the other body panels.
I ended up using needle nose pliars on this step.
Awesome detailed guide made this very easy, thank you author!
Can someone direct me to what I need to do? My tweezers slipped and I cut one of the wires on the connector. Where can I find a new Y plug for the wii?
This was the hardest part for me. I tried using my fingernails, two different tweezers, and needle nose pliers, but I ended up cutting both the wires. Anyway, I put some electric tape over the exposed wires and just reassembled the system. Funny thing is that the LED still works and I have not noticed any difference. I'm not sure what those wires did, but they seem to not be important.
For people still wondering after all these years, :), The connector is for the blue leds around the dvd when loading and unloading a disk.
Niels -
I also broke off the flimsy wires at the connector. To NOT break the wires, alternate pressing on the right and left sides of the connector with a small flathead screwdriver. Be patient, it will eventually work itself free. There isn't enough to grab onto with the tweezers and you'll only succeed in having them slip off, grab the wires, and yank the wires out.
Good news is that if you do rip out the wires, no worries... I didn't reconnect them and the unit works just fine. I have no idea what those wires are even for. Power LED continues to work no problem.
This guide is really marvellous - works a treat. But I would definitely recommend needle nose pliers for this step rather than tweezers. It's really easy if you use pliers and potentially damaging if not, and you get it wrong. I had one sniff at it with tweezers then immediate nipped out to the garage for my pliers!
Needlenose pliers did the trick for us!
Needlenose pliers did it for us!
You can save yourself some trouble at this point and skip the rest of the disassembly: See that green tab to the left of the sd card slot? THAT’S the wifi board (and that green tab, in hindsight, seems designed to make it accessible without taking apart the whole device, don’t you think?) A little careful spudging, and you’ve got it out, ready to replace! (There’s a guy who shows the process on youtube, if you want to review first)
I got the connector out ok thanks to the suggestions here, but I couldn’t figure out how to reattach it. In the end, I just kind of threw it in and it worked fine.
Very clear instructions - thanks! Faceplate needed replacing after one of my son’s friends accidentally kicked it across the room. $10 bucks to fix, thanks to ebay and these instructions. I’d never heard of a “tri-wing” screw before.
I just left the connector alone and kept it connected while working on it. There is enough wire to allow you to do what you need if you are just careful not to snag it on anything.
I, too, left the connector attached and just took care that the loose faceplate did not stretch the (not crucial) wire when moving rest of the Wii.
This was the trickiest part, I almost broke the wires using tweezers and pliers, so instead use a flat end screwdriver to pry it out, when putting it back in use needlenose pliers to start it then use your fingernail to go the rest of the way.
Anyone know of a method to replace the connector if you end up breaking the wires? Bits of wire are stuck in the white plastic connector, so I'm wondering if I can buy a connector online somewhere without replacing the whole face plate. Thanks :)
I severed both wires. If you want to avoid removing the connector, you can lengthen the two wires by unserpentining them from the wire holder that's in the cover.
Make sure there is no SD card in your unit before pulling this off, otherwise it'll get stuck and you could snap your sd card in half!
-
-
-
Abre la cubierta del puerto de los mandos hasta que esté en perpendicular con el engaste del puerto de mandos negro.
-
Tira de la cubierta del puerto de los mandos hacia arriba para soltarlo de la carcasa exterior.
I wasn't able to reassemble the socket covers when I reversed this step..
While disassembling, I did as instructed pulling the covers upwards when they where perpendicular to the black cover plate but Nintendos instructions says to open the covers (so that they are perpendicular to the black cover plate) and then gently push the covers towards the console with your fingers on the outside of the cover opposite side of the hinges so that the cover hinges will pop out and then lift it up..
I'm not sure, but I think ignoring Nintendos instructions caused the hinge sockets to break for me, so replacing the controller/memory card socket covers will not work.
When reassembling, the cover can be placed perpendicular to the black cover plate and rest on the plastic hinge with a few millimeters between the cover and the console, and then they can be pushed down to click in place. But in my case they keep falling all the way down since there's no resistance and nothing to click into.
-
-
-
Quita los dos tornillos restantes de 4.1mm Phillips que están en el borde superior del engaste del puerto de plástico negro.
-
Levanta el engaste por el lado alargado más alejado de los puertos de los mandos y sácalo de la Wii.
The 3rd hole is in step 3.
The bezel is the flat black plate. Removing the three screws that secure it allows you to remove it. If your cube is like mine, this plate likes where it lives and, even with the screws removed, managed to stay in situ without anything holding it.
Beware. The edge of the bezel, opposite these screws, has clips. Lift the bezel from the top edge, where the the screws are, to avoid breaking these clips.
-
-
-
Quita los siguientes tornillos:
-
Dos tornillos de 5mm Phillips
-
Un tornillo Tri-Wing de 8.2mm
Instead of the Phillips screw on the left I had a very small one under a cover to the left of that!
-
-
-
Quita los dos tornillos Tri-Wing de 8.2 mm escondidos debajo de las patas que acabas de quitar.
had a little trouble with theses screws. they were just barely too deep for my 54pies bit driver kit to reach. I ended up inserting a small wad of paper into the shaft of my driver so the tri-wing bit stuck out far enough to engage the screw. (I used the tweezers to remove the paper when I was done) :)
I can confirm, this works fantasticly!
Thank you
When putting the screws back in hold the tip still with the screw and carefully drop it in.
Thank you rbelknap, this is excellent advice for those using the ifixit branded driver.
You could also use the 4mm nut driver in the iFixit kit to turn the tri-wing driver. This will give you a little more reach.
How is no one talking about the included 4mm nut driver trick at Edward Tucker mentioned?! That is genius! Thanks mate!
Zabuza -
That's the idea that I needed. Agree with Zabuza.
cwdick -
Bingo. All of the other comments were unnecessary.
Because it doesn't come with the screw driver in the kit. Only has the tri wing and the cross tips.
This paper wad trick totally worked for me too!
Standard Tri-Wing bits will NOT fit into the holes. Make sure that you get one of the tool kits from iFixit (I just ordered the Mako Driver/Bit kit with 64 bits ) - the Tri-Wing bits in this kit have a narrow shaft that allows it to reach deep into narrow holes like these on the Wii . (Disclaimer - I have no association with iFixit).
I just sawed off a bit of the shank holder from the iFixit tool, in order for the bit to go deep enough into the case.
The tool still works fine.
The 4mm driver was the exact fix for this problem, no mods necessary
-
-
-
-
Saca la carcasa exterior del cuerpo de la Wii.
This step could use at least another picture from the backside so it's clearer what comes up and what stays down.
I used a spudger around the edges of the outer case to gently ease it upward since I could not lift it out with my fingers. Then it came right out.
Good tip. Having, in the past, broken pieces that required a little persuasion, I attempted to "lift" the outer case, but it wouldn't budge. Using the spudger to persuade it worked like a charm. Also added this suggestion to Step 18 "Lift the drive shield."
hey marko that really helped me thanks\. als if you need help figuring which side is up, its the one with the nintendo engraving on it
A fan filter fell out at this step how do you put it back?
Edit: I figured it out it was from the side intake vent. Just line up the two notches with the pegs in the case to hold it in place
This is an awful guide
-
-
-
Quita el pequeño tornillo Phillips que sujeta la puerta de la batería al panel inferior.
-
Saca la puerta de la batería de la Wii.
The screw is a PH0000 (quadruple zero) requiring an exceptionally small Phillips screwdriver to remove. If this is your first time in here in a while, this may also be a great time to change the CR2032 battery.
I was able to use the ph0 no problem.
I used a 00 with no problem.
julie -
What does this battery do? I never knew there was a battery inside of the WIi.
thje battery is used to maintain timwe and date etc
my wii survived 15 years already with the same battery
-
-
-
Quita el tornillo Tri-Wing de 8.2 mm que está escondido debajo de la puerta de la batería
The other drive cage hole is screwed in step 11, continue to reassemble.
-
-
-
Quita los dos tornillos Tri-Wing de 8.2 mm que sujetan el protector de la unidad de DVD cerca de los puertos del mando.
-
-
-
Levanta el protector de la unidad de DVD hacia arriba y quítalo de la Wii.
Be careful not to cut your fingers on the sharp edges of this metal shield. My daughter actually scraped enough skin to cause blood to drip off her finger. Then we noticed her skin stuck to the metal edge. Yuk.
True story I did it to myself lol
If the drive shield needs a little extra persuasion, us a spudger around its perimeter. Also helps prevent cuts when force meets resistance on this metal shield.
There are spring steel tabs on both sides.
-
-
-
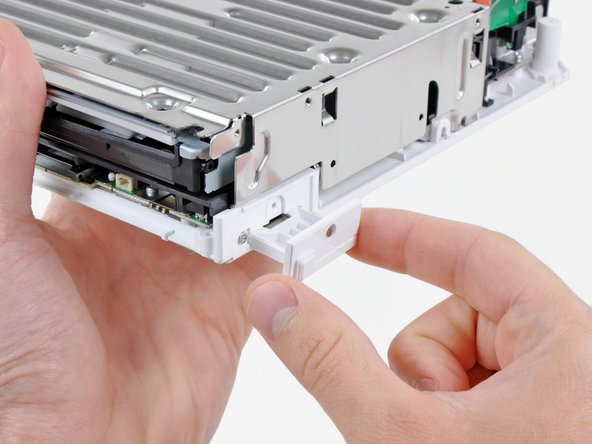
Quita los cuatro tornillos Phillips #1 de 9 mm que sujetan la unida de DVD al panel inferior.
The two left hand screws were very difficult to relocate during reassembly. I was coaching my 8 year old through this, and this was probably the only step that he couldn't do. We dropped these screws several times, and used magnets to retrieve. Miniature needle-nose pliers gripping the 'washer' surface of the screw were too wide. We managed to purchase the 'button head' of these screws with the needle-nose and drop the screws into their hole, and push with the phillips until secure. I would like to hear how others install these screws, please.
I had the same problem as you and eventually found an easy way round it. I wrote this to be added to the instructions but it was rejected: "Once the DVD drive has been removed, remove the 4 rubber washers from the screws removed earlier and insert them into your new DVD drive. Because two of the screws are difficult to reach, it is best to insert these two screws into the washers and then slide them into place ready for securing to the base plate".
The rubber washer holds the two screws roughly in position, you can then reach them with your screwdriver through the two holes (about an inch away) and finish tightening them up.
Gary -
Helpful tip: Use a magnetized screwdriver for the 2 screws nearest the DVD face because they are set in deep sockets
During reassembly, it can be tricky to position the recessed screws. To temporarily magnetize your screwdriver, rub the tip against a magnet for 5-10 seconds. (A refrigerator magnet will do.) You should then be able to put the screw on the tip and gently lower it into position.
Thanks - the refrigerator magnet trick worked for me,
Another method for getting the front screws back in is to insert a small pair of tweezers through the DVD slot to guide the screw in. I just dropped the screw in between the tweezers which held the screw just above the hole. Then I was able to use the phillips screwdriver to guide the screw into the hole and screw it in. Done in just a few seconds.
Another option would be to stick a dab of hot glue on the screw to your screwdriver and then when the screw has been driven home either the glue stays on the driver and is easily removed or it stays on the screw and you just pull it off with tweezers or needle nose pliers.
If you are disassembling your Wii because, say, a two-year-old has shovelled pennies into it (yes, that was me) you will also need to partially disassemble the drive itself, which is not covered in this guide. Luckily it's really easy. Unscrew the 4-5 larger Philips/cross head screws on the top of the frame (NOT any of the smaller darker ones) around the edges, and the frame on top of the drive will lift right off. Be careful as there is cabling running to it, so don't yank it or pull it too far off. You will now be able to get any coins or other foreign objects out.
I didn't have a magnetic screwdriver, so I applied a tiny amount of fabric glue to the head of each screw, waited a minute for it to start to harden, inserted my non-mag screwdriver into the screw head, and the screw stuck to the screwdriver long enough to insert it into the hole.
Be advised that the posts that these screws go into are very fragile and may even break. Make sure to get the little plastic pieces out if you over tighten them or they are just brittle and broken to begin with. The screws seem to be long enough to work if you do break the posts off completely.
Be careful with these screws - they seem to be quite malleable and easy to strip.
I guess this is a warning applicable to anything that has to do with plastics, but this step in particular: Be extra careful not to overtighten these screws when reassembling the unit because the plastic sockets will easily break/shatter..
-
-
-
Levanta el lado de la unida de DVD opuesta a los puertos de los mandos lo suficiente para acceder a los cables de su cara inferior.
-
Con cuidado saca el cable de alimentación de la unida de DVD de debajo de la cubierta de plástico cerca del disipador de calor.
When reversing these steps to reassemble the Wii, at this point it is possible to do a quick test before screwing the drive to the case. This will save you a lot of time if something is wrong.
Don't touch anything you don't have to while the case is off.
Carefully plug the power cable into the back of the Wii, then use a screwdriver to gently press the white button next to the glowing yellow LED on the front. You should hear the DVD drive power up and whir. Then press the white button again, wait for the yellow light to come back, and unplug the Wii.
If you didn't hear the drive start up, most likely one of the two ribbons isn't connected to the drive correctly. Doublecheck the previous 3 steps.
-
-
-
Saca el cable de alimentación de la unidad de DVd de su zócalo en la unidad de DVD.
When reversing this step, be careful re-inserting the connector. The pins are very delicate and if you aren't at the proper angle, you can bend them and ruin the drive.
The exact thing happened to me just now; I reinserted it at a (very slight) angle, and bent one of the pins at the end of the socket. Luckily, I was able to straighten it back up with a sewing needle. I made sure the spacing was consistent with the rest of the pins, and that I reinserted the connector as straight as I could, so it doesn’t happen again.
-
-
-
Usa tu uña para levantar la solapa de retención en el zócalo del cable plano de la unidad de DVD.
-
Saca el cable plano de la unidad de DVD fuera de su zócalo.
-
Quita la unidad de DVD de la Wii.
When reversing this step, make sure the ribbon is all the way in. For some reason I found positioning it with my replacement drive was much harder than with my old drive. The gentlest tug after lowering the brown clip would show that the ribbon was not actually being held tightly. I thought for a while that the clip itself was broken, but eventually I got it to hold the ribbon correctly.
Be careful with this step. I too had difficulty re-inserting the ribbon. I even popped off the brown clip and thought I broke it. Thankfully it snapped back into place.
It is difficult to tell, but be aware that the brown piece is the retaining flap, not the light piece , which is the actual socket.
Careful! When reinstalling, I think I bent and broke the ribbon. The Wii doesn't respond upon power up - I think because it doesn't see the drive.
-
-
-
Usa un par de pinzas para levantar el conector del ventilador y sacarlo de su zócalo en la placa lógica.
-
-
-
Retira los dos tornillos Phillips de 10 mm que sujetan el ventilador a la cubierta del ventilador.
-
Retira el ventilador de la Wii.
There may be a removable metal "comb" under the fan shroud, remove after removing the fan shroud when disassembling, and replace before inserting the fan shroud when reassembling: it is held in place with same screws as fan shroud.
-
-
-
Retira los tres tornillos Phillips de 10 mm que sujetan la cubierta del ventilador a la Wii.
-
Levanta la cubierta del ventilador del disipador de calor y retíralo de la Wii.
Mine (RVL-CPU-01) Is probably The first revision, and mine had another EMI Shield Under the fan shroud. I’m Guessing that they removed it in later revisions. It just fits under the shroud normally. For Pics, here is a link. Images are there soon.
-
-
-
Retira los siguientes seis tornillos que sujetan los dedos EMI al panel inferior:
-
Cuatro tornillos Phillips de 7 mm
-
Dos tornillos Phillips de 11,3 mm
-
Retira ambos juegos de dedos EMI de la Wii.
-
-
-
Retira los siguientes tres tornillos:
-
Un tornillo Phillips de 7 mm
-
Dos tornillos Phillips de 10 mm
-
Levanta el soporte de la Wii.
Be careful not to drop the 7 mm. I did and I spent 10 minutes trying to roll it and rattle it out from under the shroud, until I figured out that you can just remove the fan and shake it out of the bottom
-
-
-
Quita los tres tornillos Phillips de 10 mm que sujetan el soporte negro al panel inferior cerca del frente de la Wii.
-
Levanta ligeramente el soporte y utiliza la otra mano para retirar el clip de retención de donde las antenas Wi-Fi entran en el escudo de la placa base.
-
Retira el soporte de la Wii.
-
-
-
Levanta con cuidado la cubierta de la placa base de la placa base, prestando atención a los cables que puedan quedar atrapados.
There is a thermal pad on the WiFi chip as well! NB this because disassembling past this point requires you to also reapply a thermal pad to the WiFi chip.
When reassembling, put the wifi fingers near the battery compartment beneath the motherboard cover before screwing the cover back on. Can someone add "thermal paste" to the items needed to the top of the guide?
-
-
-
Retira los cuatro tornillos Phillips de 11,3 mm que sujetan el disipador de calor al panel inferior.
-
-
-
Levanta el disipador de calor de la placa base.
You need to use the pads. I would not recommend paste. The pre-smashed dimensions of the pads are 1.5mm thick and one is 20mmx20mm and the other is 15mmx15mm. (so, two 20x20x1.5's would have you covered easily.) Also missing is the torque on the heatsink. However there was a lot of effort on the pictures and I appreciate that!
So what is the torque spec on the heatsink then?
-
-
-
Levanta el ensamblaje de la placa base del panel inferior, teniendo cuidado con los cables que puedan quedar atrapados.
-
Queda el panel inferior.
-


Para volver a armar tu dispositivo, sigue estas instrucciones en sentido inverso.
Para volver a armar tu dispositivo, sigue estas instrucciones en sentido inverso.
Cancelar: No complete esta guía.
10 personas más completaron esta guía.
Un agradecimiento especial a estos traductores:
100%


Estos traductores nos están ayudando a reparar el mundo! ¿Quieres contribuir?
Empezar a traducir ›

3 comentarios
Hi, what is the purpose of the foam block in the last step? I've recently done a case mod, by my foam is not oriented correctly. Someone said this can cause issues. But I would like to know what exactly is its purpose.
### The small foam piece inside the Wii where the power cable plugs into serves as a cushion and helps to secure the connection.
* It helps to prevent any unwanted movement or vibrations that could potentially disrupt the power supply to the Wii console.
* The foam piece may act as a barrier to reduce the risk of any electrical interference or short circuits that could occur when plugging or unplugging the power cable.
* It's a simple but useful design element to ensure a stable and reliable power connection for the Wii console.
Die Abdeckungen sind geklebt, stecken also nicht.
Ludger - Contestar
Don’t mistakenly remove the rubber case feet
Bob Trout - Contestar
I just did. That picture could be better.
B G -
Thanks I almost removed the rubber feet
Lushane - Contestar
If you’re wondering what to use for this, the main blade of a pocket knife from the corner of the plastic works well.
Cameron Holman - Contestar
As you remove the hardware in each step, place them together on a sheet of paper and circle them with the step number.
Tom J - Contestar