Saltar al contenido principal

Nintendo NES Advantage Joystick Panel Replacement

Qué necesitas

  1. Nintendo NES Advantage Joystick Panel Replacement, Back Panel: paso 1, imagen 1 de 1
    • Remove the four sticky pads from the bottom of the device.

    • If the pads are stuck, use a spudger to remove them.

  2. Nintendo NES Advantage Joystick Panel Replacement: paso 2, imagen 1 de 2 Nintendo NES Advantage Joystick Panel Replacement: paso 2, imagen 2 de 2
    • Remove the six 8 mm screws from the bottom of the device with a Phillips #0 screwdriver.

    • Use your hands to pull the back panel away from the controller.

  3. Nintendo NES Advantage Joystick Panel Replacement, Joystick Panel: paso 3, imagen 1 de 1
    • Remove the four 12 mm screws from the small square panel on the right with a Phillips #0 screwdriver.

    • While removing the last (fourth) screw, apply downward pressure on the panel. This will make it easier to remove the last screw because of the joystick spring on the other side of this panel.

  4. Nintendo NES Advantage Joystick Panel Replacement: paso 4, imagen 1 de 2 Nintendo NES Advantage Joystick Panel Replacement: paso 4, imagen 2 de 2
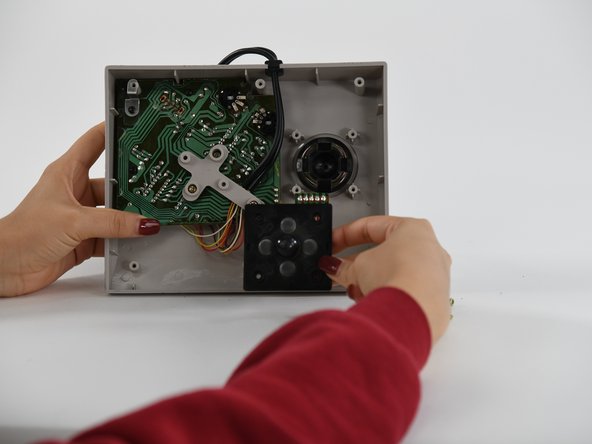
    • Remove the small square panel.

    • This panel is connected with wires to the main circuit board. To replace the joystick panel, you will need to desolder the wires. To learn more about soldering, refer to our Cómo soldar y desoldar conexiones guide.

Conclusión

To reassemble your device, follow these instructions in reverse order.

0 comentarios

Agregar Comentario

Ver Estadísticas:

Ultimas 24 horas: 0

Ultimos 7 días: 1

Ultimos 30 días: 8

Todo El Tiempo: 288