Saltar al contenido principal

Nintendo DSi XL SD Board Replacement

Qué necesitas

  1. Nintendo DSi XL SD Board Replacement, Battery: paso 1, imagen 1 de 2 Nintendo DSi XL SD Board Replacement, Battery: paso 1, imagen 2 de 2
    • Remove the two Phillips screws securing the battery cover to the back of the handheld console.

    • Lift the battery cover off the back of the DSi XL.

  2. Nintendo DSi XL SD Board Replacement: paso 2, imagen 1 de 1
    • Lift the battery from the DSi XL.

  3. Nintendo DSi XL SD Board Replacement, Lower Case: paso 3, imagen 1 de 3 Nintendo DSi XL SD Board Replacement, Lower Case: paso 3, imagen 2 de 3 Nintendo DSi XL SD Board Replacement, Lower Case: paso 3, imagen 3 de 3
    • Remove the four rubber screw covers on the lower case by prying them up with a push pin.

  4. Nintendo DSi XL SD Board Replacement: paso 4, imagen 1 de 1
    • Remove the following seven Phillips screws that secure the lower case to the rest of the DSi XL:

    • Four silver 5.3 mm screws

    • Two black 5.3 mm screws

    • One black 2.5 mm screw

  5. Nintendo DSi XL SD Board Replacement: paso 5, imagen 1 de 3 Nintendo DSi XL SD Board Replacement: paso 5, imagen 2 de 3 Nintendo DSi XL SD Board Replacement: paso 5, imagen 3 de 3
    • Turn the DSi XL over, and open the display.

    • Insert a spudger between the upper and lower case at the bottom left corner of the DSi.

    • Slide the spudger along the bottom edge of the upper case to release the latches securing the upper case to the lower case.

  6. Nintendo DSi XL SD Board Replacement: paso 6, imagen 1 de 2 Nintendo DSi XL SD Board Replacement: paso 6, imagen 2 de 2
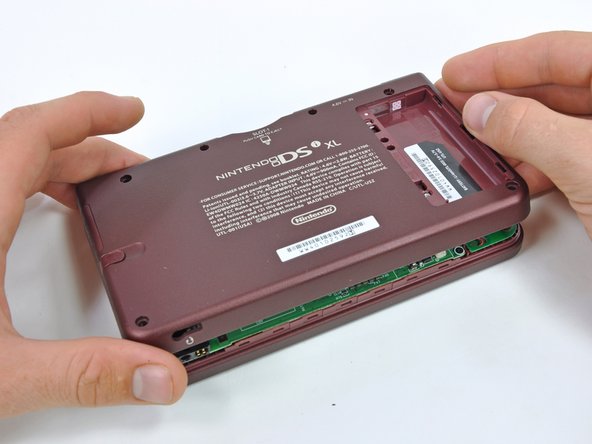
    • Close the display and turn the DSi XL over.

    • Lift the lower case from the front edge.

    • Rotate the lower case away from the DSi.

    • The lower case cannot be completely removed yet, since it is still connected to the motherboard.

  7. Nintendo DSi XL SD Board Replacement: paso 7, imagen 1 de 2 Nintendo DSi XL SD Board Replacement: paso 7, imagen 2 de 2
    • Using a spudger, pry the SD card/right shoulder button connector off its socket.

    • Pry the volume button/left shoulder button connector off its socket on the motherboard with a spudger.

  8. Nintendo DSi XL SD Board Replacement, Right Shoulder Button: paso 8, imagen 1 de 3 Nintendo DSi XL SD Board Replacement, Right Shoulder Button: paso 8, imagen 2 de 3 Nintendo DSi XL SD Board Replacement, Right Shoulder Button: paso 8, imagen 3 de 3
    • Remove the two gold 4.0 mm Phillips screws securing the right shoulder button assembly to the back case.

    • Lift the right shoulder button assembly from the back case.

    • The components of the right shoulder button assembly:

    • Right shoulder button

    • Shoulder button spring

    • Retaining pin

    • Right shoulder button holding panel

  9. Nintendo DSi XL SD Board Replacement, Stylus Housing: paso 9, imagen 1 de 1
    • Remove the stylus from its housing on the right side of the DSi XL.

  10. Nintendo DSi XL SD Board Replacement: paso 10, imagen 1 de 3 Nintendo DSi XL SD Board Replacement: paso 10, imagen 2 de 3 Nintendo DSi XL SD Board Replacement: paso 10, imagen 3 de 3
    • Remove the three 4 mm gold Phillips screws securing the stylus housing to the lower case.

    • Using a spudger, lift the stylus housing off the lower case.

    • Remove the stylus housing from the handheld console.

  11. Nintendo DSi XL SD Board Replacement, SD Board: paso 11, imagen 1 de 1
    • Lift the SD board off the lower case.

Conclusión

To reassemble your device, follow these instructions in reverse order.

Una persona más ha completado esta guía.

Brett Hartt

Miembro Desde 04/12/10

127,749 Reputación

143 Guías creadas

Equipo

iFixit Miembro de iFixit

Staff

136 Miembros

16,562 Guías creadas

0 comentarios

Agregar Comentario

Ver Estadísticas:

Ultimas 24 horas: 0

Ultimos 7 días: 12

Ultimos 30 días: 58

Todo El Tiempo: 7,544