Esta versión puede contener ediciones incorrectas. Cambie a la última instantánea verificada.
Qué necesitas
-
-
Desatornilla los dos tornillos Phillips que sujetan la tapa de la batería a la carcasa inferior.
-
Sujeta la tapa de la batería y levántala para extraerla de la carcasa inferior.
-
-
-
Usando una espátula (o tu uña), levanta la batería desde la parte superior.
-
Hay una pestaña pequeña en la parte superior de la batería para separarla más fácilmente.
-
El indicador de daño por líquido esta debajo de la batería. Haz palanca con cuidado, o podrías dañar el indicador.
-
Sujeta la batería y retírala del DSi.
-
-
-
Hay dos tornillos ocultos bajo dos pies de goma resaltados en rojo.
-
Utilice la punta de un spudger para hacer palanca los pies de goma fuera de la caja inferior.
-
-
-
-
Inserta el spudger entre la carcasa inferior y el panel inferior, cerca de la esquina superior derecha de la DSi.
-
Continúe pasando el spudger alrededor del cuerpo de la DSi hasta que la mayor parte de la carcasa inferior se haya separado.
-
Continúe pasando el spudger alrededor del cuerpo de la DSi hasta que la mayor parte de la carcasa inferior se haya separado.
-
-
Este paso está sin traducir. Ayuda a traducirlo
-
Use the tip of a spudger to pry the power board connector out of its socket on the motherboard.
-
-
Este paso está sin traducir. Ayuda a traducirlo
-
Use your fingernail or the edge of a plastic opening tool to flip up the retaining flap on power board ZIF connector.
-
After flipping up the locking tab on the socket, use your fingers or a pair of tweezers to gently pull the cable straight out of its socket.
-
-
Este paso está sin traducir. Ayuda a traducirlo
-
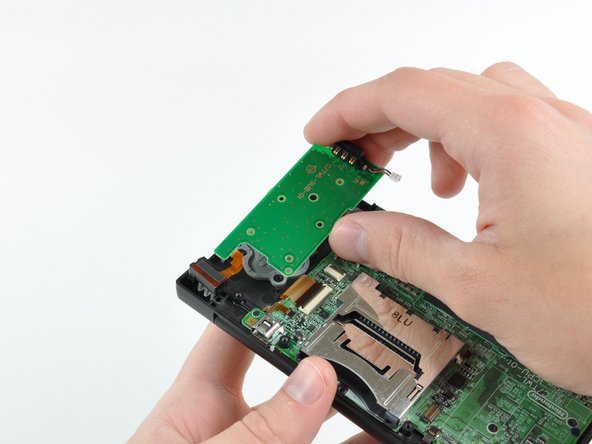
Remove the five 2.6 mm Phillips screws securing the power board to the DSi's framework.
-
Lift and remove the power board out of the DSi.
-
-
Este paso está sin traducir. Ayuda a traducirlo
-
Use your fingernail or the edge of a plastic opening tool to flip up the retaining flap on LED indicator ZIF connector.
-
After flipping up the locking tab on the socket, use your fingers or a pair of tweezers to gently pull the cable straight out of its socket.
-


Cancelar: No complete esta guía.
9 personas más completaron esta guía.

3 comentarios
So when I was attempting to repair my DSI, the red cable became unplugged and now my system won’t turn on. What can I do to fix this before I go the option of getting replaced or ordering replacement parts?
I need help. I busted off the connection of the power board to the mother board. Is there any way I can solder the red and black wires directly? Because the white piece is broken and gone now.
Hi I would like to ask about the buttons because in my case a plastic like bubble appeared on top of the contact gray button and it doesn’t make the pop sound anymore like the others that also means that it doesn’t work anymore could you help me?