Saltar al contenido principal

Nintendo DS Upper LCD Screen Replacement

Qué necesitas

  1. Nintendo DS Upper LCD Screen Replacement, Battery: paso 1, imagen 1 de 3 Nintendo DS Upper LCD Screen Replacement, Battery: paso 1, imagen 2 de 3 Nintendo DS Upper LCD Screen Replacement, Battery: paso 1, imagen 3 de 3
    • Remove the cartridge from the console.

    • Use a Phillips #00 Screwdriver to remove the screw securing the battery door to the rear case.

    • Remove the battery door.

    • In the images, it shows that the fixer is using a flathead screwdriver. This flathead screwdriver will work just like the Phillips #00 Screwdriver.

  2. Nintendo DS Upper LCD Screen Replacement: paso 2, imagen 1 de 1
    • Use a plastic opening tool or spudger to pry out the battery from the bottom. If a plastic opening tool or spudger isn't available, your fingernails may work.

  3. Nintendo DS Upper LCD Screen Replacement: paso 3, imagen 1 de 1
    • Remove the battery from the Nintendo DS.

  4. Nintendo DS Upper LCD Screen Replacement, Back Panel: paso 4, imagen 1 de 1
    • Remove the seven 6.4mm Y00 screws located on the back.

    • If your DS has a lanyard attached to it, you can remove it to make the process of opening the top-left screw easier.

  5. Nintendo DS Upper LCD Screen Replacement: paso 5, imagen 1 de 3 Nintendo DS Upper LCD Screen Replacement: paso 5, imagen 2 de 3 Nintendo DS Upper LCD Screen Replacement: paso 5, imagen 3 de 3
    • With your hands, pry the back panel off the main case.

    • Separate the back from the front, and set it aside.

  6. Nintendo DS Upper LCD Screen Replacement, Motherboard replacement.: paso 6, imagen 1 de 1
    • Using a Phillips #00 screwdriver, remove the four screws on the circuit board.

    • Be careful NOT to slip with the screwdriver, you can damage the circuit board!

  7. Nintendo DS Upper LCD Screen Replacement: paso 7, imagen 1 de 3 Nintendo DS Upper LCD Screen Replacement: paso 7, imagen 2 de 3 Nintendo DS Upper LCD Screen Replacement: paso 7, imagen 3 de 3
    • Unlock the two large ribbon cables by moving the black clip up.

    • Carefully pull the ribbon cables down and out with your fingers.

    • Do not use pliers to pull the cables, as they can be damaged easily.

  8. Nintendo DS Upper LCD Screen Replacement: paso 8, imagen 1 de 2 Nintendo DS Upper LCD Screen Replacement: paso 8, imagen 2 de 2
    • Locate the two small ribbon cables, beneath the rightmost large ribbon cable.

    • Slide the locks for the small ribbon cables down to the side, and remove the cables.

    • It may be useful to use tweezers to remove the small ribbon cables.

    • Be careful not to damage the delicate ribbon cables.

  9. Nintendo DS Upper LCD Screen Replacement: paso 9, imagen 1 de 2 Nintendo DS Upper LCD Screen Replacement: paso 9, imagen 2 de 2
    • Locate the Wifi antenna pigtail connector.

    • Remove the antenna by grasping it at the head with tweezers. Using a slight rocking motion, pull up to dislodge the connector.

  10. Nintendo DS Upper LCD Screen Replacement: paso 10, imagen 1 de 1
    • Feed the ribbon cables through the opening on the board.

    • Pull up and remove the circuit board, and set it aside.

  11. Nintendo DS Upper LCD Screen Replacement, Top LCD Screen: paso 11, imagen 1 de 3 Nintendo DS Upper LCD Screen Replacement, Top LCD Screen: paso 11, imagen 2 de 3 Nintendo DS Upper LCD Screen Replacement, Top LCD Screen: paso 11, imagen 3 de 3
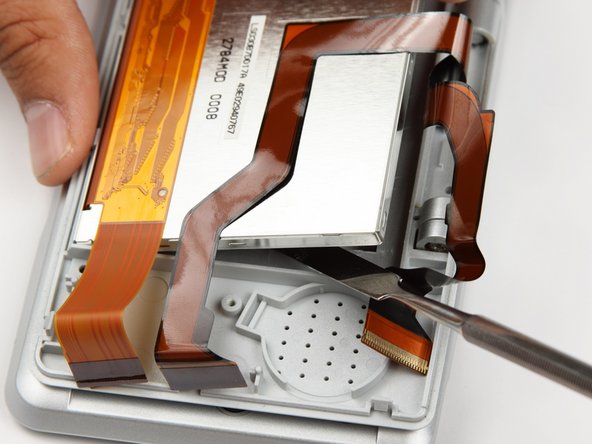
    • Use a flathead screw driver or dental tool to remove rubber covers on screen.

    • Then using a #00 screw driver remove the screws beneath.

  12. Nintendo DS Upper LCD Screen Replacement: paso 12, imagen 1 de 3 Nintendo DS Upper LCD Screen Replacement: paso 12, imagen 2 de 3 Nintendo DS Upper LCD Screen Replacement: paso 12, imagen 3 de 3
    • Using a plastic opening tool, pry the edges of the plastic case apart at the seam.

  13. Nintendo DS Upper LCD Screen Replacement: paso 13, imagen 1 de 3 Nintendo DS Upper LCD Screen Replacement: paso 13, imagen 2 de 3 Nintendo DS Upper LCD Screen Replacement: paso 13, imagen 3 de 3
    • Separate the top cover from the body.

    • Using a Phillips #00 screwdriver, remove the screw holding the hinge cover in place.

    • Remove the hinge cover and set it aside.

  14. Nintendo DS Upper LCD Screen Replacement: paso 14, imagen 1 de 2 Nintendo DS Upper LCD Screen Replacement: paso 14, imagen 2 de 2
    • Feed the ribbon cables and the Wifi pigtail cable through the opening in the hinge cover.

    • Remove the yellow spacer, and set aside.

  15. Nintendo DS Upper LCD Screen Replacement: paso 15, imagen 1 de 2 Nintendo DS Upper LCD Screen Replacement: paso 15, imagen 2 de 2
    • Using a Phillips #00 screwdriver, remove the two screws holding down the speaker circuit boards.

    • Remove the two small circuit boards and set aside.

    • Be careful of the small red and black wires connecting the two circuit boards not to break them.

  16. Nintendo DS Upper LCD Screen Replacement: paso 16, imagen 1 de 3 Nintendo DS Upper LCD Screen Replacement: paso 16, imagen 2 de 3 Nintendo DS Upper LCD Screen Replacement: paso 16, imagen 3 de 3
    • Move the black lock on the two large ribbon cables up with a pry tool, and gently pull out the two ribbon cables.

    • For the small ribbon cable, pull the lock downwards.

    • Gently pull out the small ribbon cable from the connector.

    • Set the two small circuit boards aside

    • Be careful not to damage the two delicate ribbon cables when removing them from the DS.

  17. Nintendo DS Upper LCD Screen Replacement: paso 17, imagen 1 de 2 Nintendo DS Upper LCD Screen Replacement: paso 17, imagen 2 de 2
    • Using a pry tool, gently lift the top screen out of the shell.

    • Set the top screen aside

Conclusión

To reassemble your device, follow these instructions in reverse order.

40 personas más completaron esta guía.

dnguye26

Miembro Desde 10/28/09

694 Reputación

4 Guías creadas

Equipo

Cal Poly, Team 18-3, Maness Fall 2009 Miembro de Cal Poly, Team 18-3, Maness Fall 2009

CPSU-MANESS-F09S18G3

4 Miembros

28 Guías creadas

11 comentarios

Unlike the DS Lite and later models, there is no reason to take apart the bottom portion of the original DS in order to remove the top screen. The first ten steps of this guide could be skipped.

PohTayToez - Contestar

Thanks great advice

truenhete TrueNhero -

Can a ds lite screen be used to repair a ds??

David Moore - Contestar

Nope, Nintendo engineered the Lite as a refinement of the original. Therefore almost every component is different! Likely to become cheaper to manufacture.

Del Riordan -

Can a ds lite screen be used to repair a ds one?? Lots of ds lite screens about......

David Moore - Contestar

Agregar Comentario

Ver Estadísticas:

Ultimas 24 horas: 21

Ultimos 7 días: 208

Ultimos 30 días: 1,088

Todo El Tiempo: 102,698