Qué necesitas
-
-
Coloca la 3DS boca abajo. Retira la tarjeta de juego, los auriculares, el cable de carga, el lápiz óptico o cualquier otra cosa que pueda estar conectada al dispositivo.
-
-
-
Con un destornillador JIS #000, retira los seis tornillos de 6 mm alrededor de los bordes de la cubierta secundaria.
-
-
-
-
Con unas pinzas, extrae con cuidado las cinco cintas marcadas de los conectores ZIF situados a los lados de la placa base.
-
Tres de los conectores de cinta tienen solapas de sujeción de plástico que cubren la cinta para evitar que se deslice. Utiliza las pinzas para levantarlas antes de retirar la cinta.
-
-
-
Gira con cuidado la placa base 90 grados hacia las bisagras para descubrir otros dos conectores ZIF en la parte inferior de la placa base.
-
Ambos tienen pestillos que hay que subir. El pestillo izquierdo, más largo, es negro; el derecho, más corto, es blanco. Levanta los pestillos, desliza las cintas hacia fuera y retira la placa base.
-
-
-
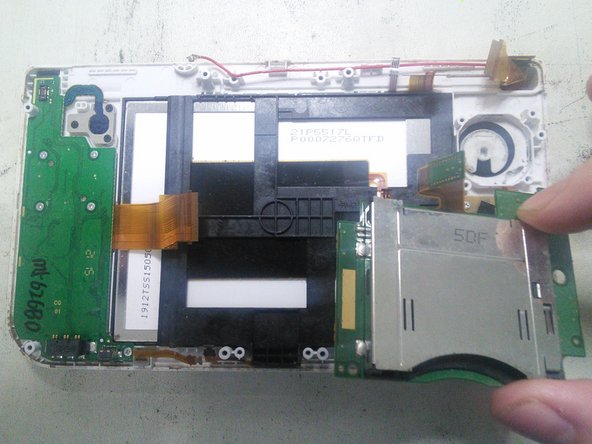
Con la ayuda de un destornillador JIS #000 quita los 3 tornillos
-
Quita a continuación el lector de cartuchos levantándolo.
-
-
-
La parte marcada en rojo es el soporte de la antena NFC. Debes quitarlo antes de continuar con el ensamblaje del LCD/digitalizador.
-
Suelta los clips de soporte de plástico de la antena NFC usando una herramienta delgada en la parte superior e inferior. Luego sepáralo.
-
-
-
Desliza una herramienta plana entre el soporte negro del LCD/digitalizador y la carcasa de la consola, luego levántala suavemente. Luego, desliza una púa de apertura debajo para sujetarla.
-
A continuación, puedes levantar todo desde abajo empujándolo hacia arriba o continuar avanzando, desenganchando todo el conjunto y extrayéndolo.
-
-
-
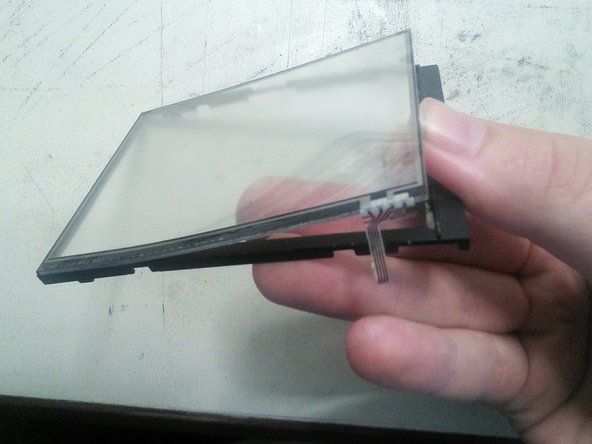
Desliza una palanca delgada entre la pantalla LCD y la carcasa negra de toda la pantalla, luego levántala suavemente. El LCD sale sin forzar.
-
-
-
Calienta los bordes de la pantalla táctil para despegarla más fácilmente y luego empújala suavemente desde abajo con los dedos para quitarla.
-


Para volver a ensamblar tu dispositivo, sigue estas instrucciones en orden inverso.
Para volver a ensamblar tu dispositivo, sigue estas instrucciones en orden inverso.
Cancelar: No complete esta guía.
16 personas más completaron esta guía.
Un agradecimiento especial a estos traductores:
100%

¡ Angel nos está ayudando a reparar el mundo! ¿Quieres contribuir?
Empezar a traducir ›

Equipo

12 comentarios
I followed this guide to the letter last night on my hyrule gold new 3ds XL (from hence forth I will refer to this unit as my “old n3dsXL”) before attempting the same repair on my new unit. It worked fine on my old n3dsXL. So I went ahead with doing the same repair on my new unit.
Well it went fine till I tried to turn it on. The blue light comes on then after a few seconds there’s a “pop” sound and the unit turns back off. Can anyone tell me what just happened here?
Also tried putting the original touch screen back in the new unit and it still does the same pop sound and shuts off
You might need to reseat the cables i had this issue on my old ds lite and my old n3ds all i had to do was that and it fixed it for me also if that doesn’t work get a cotton swab and dip it in rubbing alcohol and clean the end of the ribbon cables then re insert them.
Same thing happened to me my first time—brief blue light but would not power on. Tore it down and re-connected all the cables more carefully the second time. That fixed it.
BBW -
I just disassembled my new 3ds xl to clean my lower screen and touch sensor following this guide, it went smoothly but now everything works except the touch sensor, why??
I have done this successfully three times now—thank you for the excellent guide. Newcomers should know there is one ERROR and one OMISSION in the procedure. (1) ERROR - In Step 13, the topmost ZIF connector marked in red *does* have a clamp, unlike the other four. If you attempt to pull the connector loose without opening the clamp you will break it—see the frustrated comments to Step 13 for examples. (2) OMISSION - At Step 16, before removing the cartridge drive you must unplug the connector at the top of the component. This is shown as unplugged in the photo, but the step is missing from the written instructions. The clamp on this plug loosens on the *opposite* side from where the cable is inserted, unlike the other clamps in the guide.