Introducción
¿Estás cansado de solo poder obtener una vista superior en 2D de tus juegos? Reemplaza la pantalla LCD superior y vuelve a su experiencia de juego en 3D.
Qué necesitas
-
-
Desatornilla los cuatro tornillos Phillips #00 a lo largo de la parte superior de la tapa trasera.
-
-
-
Sujeta el borde superior de la cubierta posterior con la mano opuesta para que la cubierta no vuelva a caer en su lugar.
-
Tira de la tapa trasera hacia arriba y hacia afuera del resto del dispositivo para quitarla.
-
-
-
Inserta una herramienta de apertura de plástico en la muesca de la carcasa inferior sobre la batería.
-
Haz palanca en la batería con la herramienta de apertura de plástico.
-
Toma el borde superior de la batería y levántala para sacarla de la carcasa inferior.
-
-
-
Retira los nueve tornillos Phillips negros de 6,3 mm de la carcasa inferior.
-
Retira el tornillo Phillips plateado de 2,4 mm que se encuentra sobre la ranura del cartucho de juego.
Stuck at the same spot, those screws are in there really tight.
I had so much trouble with these screws, I gave up. Unfortunately, I can't accept failure so tried again. I figured out if you turn it right before you loosen it worked. Maybe it was just me, but I turned it right then kept pressure as I turned to loosen. I was surprised I hadn't stripped any screws out.
Does anyone have any idea of how to remove these screws. I've pretty badly stripped the screws and I've gone to 20+ pages trying to figure this. I'm considering just prying the !@#$ thing.
use a dremil and make it a flat head
ruined my screws here too...what the !@#$ nintendo?
trying to survive a nuclear meltdown inside the !@#$ thing
More like trying to subtly enforce planned obsolescence by not allowing you to make repairs to your device.
Ullyssys -
I used a #00 Philips 1/8" bit with no problem; however, the narrow diameter of the counter sunk hole can inhibit making secure contact with the screw head. You can be using the right bit (#00) but if the diameter of the bit shaft is too big you won't get proper contact.
I found this to be an excellent guide. Thanks
The screws didn't strip but the philips screw driver did? @__@
These are rough either way.
I used a "Whia 273 - PH000x40" screwdriver and held it firmly pushing the palm of my hand on the yellow end of the screwdriver and rocked the screw slightly (counter clockwise and clockwise) until it started to move. Then, without letting up on the pressure I carefully backed it out. The screwdriver is excellent because it is hardened (unlike some cheapo's out there) and the very tip is blunt not sharp. If the tip is too sharp, the point will bottom out in the screw and the sides that do all the work, won't be able to fully contact the inside of the screw. This screwdriver fits so well that the screws actually stick to it once they are removed. If the screwdriver moves AT ALL when you initially try it in the screw, STOP and find a better one. Also, start with the screws in the center, somehow they seem a little easier until you get the feel for it.
Paul -
Had the exact same problem, even tried the #000 screw driver too. Stripped the screws due to how tightly they are screwed in there and how easy they strip. I am now unsure what to do from here or if all I can do is give up.
I second the one who suggested the Whia 273 PH000x40 screwdriver. I had a terrible time unscrewing these screws, and almost stripped them using a cheaper #000 screwdriver. Also tried a 3/16" flathead and destroyed the screwdriver. I bought the Whia and glad I did. It fit perfectly and did not slip at all. DEFINITELY recommend purchasing this high-quality screwdriver. Cost about $10 but well worth it to avoid the hassle.
The best way I found that works quite well, if you find a screwdriver or bit that is good enough: hold the screwdriver or bit with tons of pressure, and rotate the 3DS clockwise! It will come out in 5-6 rotations, you can do this step in about 10 minutes this way (put down a cloth first, don't scratch the front!)
I HAVE A WAY TO GET OUT THE STRIPED SCREW. Like you, I had screwed up and tried everything to get the screw out. Do NOT try the glue in that tiny hole, you will get the screw glued permanently in there. The rubber band doesn't work in that tight space either. As desperate as I was, I was trying anything from nail polish to cramming the screw driver in as hard as I possible could. Until I realized that I had a drill. Yes, with the smallest head, I drilled into the screw a little bit, messed with the part I was trying to get out, drilled a little more, messed around, and then finally on my last attempt, I had successfully drilled off the top of the screw rendering the part free. It doesn't matter which drill you use as long as you can fit the head into the hole. Then drill forward like you are trying to drill a hole through wood. Now the only problem is that the remainder of the screw will be stuck in its place. All you really have to do is get a set of pliers and twist that puppy out. And there you go!
Got a brand new #00 screw drive and it striped the first time used it. So now I'm using eyeglass repair kit screw driver and it lasts longer that the one I got of of eBay.
And I tried all of those tactics that people have been giving and none of them are working.
Oh god, someone help i can’t get them out.
omg everyone is struggling in here smh. I used my PH000 screwdriver made sure it went in aligned to the screws and applied pressure while turning counterclockwise. once it started the screw started lifting i stopped applying pressure and they lifted beautifully. saved damaging my screws with this technique. I also used the same screwdriver size to remove the orange screw where the game slot is. Yall are welcome lol
USE A DIFFERENT SCREWDRIVER.
I was stuck on this for an hour. If your screwdriver is very thin, you won't get the grip necessary if your screws are on tight. I thought my screws were stripped but I switched to a bigger screwdriver and it was effortless. Just MAKE SURE IT IS A 00 PHILLIPS HEAD.
-
-
-
Levanta el borde inferior de la caja inferior del resto de la 3DS.
-
Usa una herramienta de apertura de plástico para hacer palanca en los cables planos de los botones laterales de sus zócalos en la placa base.
-
Retira la carcasa inferior del dispositivo.
When assembling, make sure that L ribbon is inside the case and R ribbon is not under the aluminium battery case. I got them both cut accidentally and had to replace :(
-
-
-
Retira los dos tornillos Phillips de 7,7 mm que sujetan la parte posterior del Circle Pad a la placa base.
my screws wont stop spining what to i do? i have the same problem with other screws and this leavs my joystick very loss and it is dificult to muve it becuase it is aganst the case not lifted up? any sugestions? (sorry for my bad speling jaja im very bad at speling..)
I think you stripped your screws. I think the best solution is to change the upper cover of the lower assembly and the screws. The fastest, but temporarily is to stick in some way the joystick housing to the cover, but it won’t last long, so do this only if you have to use your console while you wait the cover to come. Anyway, so not overtighten the new screws, or you will be in the same situation once again.
-
-
-
Usa el extremo plano de un spudger para sacar la parte posterior del Circle Pad de la placa base.
-
Levanta el joystick Circle Pad de la placa base y colócalo boca arriba de modo que se pueda acceder al conector del cable plano.
When reassembling verify that the circle pad control is oriented right. I had to go back in after completion when I realized it wasn't centered.
I would not disable the back side all the way because it could really mess up your 3DS.
From this step, follow this video https://youtu.be/XGdRim2Mvrk?t=627
you can skipp from step 8 to 20
lots of unnecessary steps
-
-
-
Usa el extremo plano de un spudger o la uña para levantar la solapa de retención en el conector ZIF del cable plano Circle Pad.
-
Levanta el joystick Circle Pad de la placa base.
Can you replace a zif socket? The little metal pieces on mine broke off...
YOUR &&^&@@ HAHAHAAHA, no you cant you would have to purchase a new motherboard i feek you bro happened in my first time
you might want to find someone who is skilled in component level microsoldering for that
The retaining flap on mine broke off, is there any way to fix it?
Skip steps 8 through 20. It will save a lot of time. Thanks S Maduras for the warning.
Thanks S Maduras! Your tip
made this super easy. No need for steps 8-20.
OH MY GOD THANK YOU SO MUCH!!!! I'm sure I would have destroyed my ds if I did all that
Skip steps 8-20 like they said!! Doing all those unnecessary steps wasted so so much time and frustrated me hugely by causing me to damage my microphone ribbon cable…
What do you mean by skipping 8-20? Do I not need to remove the screws in order to replace the lower LCD?
-
-
-
Usa un spudger o un destornillador para levantar las almohadillas y sacarlas del dispositivo.
When reassembling, you can use the pointy end of the spudger to align the hold again with the joystick. It’ll probably have bounced around while you’re moving other things.
-
-
-
Retira los dos tornillos Phillips de 4,5 mm que sujetan la placa SD a la placa base.
-
-
-
Inserta el extremo plano de un spudger entre la placa SD y la placa base.
-
Pasa el spudger por los lados de la placa SD para liberarla de la almohadilla adhesiva que la mantiene en su lugar.
-
Una vez liberada por completo, levanta la placa SD directamente de la placa base.
be careful on this step, the sd card board is adhered to the rf shield below it, and bay result in the shield becoming bent as it is only soldered on one side. pry from the side of the board facing the cartridge slot.
I didnt notice that and I broke the solders here :(
mine came off will this make the system not power on or make somthing not work? what do i do know?
What did come off? the sd card reader board, or the shield mentioned in the above comment?
-
-
-
Desliza el extremo plano de un spudger debajo de la esquina de la placa Wi-Fi y levántalo para separarlo de la placa base.
-
-
-
Usa el extremo plano de un spudger para sacar el conector del cable de la antena Wi-Fi de su zócalo en la placa Wi-Fi.
-
Retira la placa Wi-Fi del dispositivo.
That moment you bought all your supplies and realise while removing the wifi chip the antenna is not plugged in because you forgot to plug it in last time……… Scew me…
-
-
-
-
Sujeta el cable de cinta del micrófono cerca del micrófono con un par de pinzas.
-
Tira del micrófono hacia arriba para sacarlo de la carcasa superior.
-
-
-
Usa el extremo plano de un spudger o la uña para levantar la solapa de retención en el conector ZIF del cable plano del ensamblaje del altavoz.
-
Desconecta el cable plano del ensamblaje del altavoz con un par de pinzas.
Can there be a guide on how to replace this part? I pry on the socket accidentally.
I don't even know where they sell a new socket for this, but you'd need to have a soldering station and know how to micro solder. assuming no pads where ripped off then you'd just solder it back down. if a pad broke then you'd need to run jumpers to fix it. in short its very difficult and expensive to fix unless you have the know how and the tools already.
-
-
-
Usa el extremo plano de un spudger o la uña para levantar la solapa de retención del conector ZIF del cable plano de la cámara.
Be sure to fit the motherboard inbetween the joystick and volume slider in properly (you can double check by seeing if the volume slider on the outside goes up and down smoothly). When I closed it the first time it was stuck on full volume so I needed to go back in and readjust!
When putting the cable back I recommend to open the 3ds while keeping it face down so the cable has more room to fit.
Thank you so much, opening the 3ds is needed to fit the cable back easily.
Halefall -
The camera ribbon cable contacts face towards the motherboard, the speaker ones face away.
-
-
-
Retira los siete tornillos Phillips que sujetan la placa base a la carcasa superior:
-
Cuatro tornillos dorados de 2,5 mm
-
Dos tornillos negros de 3,5 mm
-
Un tornillo plateado de 2,5 mm.
-
Levanta el lado de la placa base que se encuentra a lo largo del borde inferior de la 3DS.
Do yourself a favor and DON'T remove the 2.5 mm silver screw (yellow circle). It just holds in a little plastic bit under the volume control. The board comes out just fine with the screw still in. If you remove it, the plastic bit will fall out at random when you turn over the case.
First time I took mine apart, I noticed something fall out later, tracked it down and then puzzled over what it was and where it came from.
There is some adhesive where the AC adapter plugs in so I recommend watching out for that
-
-
-
Usa el extremo plano de un spudger o la uña para levantar la solapa de retención en el zócalo ZIF del cable plano LCD.
Reinserting this ribbon cable is quite difficult. I found opening the case so that it sits upright at a 90 degree angle helps. The first two times I tried reassembling the top display did not work. Turned out that I was not inserting the ribbon cable in enough. I used tweezers to push this in by gently grabbing the ribbon cable. I was continually inspecting the cable for damage but apparently did not damage it. If anyone has a better idea on how to reinsert this cable I think others would greatly appreciate it.
Putting the cable back in is the hardest part out of all of this (if you can get past the screws near the beginning). If you have a friend that you trust very much and is very gentle, another pair of hands here really will help. If you're without a friend, make sure to use some flat, angled precision tweezers to push the ribbon in with one hand (pointed tweezers will do in a pinch but you'll have to be careful - I put a small dent in the ribbon and thought I'd broke it), and then use a spudge or something in the other to push the flap down.
Also worth noting is that the ribbon for the top screen also handles the 3D - if you complete the guide and find you are unable to turn the 3D effect off, you didn't insert the ribbon enough, as I had the problem and re-inserting the ribbon fully fixed it.
Careful when reassembling -- watch the position of the black wifi antenna wire! I got mine most of the way back together and noticed it wouldn't close all the way. This wire had come out of the little posts holding it in place and was wedged between the screen and motherboard. Now I have to take it all apart again to fix this.
Also if you're taking the board out of a working unit to get at the CLK signal to backup the NAND chip ("hardmod"), you don't need to remove the difficult ribbon cable in this step, or the other two wide ones at the top right from earlier. Leave them attached and swing the board out. It won't rotate a full 180 degrees to sit flat outside the unit, but you can open the screen 90 degrees to prop the rest up while having the board out on your table.
I am having problems re-inserting the three ribbon cables (3DS XL). Do you need to flip up the retaining flaps first? (I just pulled them out of the slots when removing them.
if the flap for the ribbon cable breaks what do you do
who else felt really proud after finally reinserting the cable
The easiest way to get that ribbon back in is to hold it with some reverse tweezers that I fix it sells and use it to grab the ribbon and hold it while you fiddle with getting the ribbon in the slot. It’s super easy this way. You’ll have it installed in 36 seconds. Try it. (Reverse tweezers…press to release ones)
-
-
-
Retire el conjunto de la placa base del resto del dispositivo.
Make sure when putting the motherboard back onto the bottom part of the casing that the antenna wire is where it should be - the first time I put this back together the wire got loose and was smooshed in between the casing and the Y and Power buttons, causing them to be stiff/not work. Using the spudge should help in pushing the wire back into the slots along the inside of the case.
when reassembling, watch out for the wireless on/off slider - i had started screwing things back in when i realized the slider had slipped to the wrong side, making the slider non functional. by the same token, watch out for the volume slider on the other side.
-
-
-
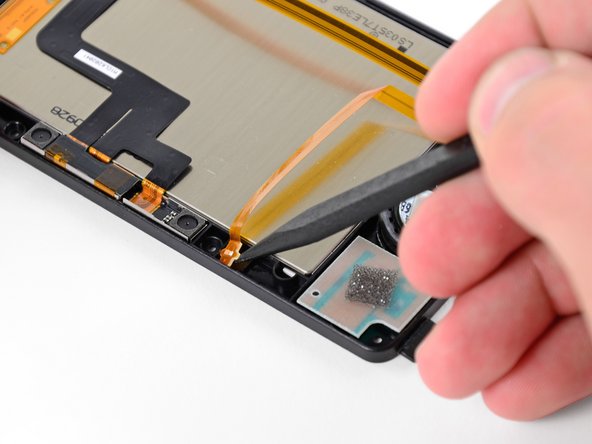
Antes de continuar con el desmontaje, usa un par de pinzas para quitar el difusor de plástico transparente del LED de notificación inalámbrica. Es probable que la pieza pequeña se caiga por sí sola y puede ser difícil de encontrar si cae al suelo.
-
-
-
Calienta los bordes del panel frontal superior de la pantalla con un secador de pelo o una pistola de aire caliente para ablandar el adhesivo que lo sujeta al bisel de la pantalla.
-
Comienza haciendo palanca en los bordes del panel frontal con una herramienta de apertura de plástico.
adhesive is definitely reusable. I just completed this step. Please make sure the new display is ready to take the tape as soon as you remove it from the old display.
Disclaimer: I replaced my front panel entirely, and threw away the old one.
-
If you do not have a replacement front panel, gently removing it (without getting the adhesive oily from your fingers/dusty) and replacing it is an option. The adhesive is incredibly tacky, and while removing the front panel will weaken the adhesive - it will likely be sticky enough to do its job. If not, double-sided tape or small amounts of water based craft glue may help (disclaimer again: I haven't tried these)- do NOT use superglues/liquid cements/epoxies.
Tai -
-
-
-
Continúa haciendo palanca en los lados restantes del panel frontal deslizando la herramienta de apertura de plástico hacia abajo en cada borde.
BE VERY CAREFUL NOT TO MELT THE SPEAKERS. This happened to me and now one of the plastic covers for the speakers is melted inside the speaker itself, despite the display cover being undamaged. It is made of a much thinner plastic and i assume it heats up faster.
-
-
-
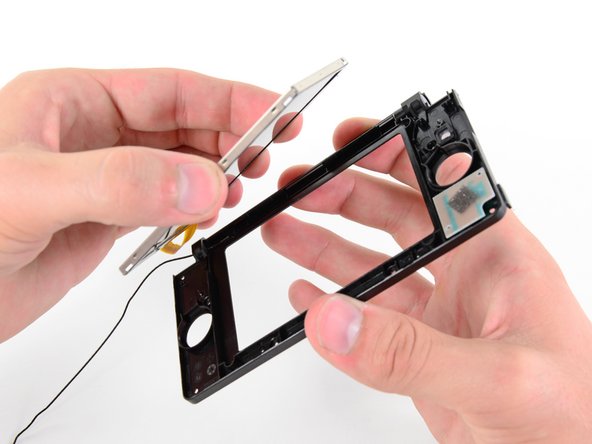
Retira los seis tornillos Phillips de 3,6 mm que sujetan el bisel de la pantalla trasera al bisel de la pantalla frontal.
-
-
-
Retira el interruptor de ajuste 3D del bisel de la pantalla frontal.
-
-
-
Inserte una sonda de metal en el espacio sobre los botones ABXY con el punto tocando la bisagra de metal.
-
Empuje la bisagra hacia el centro de la caja superior. Esto requerirá una buena cantidad de fuerza.
When reassembling you may find it difficult to get the bar back into the hole in the hinge. A couple of tips:
* Reassemble it with the clamshell pieces in a ‘closed’ position (same position that you took it apart).
* The pin/bar may have rotated slightly during disassembly (mine did). It only goes into the hole one way - the hole is actually a slot. If the alignment is off even a couple of degrees it won’t pop back in. If this happens simply lift the edge with the bar up out of the hinge and push the bar so it pops back out (like it was going into the hinge). The take a pair of pliers and gently rotate the bar to fix the alignment, pop the bar back to the ‘unhinged/open’ position, then reassemble.
-
-
-
Pasa con cuidado el cable plano del conjunto del altavoz a través del orificio en el bisel superior de la pantalla.
You may want to use small pieces of scotch tape to reinforce each individual ribbon cable before proceeding, being careful not to cover the gold contacts. The cables can be very brittle and when rolled up tightly they can crack and break like a dry leaf. The tape can be left on the cables after removal and installation.
-
-
-
Usa el extremo plano de un spudger o la uña para levantar las aletas de retención en los enchufes ZIF del cable plano de la barrera de paralaje.
-
Usa un par de pinzas de metal para desconectar los dos cables planos.
-
-
-
Usa el extremo plano de un spudger para sacar los altavoces izquierdo y derecho de sus lugares en el bisel superior de la pantalla.
-
Saca el LED de estado de la cámara del bisel superior de la pantalla con la punta de un spudger.
I accidentally broke the ribbon cable for the camera status LED, reckon I'll get away with it being broken or will it need replacing?
-
-
-
Enrolla con cuidado el cable plano de la pantalla LCD superior y el cable plano de la cámara e insértalos en la abertura de la bisagra.
This is the crazy hard part of the process. Be patient and it should eventually work. I found that reassembling but leaving all of the pieces out of the case (screen, camera harness, speaker harness) helped. It’s nearly impossible to do this if the screen is sitting in it’s normal position - the corner of the screen blocks a part of the hole. Assemble it all outside of the case, curl up the harnesses, and then work them through the hole. Once you have that done, then snake the wifi antenna through the hole. And finally place the screen into place (and the speakers/cameras/led). This probably took me an hour to figure out.
Oh, and once all of that was done *then* I worried about curling things up again and getting that black bushing over the cables. I doubt I could have done it with the bushing in place in the hole.
I’d recommend watching Daniel-Jay Pascual’s video and giving their method a shot. It did take awhile to get it just right, but I eventually got it to work. It worked best for me when I started twisting right below the contacts. As long as you are patient and don’t rush anything you’ll be fine.
When I was assembling back, when the time arrived of putting back the ribbon cables, I realized the cables need to be at specific order, otherwise they'll get tangled and will slowly slip away from the connection. I had to redo the entire process and weren't told about it until it was too late.
-
-
-
Usa un par de pinzas de metal para quitar el anillo de la bisagra de metal negro del bisel superior de la pantalla.
-
Tira con cuidado de los cables planos de la cámara y de la pantalla LCD superior a través de su orificio en el bisel superior de la pantalla.
-
-
-
Usa tus pulgares para empujar la pantalla LCD superior desde el frente hacia afuera del bisel de la pantalla superior.
-
Retira la pantalla LCD superior.
-


Para volver a armar tu dispositivo, sigue estas instrucciones en orden inverso.
Para volver a armar tu dispositivo, sigue estas instrucciones en orden inverso.
Cancelar: No complete esta guía.
63 personas más completaron esta guía.
Un agradecimiento especial a estos traductores:
100%


Estos traductores nos están ayudando a reparar el mundo! ¿Quieres contribuir?
Empezar a traducir ›

19 comentarios
Thanks very much for this. After two different electronic repair shops had refused to replace the broken top screen in the 3DS which our daughter had borrowed from a friend, I reluctantly decided try it myself, having studied this guide a couple of times.
It took me over 4 hours, almost an hour of which was just getting the 3 ribbon cables out through the hinge and back in again. It was incredibly satisfying to power it up again and have everything work. Without this detailed guide and photographs, I would certainly have given up.
Use good quality screwdrivers!
All the commentors talking about how they stripped the screws are obviously not using the correct screwdriver - they're phillips #00 screws and they come out easily. You don't need to buy an expensive speciality screwdriver, just do it properly. Make sure the driver grips the screw properly, apply a moderate amount of pressure, and turn it slowly. It isn't hard at all. The only thing I can think is that everyone stripping the screws is using one of those screwdrivers with the head shaped like an 8 pointed star. Those will strip screws easily and are easy to mistake for the usual + shaped screwdriver. The one I used comes from a Black & Decker precision screwdriver set. I think it was £7 from Homebase.
Dear colleagues of gaming
My son dropped the 3DS, and this is the result:
https://www.dropbox.com/s/0t5p5enpdu1d6g...
can you tell me your opinion, is the substitution of the lcd necessary and/or sufficient? The glass (external) is not broken.
Thank you
If its the LOWER LCD its probably fixable pretty easily but if its the UPPER LCD, buy a new DS! Or dish out the $100 for Nintendo to repair it, as its incredibly difficult to repair yourself!! As the ribbon cables are not just hard to get them rehooked up, its that there VERY DELICATE too and its very easy to tear one or more also then you going to need to buy new parts... Like I say having a authorized Nintendo repair service place is the way to go for a damaged UPPER LCD!
where is the best place to purchase the replacement screen?
Changing the upper LCD on the standard 3DS is like 4-5 hours, god! I would never do this on my life if this happens, instead on the 3DS XL, its 45 min. - 2 hours
THANK YOU! I got a 3DS with a broken top screen. I followed your guide and I could change it without problems.
If you have to replace a upper LCD its probably worth it to dish out the $100 for Nintendo repair service as the ribbon cables are a pain in the (BEEP) to get them right and if anything is just a tad off it wont work!! The difficulty to do this correctly is BEYOND EXTREMELY HARD, its like almost UNIMAGINABLE to get everything back correctly especially the routing and connecting the ribbon cables!! Just ... If you have to use Nintendo repair make sure you haven't done to much tampering with your system for the repair service to detect it as if they do they'll return it to you indicating it was tampered with. As most companies wont repair (even if its outta warranty) a device that has been tampered with! Or if you don't care about loosing your games that you downloaded onto your DS, Id suggest just purchasing a new DS system all together as the repair of a upper LCD is like I say a TRUE NIGHTMARE!
How do I put it all back?
My husband accidentally broke the ribbon cable to the new lcd while trying to reassemble. Is there any way to fix it? Or is it possible to swap the cable from the other lcd we were replacing? Don't want to buy another screen…
Did this today, it took about four and a half hours. By far the most difficult thing is curling those cables through the hinge hole. That took a good hour to figure out. Read the comments that are with that step, it’ll help. There is no way I would have figured this all out without this guide - thank you! The 3DS powered up and worked great! (Well, after I took it back apart to slot the volume slider to hit the switch correctly. And then took it apart one more time to fix the buttons that had become displaced while I was fixing the volume switch). :)
So 90% of the work here is feeding the ribbon cables through the hinge. Other than that it took me an less than hour to disassemble and assemble again. Those cables took me about 2 hours to get rolled correctly to be able to feed them though and an hour to get them out without causing any damage. A speaker wire did break from the solder when it jumped on to the screen but that was a quick 5 minute repair. I would say overall not a hard repair, You just have to take it slow cause of all the fragile ribbon cables… As for engineering recommendation make the robin cables detachable from both ends Nintendo.
Just finished to repair a broken console that I bought at a ridiculously low price (10€).
Really hard to do, you need more than patience, especially with this $@$*!& ribbons cables.
It took me over at least 4 hours, and the replacement screen from aliexpress is a little yellowish, but everything work fine and I’m happy :)
I have a nightmare with the top screen ribbons and I don't even know how to fit the sound cable ribbon in the edge of the top screen I really screwed everything up I wish I had a time machine.
I will never want to do this repair again. Took around 3 hours and 15 minutes, which included a 20 break for the thought of killing the 3ds. I had that one ribbon cable upside down for the speakers. Works great now, but insanely tedious especially for the ribbon cables through the hinge.
be warned the SD card slot is very hard to reconnect due to it being under the analog stick. The guy in the video made me so hard i want to call him daddy
#00 screwdriver is too big... probably need a #000
thomascroguennec - Contestar
#00 will work - but you must press down firmly and sort of jerk the screw out a few degrees at a time. If you don't press firmly, the screws strip very easily. Using #000 will strip the screws more easily.
Tai -
I used a #0 without any issues and 0 stripped. I used the #0 for all screws internally and externally. The head was sharp and I applied adequate amounts of pressure when loosening the screw.
Ben Kevan -
The correct screwdriver should be a JIS, or you can get a screwdriver specific for the 3DS from other sites for less than $2
Oscar - Contestar
do you have to buy it
deeznuts -
Where would I buy a screwdriver specifically for the 3DS? Also would it work on the DS? I need to replace the battery for my DS.
Caitlin Lumsden -
I used Phillips #000 and it worked like a charm, i need to order a new SD board or do you guys think i should send it. What happened is that it got water damaged and everything works fine when i opened it everything looked fine no signs of water corrosion everything on the 3DS works exept it always give me a message saying the SD card is locked and i know for a fact it isnt locked i already tried using 3 different SD cards and none of them are lock protected and yes they are formatted as well. I need help
Leo Torres - Contestar
there's a switch on the SD card, switch it and it will be unlocked again. it happened to me once too.
Bagel -
david hodson you are incredible. literally all you need to do is heat the screen up and pry it off and you make them take apart the whole thing
melody - Contestar
You've done this?
magykmaster -
I have to ask the same question. If just the glass display is broken, and you're heating it up to remove the glass, is it really necessary to remove everything? Doesn't like like it is necessary
Wade -
I just did it your way and it went fine. didnt even have to remove the battery. This is incredible misstep on the authors part.
patrick -
only take out the screen for a motherboard removal? Are you using the wrong guide or was this guide used for two different repairs?
Reed Deemer -
I used a PH0x50, but it wasn't easy.
John - Contestar
This may be a dumb question but where do I buy the 3DS upper screen?
John - Contestar
eBay... Just do a search for the 3DS Upper screen. $9.49 & it comes with the tools.
Gary Darnell -
The LCD screen I ordered came with all the tools I needed except a pair of tweezers. All in all it was about $14.00 and a little bit of my time.
Gary Darnell - Contestar
Does anyone know where I can find the right bumper button for a 3ds? I can't find it on ebay must of damaged it playing smash bros.
Steven Castro Parrilla - Contestar
Really wish I had read the comments first... How about instead of the warning saying to press down hardly and go slow, you say to use the correct screwdriver size like others mentioned in the comments. I not only stripped multiple screws, even after putting a glove on for more pressure, I bent my screwdriver from pressing down so hard. Granted it's a cheap jeweler's kit screwdriver, but it still would've been nice to not have that problem and be informed of the right size in the first place.
hockeymorgan35 - Contestar
Got my tools one day after ordering, as I live a couple hours away from the supplier, Will post again when i try guide.
nintendokakashi - Contestar
I tried doing this with a #00 Philips but it just didn't turn
Acrobatic Mars01 - Contestar
Hello there, I need some assistance I have done a full housing replacement I have everything working except the 3d slider . The 3D option is always on can someone let me know which flex it is or what I am forgetting . Thanks guys !
Noe Ibarra - Contestar
The 3D light lets you know there is a 3D option available for the current game you’re playing. Usually, it is always on, except when you’re playing a game that doesn’t support 3D. Turning the 3D slider off does not turn off the 3D LED.
Scott D -
I've always been lucky with these four, and at the time it was my first disassembly so I didn't know what stripping a screw was!
FarmYard Gaming - Contestar
These screws don't strip easily, however, the screws at step 4 do.
TheBlueInkling -