Saltar al contenido principal

Nikon Coolpix S9050 Menu Wheel and OK Button Replacement

Qué necesitas

  1. Nikon Coolpix S9050 Menu Wheel and OK Button Replacement, Menu Wheel and OK Button: paso 1, imagen 1 de 3 Nikon Coolpix S9050 Menu Wheel and OK Button Replacement, Menu Wheel and OK Button: paso 1, imagen 2 de 3 Nikon Coolpix S9050 Menu Wheel and OK Button Replacement, Menu Wheel and OK Button: paso 1, imagen 3 de 3
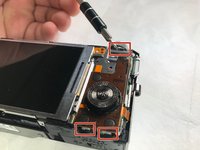
    • Using a Phillips #000 screwdriver, remove the two 3.2mm black screws on both sides of the camera.

    • Set the camera face down and remove the four 3.2mm silver screws using the same screwdriver.

  2. Nikon Coolpix S9050 Menu Wheel and OK Button Replacement: paso 2, imagen 1 de 1
    • Remove the display frame and trim from the main body of the camera.

  3. Nikon Coolpix S9050 Menu Wheel and OK Button Replacement: paso 3, imagen 1 de 3 Nikon Coolpix S9050 Menu Wheel and OK Button Replacement: paso 3, imagen 2 de 3 Nikon Coolpix S9050 Menu Wheel and OK Button Replacement: paso 3, imagen 3 de 3
    • Press down and pull the Menu Wheel/OK Button panel toward the screen.

    • This releases the panel from the slots.

  4. Nikon Coolpix S9050 Menu Wheel and OK Button Replacement: paso 4, imagen 1 de 3 Nikon Coolpix S9050 Menu Wheel and OK Button Replacement: paso 4, imagen 2 de 3 Nikon Coolpix S9050 Menu Wheel and OK Button Replacement: paso 4, imagen 3 de 3
    • Lift the black plastic tabs, which are securing the panel.

    • Gently pull the panel out to separate the display ribbon cable from the camera body.

Conclusión

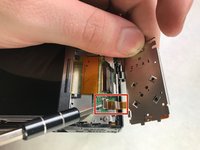
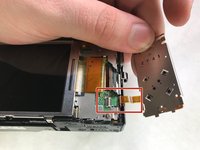
To reassemble your device, follow these instructions in reverse order.

Una persona más ha completado esta guía.

Catrionna Bruce

Miembro Desde 11/01/18

226 Reputación

2 Guías creadas

Equipo

IUPUI, Team S3-G3, Harley Fall 2018 Miembro de IUPUI, Team S3-G3, Harley Fall 2018

IUPUI-HARLEY-F18S3G3

3 Miembros

4 Guías creadas

0 comentarios

Agregar Comentario

Ver Estadísticas:

Ultimas 24 horas: 0

Ultimos 7 días: 2

Ultimos 30 días: 6

Todo El Tiempo: 547