Saltar al contenido principal

Nikon Coolpix S51c Motherboard Replacement

Qué necesitas

  1. Nikon Coolpix S51c Motherboard Replacement, Back Cover: paso 1, imagen 1 de 2 Nikon Coolpix S51c Motherboard Replacement, Back Cover: paso 1, imagen 2 de 2
    • First, use a Phillips #00 screwdriver to remove all five screws that are located at the bottom of the camera.

  2. Nikon Coolpix S51c Motherboard Replacement: paso 2, imagen 1 de 1
    • Next, slide the battery door open in the direction of the arrow to reveal a hidden screw on the opposite side of the orange lever.

    • Remove this screw using the Phillips #00 screwdriver.

  3. Nikon Coolpix S51c Motherboard Replacement: paso 3, imagen 1 de 1
    • Rotate the camera to find the side panel with the lanyard attachment.

    • Detach the side panel by the lifting bottom corner slightly with the spudger.

  4. Nikon Coolpix S51c Motherboard Replacement: paso 4, imagen 1 de 1
    • Lift the back cover.

    • Be careful not to rip the orange cables between the camera and the back cover.

  5. Nikon Coolpix S51c Motherboard Replacement: paso 5, imagen 1 de 1
    • With the back cover lifted, lift the black flap that connects the ribbon to the motherboard with the spudger.

    • Carefully remove the back cover.

  6. Nikon Coolpix S51c Motherboard Replacement, Lens: paso 6, imagen 1 de 3 Nikon Coolpix S51c Motherboard Replacement, Lens: paso 6, imagen 2 de 3 Nikon Coolpix S51c Motherboard Replacement, Lens: paso 6, imagen 3 de 3
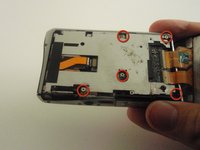
    • Remove the five screws on the metal plate.

    • One of them is in a hole in the corner of the metal plate.

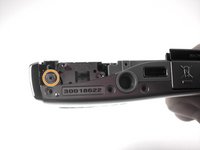
    • Remove the screw at the bottom of the camera.

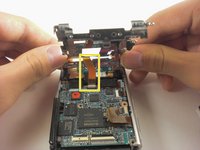
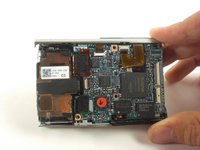
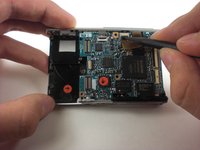
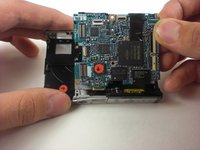
    • Carefully lift the metal plate from the right side to reveal a ribbon connected to the motherboard.

  7. Nikon Coolpix S51c Motherboard Replacement: paso 7, imagen 1 de 2 Nikon Coolpix S51c Motherboard Replacement: paso 7, imagen 2 de 2
    • Lift the white flap with the spudger to release the ribbon.

    • Remove the back metal plate.

  8. Nikon Coolpix S51c Motherboard Replacement: paso 8, imagen 1 de 3 Nikon Coolpix S51c Motherboard Replacement: paso 8, imagen 2 de 3 Nikon Coolpix S51c Motherboard Replacement: paso 8, imagen 3 de 3
    • Lift the two ribbons with the spudger to disconnect the lens and pull it out.

  9. Nikon Coolpix S51c Motherboard Replacement, Motherboard: paso 9, imagen 1 de 2 Nikon Coolpix S51c Motherboard Replacement, Motherboard: paso 9, imagen 2 de 2
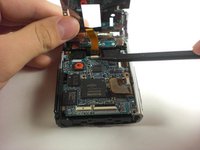
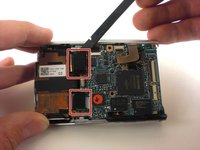
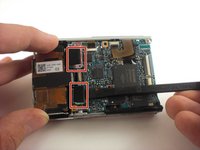
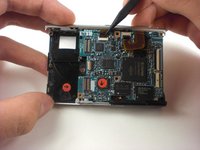
    • Lift two flaps with the spudger on the top of the motherboard to release ribbons.

  10. Nikon Coolpix S51c Motherboard Replacement: paso 10, imagen 1 de 2 Nikon Coolpix S51c Motherboard Replacement: paso 10, imagen 2 de 2
    • lift motherboard from the top to remove it from the camera.

Conclusión

To reassemble your device, follow these instructions in reverse order.

Ryan

Miembro Desde 04/12/11

155 Reputación

6 Guías creadas

Equipo

Cal Poly, Team 18-24, Garner Spring 2011 Miembro de Cal Poly, Team 18-24, Garner Spring 2011

CPSU-GARNER-S11S18G24

4 Miembros

6 Guías creadas

0 comentarios

Agregar Comentario

Ver Estadísticas:

Ultimas 24 horas: 0

Ultimos 7 días: 2

Ultimos 30 días: 4

Todo El Tiempo: 1,852