Saltar al contenido principal

Nikon Coolpix P4 Flash Bulb Replacement

Qué necesitas

  1. Nikon Coolpix P4 Flash Bulb Replacement, Battery: paso 1, imagen 1 de 1
    • 'Click' the battery door over to the side.

  2. Nikon Coolpix P4 Flash Bulb Replacement: paso 2, imagen 1 de 1
    • Open the battery door. Inside is the memory card and the battery.

    • Click over the orange tab and take out the battery.

    • Close the battery lid by pushing it down and sliding it back.

  3. Nikon Coolpix P4 Flash Bulb Replacement, LCD Screen: paso 3, imagen 1 de 1
    • Remove the four screws located on bottom of camera. (.086in screws)

  4. Nikon Coolpix P4 Flash Bulb Replacement: paso 4, imagen 1 de 2 Nikon Coolpix P4 Flash Bulb Replacement: paso 4, imagen 2 de 2
    • Remove the two screws, then remove the panel. (.113in screws)

  5. Nikon Coolpix P4 Flash Bulb Replacement: paso 5, imagen 1 de 3 Nikon Coolpix P4 Flash Bulb Replacement: paso 5, imagen 2 de 3 Nikon Coolpix P4 Flash Bulb Replacement: paso 5, imagen 3 de 3
    • Remove panel on right side (front view) by removing these two screws. (.196in screws)

    • Remove single screw set underneath panel. (0.083in screw)

  6. Nikon Coolpix P4 Flash Bulb Replacement: paso 6, imagen 1 de 1
    • Remove the two screws attaching the back panel to the body on the left side. (.188in screws)

  7. Nikon Coolpix P4 Flash Bulb Replacement: paso 7, imagen 1 de 1
    • Gently pull off back cover

  8. Nikon Coolpix P4 Flash Bulb Replacement: paso 8, imagen 1 de 2 Nikon Coolpix P4 Flash Bulb Replacement: paso 8, imagen 2 de 2
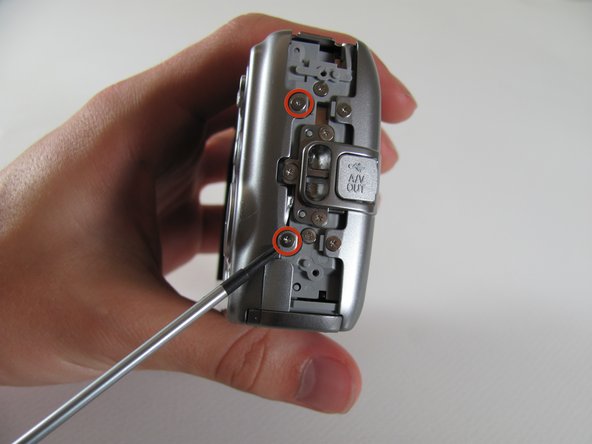
    • Then remove the three screws on the A/V Out tab (left side). (.188in screws)

    • Remove tab.

  9. Nikon Coolpix P4 Flash Bulb Replacement: paso 9, imagen 1 de 1
    • Remove the two screws attaching the front panel to the body on the left side. (.18in screws)

  10. Nikon Coolpix P4 Flash Bulb Replacement: paso 10, imagen 1 de 1
    • Flip up front panel.

    • There should be wires still attaching the panel to body. DO NOT TRY TO PULL OFF COMPLETELY

  11. Nikon Coolpix P4 Flash Bulb Replacement: paso 11, imagen 1 de 1
    • Remove three screws as shown. (Right screw:0.084in, Left screw:0.088in, Middle screw:0.114in)

  12. Nikon Coolpix P4 Flash Bulb Replacement: paso 12, imagen 1 de 1
    • Carefully pull orange LCD connector up and out of the port.

    • Be careful to pull vertically while pushing the black tab upwards

  13. Nikon Coolpix P4 Flash Bulb Replacement: paso 13, imagen 1 de 1
    • Remove the screw below the LCD (.124in)

  14. Nikon Coolpix P4 Flash Bulb Replacement: paso 14, imagen 1 de 1
    • Carefully pull out the plug connecting the LCD to the motherboard.

  15. Nikon Coolpix P4 Flash Bulb Replacement: paso 15, imagen 1 de 1
    • You can now remove the LCD from the camera body.

    • Insert new LCD and reassemble using the steps in reverse order.

  16. Nikon Coolpix P4 Flash Bulb Replacement, Motherboard: paso 16, imagen 1 de 1
    • Remove the screw to the right of the flash.

    • Remove the screw to the right of the microphone on the bottom. (0.124in)

  17. Nikon Coolpix P4 Flash Bulb Replacement: paso 17, imagen 1 de 1
    • Remove the two screws on the right side of the camera. (0.115 in screws)

  18. Nikon Coolpix P4 Flash Bulb Replacement: paso 18, imagen 1 de 1
    • Remove the four bottom screws (0.116in [fat head]-center screw, 0.112in [skinny head]-other screws).

  19. Nikon Coolpix P4 Flash Bulb Replacement: paso 19, imagen 1 de 1
    • Remove the 7 screws from the back of the camera (0.111in screws).

  20. Nikon Coolpix P4 Flash Bulb Replacement: paso 20, imagen 1 de 1
    • Remove the plug that connects the lens to the left side of the motherboard by firmly grasping the plug's base and pull it gently away from the camera.

  21. Nikon Coolpix P4 Flash Bulb Replacement: paso 21, imagen 1 de 1
    • Remove the right panel.

  22. Nikon Coolpix P4 Flash Bulb Replacement: paso 22, imagen 1 de 1
    • Remove the screw from the top of the camera (0.112in screws).

  23. Nikon Coolpix P4 Flash Bulb Replacement: paso 23, imagen 1 de 1
    • Remove the three screws from the motherboard (0.112in screws).

    • Detach the orange tab with the foam on top. It will click out of place.

  24. Nikon Coolpix P4 Flash Bulb Replacement: paso 24, imagen 1 de 1
    • Remove the motherboard by pulling it up and out of the port.

  25. Nikon Coolpix P4 Flash Bulb Replacement: paso 25, imagen 1 de 1
    • Carefully remove the tab that connects the flash to the motherboard from the port by gently pulling the connector to the right and out of its port.

  26. Nikon Coolpix P4 Flash Bulb Replacement: paso 26, imagen 1 de 1
    • Remove the motherboard from the camera body.

    • Replace it with a new motherboard.

    • Follow the steps in reverse order to reassemble it.

  27. Nikon Coolpix P4 Flash Bulb Replacement, Lens: paso 27, imagen 1 de 1
    • Remove the orange plug by carefully pulling it out. It snaps in and out of place.

  28. Nikon Coolpix P4 Flash Bulb Replacement: paso 28, imagen 1 de 1
    • Remove flash unit from it's place in the camera.

    • The flash unit is still attached to the camera.

  29. Nikon Coolpix P4 Flash Bulb Replacement: paso 29, imagen 1 de 1
    • Remove the lens from the camera.

  30. Nikon Coolpix P4 Flash Bulb Replacement, Flash Bulb: paso 30, imagen 1 de 1
    • Remove the tab connecting the flash to the motherboard by gently pulling the connector sideways out of its port, away from flash unit.

    • Unsolder red and black wires.

    • Remove the flash unit.

Conclusión

To reassemble your device, follow these instructions in reverse order.

Luke Baumann

Miembro Desde 04/13/11

128 Reputación

5 Guías creadas

Equipo

Cal Poly, Team 8-5, Regan Spring 2011 Miembro de Cal Poly, Team 8-5, Regan Spring 2011

CPSU-REGAN-S11S8G5

4 Miembros

10 Guías creadas

0 comentarios

Agregar Comentario

Ver Estadísticas:

Ultimas 24 horas: 1

Ultimos 7 días: 3

Ultimos 30 días: 7

Todo El Tiempo: 3,556