Saltar al contenido principal

Nikon Coolpix 4600 Lens and Flash Assembly Replacement

Qué necesitas

  1. Nikon Coolpix 4600 Lens and Flash Assembly Replacement, Front and Rear Case: paso 1, imagen 1 de 2 Nikon Coolpix 4600 Lens and Flash Assembly Replacement, Front and Rear Case: paso 1, imagen 2 de 2
    • Locate the six screws on the outside of the camera (2 3.3 mm on the bottom, 2 5.25 mm on the left, and 2 5.25 mm on the right).

    • Using a Phillips 00 screwdriver, remove all of the six screws.

  2. Nikon Coolpix 4600 Lens and Flash Assembly Replacement: paso 2, imagen 1 de 2 Nikon Coolpix 4600 Lens and Flash Assembly Replacement: paso 2, imagen 2 de 2
    • Carefully pull the front and back case apart.

    • The front case is attached to internal components and cannot be removed independently.

  3. Nikon Coolpix 4600 Lens and Flash Assembly Replacement: paso 3, imagen 1 de 1
    • Look closely at the connection between the ribbon cable and the motherboard. Locate the two grey tabs on either side of the connecting bracket.

    • Slide the grey tabs toward the bottom of camera. Gently disconnect the ribbon cable from the motherboard.

    • After disconnecting the data ribbon, you can now separate the back case from the front case.

  4. Nikon Coolpix 4600 Lens and Flash Assembly Replacement, Motherboard: paso 4, imagen 1 de 1
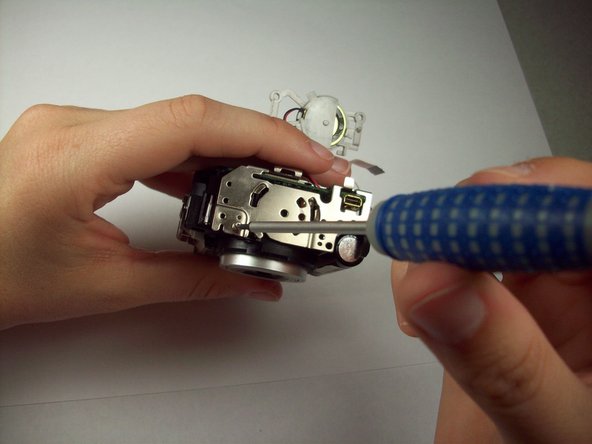
    • Locate and remove the four 4.25 mm screws on the motherboard using a Phillips 00 screw driver.

  5. Nikon Coolpix 4600 Lens and Flash Assembly Replacement: paso 5, imagen 1 de 1
    • Remove the ribbon cable on the top right of the motherboard. To remove the cable, slide the two grey tabs, located on both sides, towards the top of the camera and gently pull the cable out.

  6. Nikon Coolpix 4600 Lens and Flash Assembly Replacement: paso 6, imagen 1 de 1
    • Turning the camera to the left and tilting it up, look at the left end of the motherboard to locate the grey bracket.

    • Twist the grey bracket counter clockwise to remove it from the silver LCD bracket.

  7. Nikon Coolpix 4600 Lens and Flash Assembly Replacement: paso 7, imagen 1 de 2 Nikon Coolpix 4600 Lens and Flash Assembly Replacement: paso 7, imagen 2 de 2
    • Using a Phillips 00 screwdriver, remove the 4.25 mm screw on bottom left edge of the LCD bracket.

    • Lift off the LCD bracket and slip the grey bracket through the LCD bracket. The LCD bracket should now be completely removed.

  8. Nikon Coolpix 4600 Lens and Flash Assembly Replacement: paso 8, imagen 1 de 2 Nikon Coolpix 4600 Lens and Flash Assembly Replacement: paso 8, imagen 2 de 2
    • Desolder the wire (both black and red) from the motherboard.

    • Remove the orange ribbon cable. This is done by sliding each side of the lock bar toward the center of the camera. Gently pull on the ribbon cable to remove.

  9. Nikon Coolpix 4600 Lens and Flash Assembly Replacement: paso 9, imagen 1 de 2 Nikon Coolpix 4600 Lens and Flash Assembly Replacement: paso 9, imagen 2 de 2
    • Gently peel back the black tape on the bottom, middle of the motherboard. Underneath you will find a screw.

    • Remove the 4.25 mm screw with a Phillips 00 screwdriver.

  10. Nikon Coolpix 4600 Lens and Flash Assembly Replacement: paso 10, imagen 1 de 1
    • Gently pull the motherboard away from the lens.

    • Flip the camera over.

    • Connecting the motherboard to the front case are seven wires.

    • Desolder the seven wires.

    • If you are only removing the motherboard as an intermediate step to get to other components, do not desolder yet, as not all wires need to be removed.

    • Be careful when desoldering the wires. If you do not know how to properly desolder a wire, seek help to prevent damage to the motherboard. Also, make sure the soldering crunches don't fall into the lens case.

  11. Nikon Coolpix 4600 Lens and Flash Assembly Replacement, Lens and Flash Assembly: paso 11, imagen 1 de 2 Nikon Coolpix 4600 Lens and Flash Assembly Replacement, Lens and Flash Assembly: paso 11, imagen 2 de 2
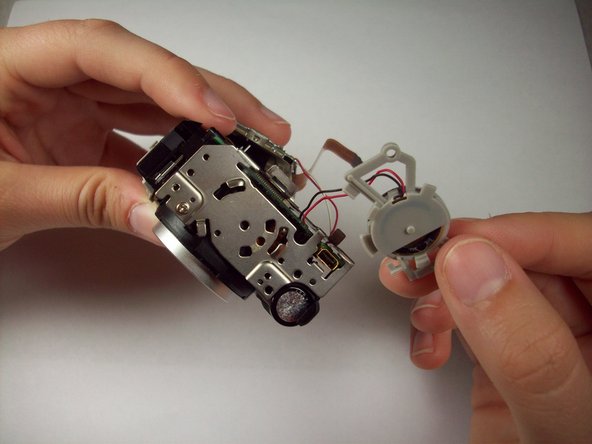
    • The flash and lens assembly should now be separate from the motherboard.

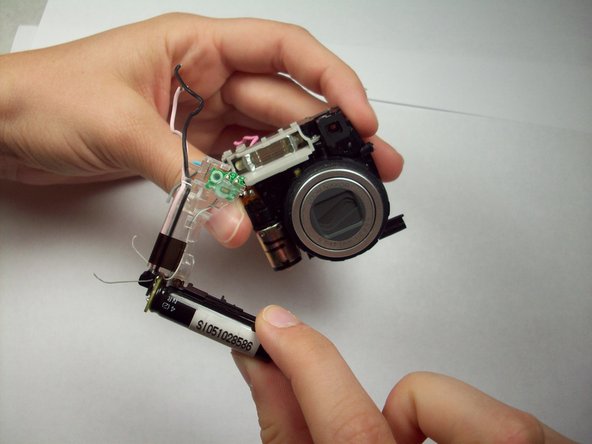
    • Locate the capacitor. It is the component that looks similar in size and shape to a AAA battery.

    • With the lens upright and facing you, gently lift the capacitor up and to the left to remove main flash assembly.

  12. Nikon Coolpix 4600 Lens and Flash Assembly Replacement: paso 12, imagen 1 de 1
    • Locate the 4.8 mm screw above the middle of lens on the front side and remove it.

    • The flash bulb can now be lifted off the lens assembly.

  13. Nikon Coolpix 4600 Lens and Flash Assembly Replacement: paso 13, imagen 1 de 1
    • The lens assembly is now separated from all other components.

    • Follow the steps in reverse order to re-install new lens.

Conclusión

To reassemble your device, follow these instructions in reverse order.

Nathan Sperling

Miembro Desde 05/08/12

119 Reputación

4 Guías creadas

Equipo

Cal Poly, Team 9-43, Regan Spring 2012 Miembro de Cal Poly, Team 9-43, Regan Spring 2012

CPSU-REGAN-S12S9G43

5 Miembros

12 Guías creadas

0 comentarios

Agregar Comentario

Ver Estadísticas:

Ultimas 24 horas: 0

Ultimos 7 días: 1

Ultimos 30 días: 9

Todo El Tiempo: 1,565