Saltar al contenido principal

Nikon COOLPIX P600 Viewfinder Replacement

Qué necesitas

  1. Nikon COOLPIX P600 Viewfinder Replacement, Tripod Mount: paso 1, imagen 1 de 1
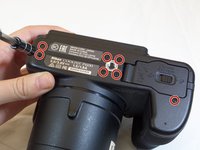
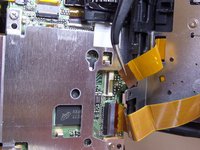
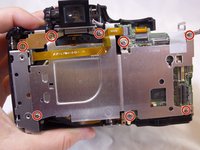
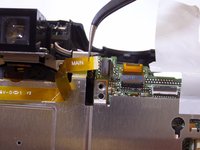
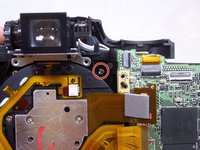
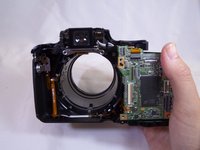
    • Position the back of the camera facing you and open the LCD screen to the left.

  2. Nikon COOLPIX P600 Viewfinder Replacement: paso 2, imagen 1 de 2 Nikon COOLPIX P600 Viewfinder Replacement: paso 2, imagen 2 de 2
    • Use a Phillips screwdriver to unscrew the two 5.556 mm screws under the LCD screen.

  3. Nikon COOLPIX P600 Viewfinder Replacement: paso 3, imagen 1 de 3 Nikon COOLPIX P600 Viewfinder Replacement: paso 3, imagen 2 de 3 Nikon COOLPIX P600 Viewfinder Replacement: paso 3, imagen 3 de 3
    • Use a Phillips screwdriver and remove the eleven 5.556 mm screws around the outside frame of the camera.

  4. Nikon COOLPIX P600 Viewfinder Replacement: paso 4, imagen 1 de 1
    • Open the "HDMI" rubber flap.

    • Use a Phillips screwdriver and remove the 5.556 mm screw underneath the flap.

  5. Nikon COOLPIX P600 Viewfinder Replacement: paso 5, imagen 1 de 1
    • The flash button is located on the left side of the built-in flash compartment.

    • Press the flash button (as shown) to access flash.

  6. Nikon COOLPIX P600 Viewfinder Replacement: paso 6, imagen 1 de 1
    • Use a spudger to wedge underneath the flash

    • Pry (up and down) to separate.

    • It is important to choose a tool that is ESD-safe to avoid accidental damage to the device. A black nylon spudger, or plastic opening tool, should be used whenever possible.

  7. Nikon COOLPIX P600 Viewfinder Replacement: paso 7, imagen 1 de 1
    • Use your hands to gently pull the front and back of the camera apart.

    • Be careful not to damage the ribbon-wire shown in the red box.

  8. Nikon COOLPIX P600 Viewfinder Replacement: paso 8, imagen 1 de 3 Nikon COOLPIX P600 Viewfinder Replacement: paso 8, imagen 2 de 3 Nikon COOLPIX P600 Viewfinder Replacement: paso 8, imagen 3 de 3
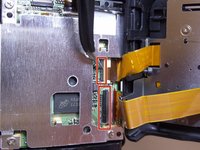
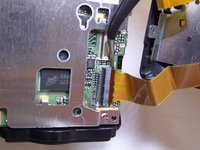
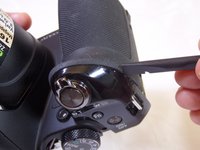
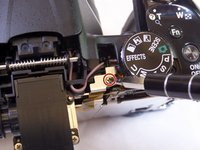
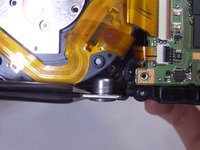
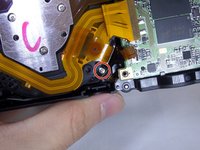
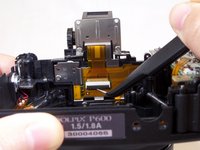
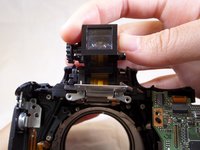
    • Use needle-nose tweezers to gently lift the black/grey latch towards the ribbon-wire (the latch rotates upward to release and snaps down to lock).

    • Be careful not to break the latch. It cannot be replaced.

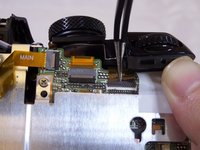
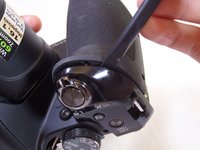
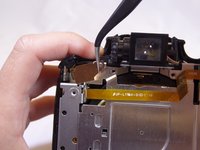
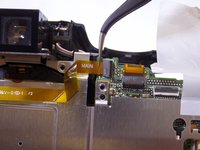
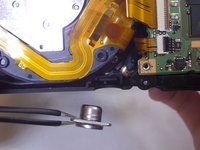
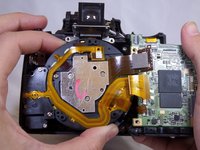
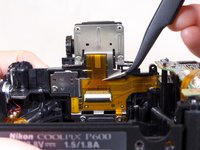
    • Use tweezers to gently remove ribbon-wires.

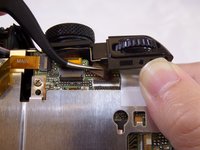
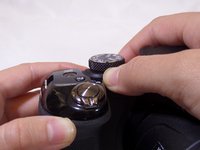
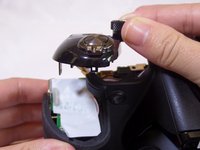
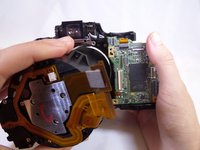
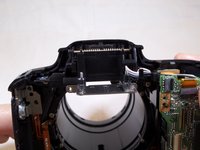
    • Pull the ribbon-wires towards the back-end of the camera.

  9. Nikon COOLPIX P600 Viewfinder Replacement: paso 9, imagen 1 de 1
    • Use a Phillips screwdriver and remove the single 6.350 mm screw, left of the mode-adjustment dial.

  10. Nikon COOLPIX P600 Viewfinder Replacement: paso 10, imagen 1 de 2 Nikon COOLPIX P600 Viewfinder Replacement: paso 10, imagen 2 de 2
    • Use needle-nose tweezers to remove the large ribbon-wire located under the screw.

    • Gently wiggle the ribbon out in an upward motion.

    • For easier access, you can push the black surface of the camera where the buttons and dials are located. Do not push too hard as this may break the plastic.

  11. Nikon COOLPIX P600 Viewfinder Replacement: paso 11, imagen 1 de 2 Nikon COOLPIX P600 Viewfinder Replacement: paso 11, imagen 2 de 2
    • Insert a plastic opening tool under the shutter button.

    • Gently pry (back and forth) between the rubber grip and camera casing.

  12. Nikon COOLPIX P600 Viewfinder Replacement: paso 12, imagen 1 de 2 Nikon COOLPIX P600 Viewfinder Replacement: paso 12, imagen 2 de 2
    • Place hands around the camera. Hold onto the mode dial and grip under the shutter button.

    • Gently push right thumb away and pull in left index finger to separate the camera halves.

  13. Nikon COOLPIX P600 Viewfinder Replacement: paso 13, imagen 1 de 3 Nikon COOLPIX P600 Viewfinder Replacement: paso 13, imagen 2 de 3 Nikon COOLPIX P600 Viewfinder Replacement: paso 13, imagen 3 de 3
    • Use a Phillips screwdriver to remove the nine 3.175 mm screws on the inside of the camera.

    • Use tweezers to remove the golden bracket.

  14. Nikon COOLPIX P600 Viewfinder Replacement: paso 14, imagen 1 de 1
    • Use tweezers to remove the white film under the shutter-release button.

    • This white film is a cover for the electrical components. The camera will not be affected if it rips or comes off completely.

    • Be careful: three high-discharge capacitor leads are located under this film, and can result in electric shock if touched.

  15. Nikon COOLPIX P600 Viewfinder Replacement: paso 15, imagen 1 de 2 Nikon COOLPIX P600 Viewfinder Replacement: paso 15, imagen 2 de 2
    • Use tweezers to remove the yellow ribbon-wire.

    • Gently wiggle it to the left and then out of its port.

  16. Nikon COOLPIX P600 Viewfinder Replacement: paso 16, imagen 1 de 1
    • Use hands to remove the metal cover.

    • Pull the cover up.

  17. Nikon COOLPIX P600 Viewfinder Replacement: paso 17, imagen 1 de 1
    • Use tweezers to remove the golden bracket.

  18. Nikon COOLPIX P600 Viewfinder Replacement: paso 18, imagen 1 de 2 Nikon COOLPIX P600 Viewfinder Replacement: paso 18, imagen 2 de 2
    • The tripod connector is located at the bottom of the camera.

    • Use tweezers to remove the tripod connector.

  19. Nikon COOLPIX P600 Viewfinder Replacement, Lens: paso 19, imagen 1 de 3 Nikon COOLPIX P600 Viewfinder Replacement, Lens: paso 19, imagen 2 de 3 Nikon COOLPIX P600 Viewfinder Replacement, Lens: paso 19, imagen 3 de 3
    • Unscrew the three 3.175mm screws.

    • Use caution to not to lose the screws in the cavities of the camera.

  20. Nikon COOLPIX P600 Viewfinder Replacement: paso 20, imagen 1 de 1
    • Continue removing screws, keeping an awareness of the cavity right below the screw. It would be difficult to extract screw if lost in this cavity.

  21. Nikon COOLPIX P600 Viewfinder Replacement: paso 21, imagen 1 de 3 Nikon COOLPIX P600 Viewfinder Replacement: paso 21, imagen 2 de 3 Nikon COOLPIX P600 Viewfinder Replacement: paso 21, imagen 3 de 3
    • Remove lens by pulling up vertically.

    • Be careful not to damage any of the electrical ribbon on top of the lens.

  22. Nikon COOLPIX P600 Viewfinder Replacement, Viewfinder: paso 22, imagen 1 de 1
    • Unscrew the 2 screws located at the top of the viewfinder.

  23. Nikon COOLPIX P600 Viewfinder Replacement: paso 23, imagen 1 de 2 Nikon COOLPIX P600 Viewfinder Replacement: paso 23, imagen 2 de 2
    • Unclip and pull out the yellow wire ribbon.

  24. Nikon COOLPIX P600 Viewfinder Replacement: paso 24, imagen 1 de 3 Nikon COOLPIX P600 Viewfinder Replacement: paso 24, imagen 2 de 3 Nikon COOLPIX P600 Viewfinder Replacement: paso 24, imagen 3 de 3
    • Vertically lift the viewfinder piece for removal.

    • Carefully, as the wire ribbon is slowly removed out of its slot when viewfinder is pulled out.

Conclusión

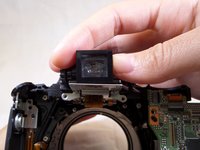
To reassemble your device, follow these instructions in reverse order.

5 personas más completaron esta guía.

Documentos Adjuntos

Stephen Lee

Miembro Desde 09/14/15

311 Reputación

1 Guía escrita

Equipo

CSU Fullerton, Team 1-5, Bruce Fall 2015 Miembro de CSU Fullerton, Team 1-5, Bruce Fall 2015

CSUF-BRUCE-F15S1G5

3 Miembros

8 Guías creadas

0 comentarios

Agregar Comentario

Ver Estadísticas:

Ultimas 24 horas: 2

Ultimos 7 días: 5

Ultimos 30 días: 27

Todo El Tiempo: 5,316