Saltar al contenido principal

Nike+ Sportband Battery Replacement

Qué necesitas

  1. Nike+ Sportband Battery Replacement, External Case: paso 1, imagen 1 de 2 Nike+ Sportband Battery Replacement, External Case: paso 1, imagen 2 de 2
    • To begin the disassembly of your NikePlus Sportband, first remove the device from the rubber wristband.

  2. Nike+ Sportband Battery Replacement: paso 2, imagen 1 de 2 Nike+ Sportband Battery Replacement: paso 2, imagen 2 de 2
    • Finish the disassembly of your NikePlus Sportband by utilizing the metal spudger tool on the short edge to pry the external body pieces apart.

  3. Nike+ Sportband Battery Replacement, Screen: paso 3, imagen 1 de 2 Nike+ Sportband Battery Replacement, Screen: paso 3, imagen 2 de 2
    • After the cover had been removed, use the metal spudger tool to remove the body of the device from the casing.

  4. Nike+ Sportband Battery Replacement: paso 4, imagen 1 de 3 Nike+ Sportband Battery Replacement: paso 4, imagen 2 de 3 Nike+ Sportband Battery Replacement: paso 4, imagen 3 de 3
    • Use the metal tweezers to pry the screen casing from the body of the device.

    • The screen casing is fastened to the body of the device by four clips located in each corner of the casing.

  5. Nike+ Sportband Battery Replacement: paso 5, imagen 1 de 2 Nike+ Sportband Battery Replacement: paso 5, imagen 2 de 2
    • Flip the body of the device over so that the screen is now on the bottom.

    • The display ribbon cable is soldered to the motherboard. We were able to peel up the ribbon cable with a pair of tweezers.

    • Successfully resoldering this ribbon cable to the motherboard may prove difficult to the very small traces.

  6. Nike+ Sportband Battery Replacement: paso 6, imagen 1 de 3 Nike+ Sportband Battery Replacement: paso 6, imagen 2 de 3 Nike+ Sportband Battery Replacement: paso 6, imagen 3 de 3
    • Flip the body of the device back over so that the screen is facing up.

    • Using the tweezers, gently lift the screen from body of the device.

  7. Nike+ Sportband Battery Replacement, Motherboard: paso 7, imagen 1 de 1
    • Remove the four highlighted screws from the motherboard using the Philips screwdriver.

  8. Nike+ Sportband Battery Replacement: paso 8, imagen 1 de 3 Nike+ Sportband Battery Replacement: paso 8, imagen 2 de 3 Nike+ Sportband Battery Replacement: paso 8, imagen 3 de 3
    • Use the metal tweezers to lift the motherboard out of the device.

  9. Nike+ Sportband Battery Replacement, Battery: paso 9, imagen 1 de 2 Nike+ Sportband Battery Replacement, Battery: paso 9, imagen 2 de 2
    • Slowly lift the motherboard off of the mounting body of the band with a pair of tweezers.

  10. Nike+ Sportband Battery Replacement: paso 10, imagen 1 de 1
    • Gently lay the motherboard upside down exposing the underside of the motherboard.

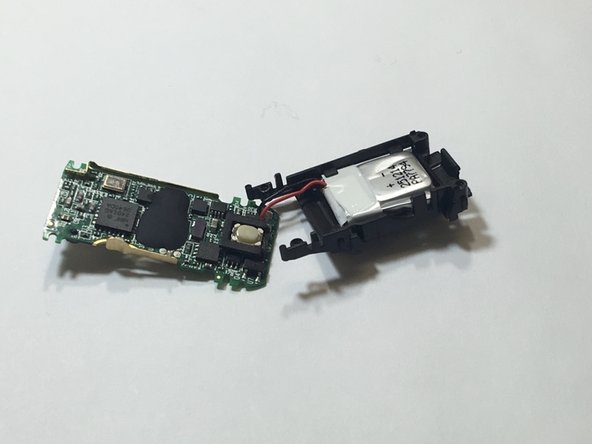
    • The red and black battery wires may need to be desoldered from the board. Check out the How To Solder and Desolder Connections guide for some helpful tips on this.

    • Using the flat edge of a spudger separate the battery from the body of the band.

Conclusión

To reassemble your device, follow these instructions in reverse order.

Una persona más ha completado esta guía.

Alyssa Setnar

Miembro Desde 02/15/16

331 Reputación

3 Guías creadas

Equipo

IUPUI, Team 9-9, Wilson Spring 2016 Miembro de IUPUI, Team 9-9, Wilson Spring 2016

IUPUI-WILSON-S16S9G9

5 Miembros

4 Guías creadas

0 comentarios

Agregar Comentario

Ver Estadísticas:

Ultimas 24 horas: 0

Ultimos 7 días: 1

Ultimos 30 días: 9

Todo El Tiempo: 2,174