Esta versión puede contener ediciones incorrectas. Cambie a la última instantánea verificada.
Qué necesitas
-
Este paso está sin traducir. Ayuda a traducirlo
-
Gently insert a plastic opening tool between the rear panel and the inner rear frame near the rear-facing camera.
-
Use your plastic opening tool to pry up the rear case around the perimeter of the Nexus S.
-
-
Este paso está sin traducir. Ayuda a traducirlo
-
Using the edge of a plastic opening tool, lift the battery from the end closest to the headphone jack.
-
Remove the battery from the Nexus S.
-
-
Este paso está sin traducir. Ayuda a traducirlo
-
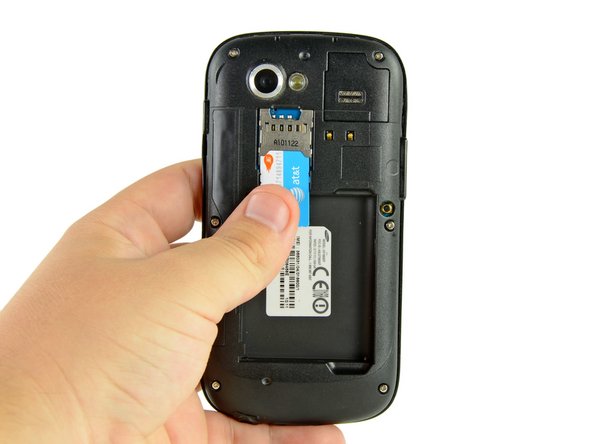
Use your thumb to slide the SIM card downwards from the SIM card slot.
-
Remove the SIM card.
-
-
-
Este paso está sin traducir. Ayuda a traducirlo
-
Remove the six Phillips screws securing the rear inner frame to the inner case.
-
-
Este paso está sin traducir. Ayuda a traducirlo
-
Insert the flat edge of a plastic opening tool in between the rear inner frame and the top left corner of the Nexus S.
-
Pry the opening tool upwards to pop the top right corner from the clips securing it to the inner assembly.
-
-
Este paso está sin traducir. Ayuda a traducirlo
-
Insert the plastic opening tool to the right of the power button.
-
Slide the plastic opening tool downwards along the perimeter of the Nexus S to release the clips on the right side.
-
-
Este paso está sin traducir. Ayuda a traducirlo
-
In the same manner as previously described, release the bottom clips located near the bottom of the Nexus S.
-
-
Este paso está sin traducir. Ayuda a traducirlo
-
Insert and pry the plastic opening tool to release the final clip securing the rear inner frame to the inner assembly.
-
-
Este paso está sin traducir. Ayuda a traducirlo
-
Lift and remove the rear inner frame from the Nexus S.
-
Cancelar: No complete esta guía.
4 personas más completaron esta guía.


