Esta traducción podría no reflejar los cambios más recientes añadidos a la guía de referencia. Ayúdanos a actualizar la traducción o revisa la guía original.
Introducción
El ensamblaje de la pantalla LCD está compuesto por el digitalizador (vidrio de la pantalla) y el LCD. Al completar todas las guías de prerrequisitos, quedarás con el conjunto de la pantalla LCD de su dispositivo.
Qué necesitas
Resumen del Video
-
-
Apaga el dispositivo.
-
Usa tu herramienta de apertura de plástico para calzar entre los rebordes alrededor de los lados del dispositivo. Haz palanca en cada lado, uno a la vez.
-
-
-
Trabaja con los dedos alrededor del reborde entre el dispositivo y la tapa posterior. Usa la herramienta de apertura de plástico y los dedos para separar cada lado hasta que el dispositivo y la tapa trasera estén completamente separados.
I did two of these. The first was a WIFI model that the earphone plug had become intermittant (just needed to resolder the connections.) The second an LTE version that the battery had gone bad and swelled to about 3 times the size.
The swollen battery had pushed the glass free of the upper mount, and made the entire thing extremely tight.
The WIFI one came apart easily like described.
The LTE one (with the swollen battery) required a lot more care and a lot more force/damage to get into the gap between the two plastic pieces. (I did the wifi one first, so I could easily tell the difference.
So depending on your situation...it may not be easy to separate the pieces...but remmber, the thin glass is sitting on one piece of plastic, the gap is between that piece of plastic and the back panel...a darker shiny black plastic is the top piece, a slightly lighter duller black plastic is the back panel...of course the glass is ALSO black...so good luck.
-
-
-
Inserta la herramienta de apertura de plástico debajo del borde lateral del conector de la batería y haz palanca hacia arriba para desconectarlo.
We moved this step to be fist, thanks for the edit!
-
-
-
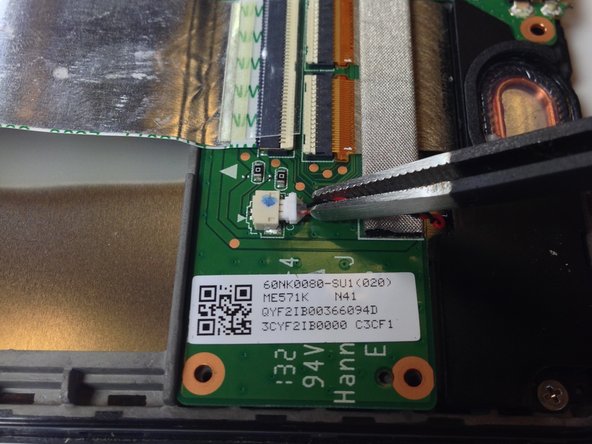
Usa el extremo plano de un spudger o tu uña para voltear hacia arriba la solapa protectora transparente en el enchufe ZIF del cable plano.
-
Con el extremo plano de un spudger o de la uña, voltea la parte delgada del conector (opuesto al lado donde se inserta el cable) para liberar el cable de su toma.
-
Desliza el cable fuera de la toma ZIF.
Flip up on the WHITE part, facing away from the cable. I sort of struggled with this part, but fortunately didn't do any serious damage.
This is the correct way to do it. Flipping up the white part is what you have to do. I tried flipping up the black part and some of it broke off.
Ryan -
I found that I had to flip up on the black part here. I broke a section of the white trying to flip it up.
This comment saved me on this step. Indeed the secret is to flip up the black part of the connector, located opposite the side where the cable inserts.
This is wrong, these comments should be deleted so as to not confuse more people.
It's possible there's more than one color variation in production on these Nexus 7 ZIF sockets. To complicate matters, it looks like the guide's original author/photographer may have simply yanked the ribbon cable out without opening the socket, so there's very little visual clue here as to which is the right section to flip up. Based on these photos, I'd say Hannah's tip is probably correct—you want to flip up the thinner portion of the socket, opposite the cable (regardless of its color scheme). If someone who has successfully completed this step could supply a better photo, that would be super helpful!
I revised the text so there's no long any mention of the coloration of the socket.
This was my first time with this kind of ZIF socket and found these instructions/pictures ambiguous. In hindsight I see what was being described (actually used the replacement daughterboard as my guide). May I suggest this phrasing:
The ZIF clamp hinges on the side opposite of where the cable in inserted. Using the flat end of a spudger or your fingernail, flip the thin portion of the connector up and away from the insertion side of the connector.
Correction of Charles' Oct comment: The ZIF clamp hinges on the same side as the cable is inserted, the side towards the battery. The cable runs over the battery and into the thick connector, with contacts both on the side closest to the battery and on the side away from the battery. Beyond the contacts on the side away from the battery is the thin part to be lifted. Using the flat end of a spudger or your fingernail, flip the thin portion of the connector up and towards the insertion side of the connector. You can leverage gently against the big copper-covered area on the side away from the battery, in lifting the thin (white in the current picture) part of the connector.
You can leverage gently against the big copper-covered area on the side away from the battery, in lifting the thin (white in the current picture) part of the connector, using a motion similar to the described in step 5 below for removing the orange ribbon connector.
some better macro photos of the zif socket would help a lot, in closed and open states
Please make the pictures clearer as Iain Lennon said. I too was a fool to not read the comments and broke the connector off of the motherboard.
Ha.
So one side of the cable has a white strip connector, and the other side has a black strip connector. (both comments above are correct, depending on which side you are looking at)
The side in the photo has a black connector strip that needs to be opened. It is the long small strip of plastic on the _opposite_ side of the connection point, to the cable.
It clicks up into the air, like on a hinge.
The cable then pulls out, without any resistance.
Having totally destroyed the ZIF connector I can now say that the WHITE portion is hinged and the BLACK portion is not. Both parts are extremely fragile. The photographs are really useless.
exactly ……..
esykas -
This shouldn’t be the first cable to disconnect. Disconnect the battery cable first. Always remove power first!
Good catch @hobohax0r, we rearranged the steps to help fix that!
I have added a photo of the socket in the open state. Also looking at the comments above it seems that the confusion is due to the fact that this cable is connected to a similarly looking connector on the other side, where the colors are reversed. It may be worth to point this out and tell that the connector the guide is talking about is located near the heatsinks
I tried to take some pictures of the way the sockets worked on mine (2013 Wi-Fi (Flo)), but considering hardware variations, I’m not sure if this applies to every Nexus 7 (or even every Flo)
Just to follow up, much later… if you see white, you should see a small notch. lift there.
Look very carefully at the second photo and see the white “flap” has been opened, pointing at you.
Whichever color, it takes NO REAL EFFORT to flip them back. No need to force anything at this micro level.
-
-
-
Ahora que las dos cintas principales están desconectadas, dóblalas y sujétalas con los dedos, o coloca las pinzas o un objeto ligero sobre las cintas para mantenerlas en su lugar.
How called is the left one ? I broke it and i will buy it but cant find it..
-
-
-
Usa el destornillador Phillips #00 para remover los cuatro tornillos plateados Phillips de 3 mm de alrededor de la carcasa de la batería.
There are 6 screws on mine. One at the top and the other directly across from that on the other side of the battery at the bottom. These two screws are covered with a small adhesive sticker that says “seal". Those stickers need to be removed so the Phillips screwdriver can be inserted to remove them.
-
-
-
-
Retira la batería de tu dispositivo aplicando presión en la base de la batería y levantándola.
If your replacement battery doesn’t have the metal battery tray included (like mine came) be aware you’ll have to CAREFULLY pry the old battery out of the metal tray. It has some pretty strong glue holding it in, but prying on it slowly and carefully should get it free without bending up the metal tray. There should be enough glue residue left in the tray to hold the new battery in, at least until you get the tablet back together.
Thank you for the very helpful comment - I was facing the same issue!
You probably should add that the battery is held in the tray with some glue strips. It took a bit to carefully remove the battery from the tray without bending the tray too much. Also, the replacement battery I had was slightly smaller than the OEM battery. When putting back together make sure you place the battery in the tray so the battery is close enough to the battery connector and you can reconnect the battery without pulling on the connector wires.
-
-
-
Retira el sello gris que cubre el tornillo central superior de la tarjeta hija
I couldn't get a grasp on the sticker enough to peel it off, so just punched through it with the screwdriver. I don't know the point of removing the sticker, since the warranty is voided anyway by either time or the mere act of disassembly.
How come the battery is still in place in the picture? I couldn't get the battery out until I'd removed another 3 screws...1 on the daughterboard (step 11) and 2 on the motherboard (step 16).
There actually is no need to remove the daughter board and everything like that. Mother and daughterbord can be taken off at the same time, together with speakers and kept together by the WIFI cables, if you only need replacing the screen
This guide is still value-for-the-money if you need all the other tricky little details
-
-
-
Desenrosca los 5 tornillos negros de 2 mm de tamaño con el destornillador Phillips #0 de alrededor del borde de la placa madre.
-
Usa el mismo destornillador Phillips #0 para quitar los dos tornillos plateados de 3 mm a cada lado del micro USB.
Is there a reason you suggested removing the screws at this point? I found it to be more of a hassle having the board moving around as I did the next several disconnects. Unless there's a good reason, I would suggest leaving the screws in until the foam and the connectors have been detached.
-
-
-
Usa el extremo plano de una papa o tu uña para voltear cuidadosamente las dos solapas de retención de cada uno de los zócalos ZIF.
Flip up on the WHITE part, facing away from the cable. I sort of struggled with this part, but fortunately didn't do any serious damage.
-
-
-
Usa las pinzas para despegar la etiqueta adhesiva del tornillo que se encuentra más cerca de la batería.
I couldn't get a grasp on the sticker enough to peel it off, so just punched through it with the screwdriver. I don't know the point of removing the sticker, since the warranty is voided anyway by either time or the mere act of disassembly.
the stickers are probably put there for insulating purposes. i have found that discarding them has no bearing on nexus' operation.
-
-
-
Utiliza el extremo plano de un spudger o de su uña para voltear cuidadosamente la tapa de retención en el zócalo ZIF del cable plano.
The front panel assembly I got from iFixit didn't have this ribbon cable for power and volume, so I had to peel it off the old one. To remove it, work the spudger underneath and gently loosen it from the adhesive. There should be enough residual adhesive to stick it in place on the replacement panel assembly.
your amendments are much appreciated. definitely helpful. THank YOU!
I also had to remove the old ribbon cable here. I used a credit card to slide behind the adhesive.
-
-
-
Con el destornillador de cabeza Philips #0, retira los tres tornillos negros de 2 mm que sujetan el borde interior de la placa madre en su lugar.
-
Con el destornillador de cabeza Philips #0, retira los cinco tornillos plateados de 3 mm que sujetan el borde exterior de la placa madre en su lugar
-
-
-
Levanta con cuidado la placa madre por el borde y retírala de la caja de la tableta.
Careful when comparing to this picture. Actually, the camera which can be seen on the left oh the housing in this picture is connected to the board.
Removing the camera is necessary, as it is impossible (with any tool I have, anyway) to reconnect the camera to the motherboard while it is still in the housing. However, doing so was quite a pain on my machine as it not only did not "lift out of the tablet with the motherboard", but it also was stuck in there so tightly I wondered if it might be glued. I needed to spend several minutes gently prying it out with pliers.
I would add that it’s imperative to loosen the camera from its housing before attempting to remove the motherboard. The two are connected via another very short ribbon cable with zif connector. Trying to pull the motherboard out with the camera still stuck to the front could damage the cable/connector. In my mind it’s safer for both to come out together while still connected.
Also, see that conductive strip in the lower right corner of the first picture with the brownish tape on the metal backplane? Many replacements do not come with that. If you look on the back of the motherboard there is a copper strip that matches this conductive strip. It connects this copper strip on the motherboard to the metal backplane of the touch screen and helps the touchscreen work properly. It doesn’t peal off easily so work at it carefully.
-
-
-
Usa un destornillador Phillips #0 para remover los dos tornillos de cada extremo del altavoz.
-
-
-
Una vez que hayas retirado la tapa trasera, la batería, la placa madre, la placa base y los altavoces, el ensamblaje de la pantalla LCD permanecerá.
how is the frame attached to the LCD panel? I cracked my screen and looking at replacement LCD and digitizer, but I figure that the frame should be removed from the original screen as well
The frame is attached to the LCD/Digitizer by a layer of double-sided adhesive tape, essentially, or more accurately several pieces of tape. It's very important, once you get to the last step, to HEAT the edges (I used a hairdryer on high) and SLOWLY pry more and more away using proper plastic spudges. I learned the hard way that you can easily shatter the screen if you rush this step. You can still remove all the bits, but it's time consuming, and if you simply accept going slowly, you will actually save time.
If you get the front panel assembly part, it is the entire front glass, frame, and LCD panel. Which is good, because I can't imagine having to replace those pieces separately on top of everything else.
I've just separated the frame from the front glass using a domestic hairdryer and a butter knife.
I removed the ribbon cable (peel black sticker from housing, flip black part of ZIF connector, slide ribbon out) the power /volume button thing (tweezers, from connector end, it's stuck on with tape) and gold/silver sticker you can see on photo.
I then covered the middle section on the glass side with electrical tape, anything without plastic underneath and the camera holes. I evenly heated glass side on hottest setting of hairdryer, moving the hairdryer around and slid the knife under the middle sides and corners opposite the camera end. I reheated it a couple of times more. A few bits around the edges stuck to the adhesive, but were easily pulled off with the tape.
Suggest wearing latex gloves and glasses as a few shards flew up, but it was easier and quicker than getting the back of the tablet off!
VERY IMPORTANT! Do you see that large orange ribbon cable in the picture. Dont expect to get that from the ifixit replacement part. You will need to remove it and replace it along with that small cable with the adhesive along the side. Both these notes should be in the guide. Also be careful that when you are pulling up that small piece of electrical tape that you dont pull that tiny lock lever off the connection. I managed to reconnect it...but a heads up on this would have been helpful. I would READ all the comments before attempting this repair.
Good tip on the orange ribbon cable, it does not typically come with the spare part when purchasing the LCD/Digitizer replacement.
this step was a total MOTHERXXcker!!! i would strongly advise just to have the part that has the plastic housing. ok assembly starts now!
-


Para volver a ensamblar tu dispositivo, sigue estas instrucciones en orden inverso.
Para volver a ensamblar tu dispositivo, sigue estas instrucciones en orden inverso.
Cancelar: No complete esta guía.
76 personas más completaron esta guía.
Un agradecimiento especial a estos traductores:
80%

¡ Mariana Roca nos está ayudando a reparar el mundo! ¿Quieres contribuir?
Empezar a traducir ›
Equipo

Cal Poly, Team 20-16, Maness Winter 2015 Miembro de Cal Poly, Team 20-16, Maness Winter 2015
CPSU-MANESS-W15S20G16
4 Miembros
24 Guías creadas
16 comentarios
This provided a nice overview to replace the front panel assembly, but there were a couple items not covered or that could have been more clear (see my comments on Steps 3, 10, 14, 16, and 18).
As far as "Flipping up the White part"....the author HAS clearly included links for this if you are unfamiliar....To me....Very well written!!...and no...I'm not the author, nor do I know him....Nice job!
Worked for me, thanks very much.
So there is no way to replace just touch screen digitizer separate of still functioning LCD screen in 2nd generation NEXUS 7 released in 2013?
The digitizer and LCD are fused together at the factory with industrial adhesives. While it is theoretically possible to separate them and re-adhere an unbroken digitizer to the LCD screen, in practice this requires specialized tools, and is seldom worth the cost to pay those who do have the tools and expertise, as the repair would cost as much as the device. Replacing the LCD/Digitizer is the most economical, but replacing the entire display assembly including the frame is apparently possible and avoids the step of heating the adhesive tape securing the display unit to the frame.
You cannot separate the touchscreen from the LCD without professional equipment. If you try to do so you will destroy the LCD underneath the touch screen. Also heating the LCD with the heat gun to the point where it we'll separate also destroys the LCD display. Buy the touchscreen LCD assembly preferably with the frame. Then you simply move the circuit boards, the battery, the camras, and the speakers to the new frame assembly. Review the disassembly procedures thoroughly and then execute in reverse order be very careful with all the connectors. Watch YouTube videos to know what flips up on the connectors to release the ribbon cables.
M Gasque -
Hello,
Many thanks for the guide. Could you tell if would be a good thing to have a guide with the compatible displays across different devices, tablets, phones ?
Eg. Would be possible to use the nexus 7 display on the Samsung Tab7.0 Plus or the display of the Galaxy tab A 7.0 on the Tab 7.0 Plus? Or would be possible to exchange the tab 7.0 plus display with a better compatible 7.0 inch display from a diferent tablet ?
Thank you,
George
Luckily I have a pro standard heat gun. Set to 150oC and gentle blow, the glue releases enough to slide a swiss army knife blade around the edges; the old screen cracks as it comes away .. but it was cracked anyway.
The problem then is fixing the new screen ..it comes pre-glued with strong contact adhesive and there is also glue on the old frame; as soon as it touches, it's stuck. I got mine very slightly off centre and when I tried to push it into place the new screen cracked.
Back to square 1. Worth another £27 for another go? Not sure.
!&&* if this is a 7/10 for repairability, I'm glad I wasn't trying to mend a Microsoft Surface pro!!
Good clear instructions here. The hardest part I can confirm was removing the old, damaged screen from the frame. I hadn't realised that the screen was attached to a frame and I had just ordered the replacement LCD digitiser. It was a pure pain in the back side but using a hairdryer I eventually got the old screen off by basically heating and prying all the screen of. It broke into loads of pieces but i just systematically worked my way around the frame. Luckily there was enough glue residue left on the frame to stick the new one in place and its holding well. Back up and running with my excellent NEXUS. Thanks guys for the guide. Invaluable!!!!
Way, way easier if you just buy the complete assembly LCD. Done in exactly 40 minutes. Extremely well detailed guide.
My nexus 7 1st gen has a nonresponsive part on screen. I tried replacing screen its still got that one spot, right around the lower middle left. When held vertical.
Here is my problem in a nutshell.
Worked for me, many thanks.
You folks helped me resurrect my Nexus 7, many thanks. I really needed it fixed since a drunk friend (?) accidentally dropped my Samsung tablet into the pool. It was a replacement from my Nexus 7 with the broken screen. Thanks Again. Now, onto the section with the Samsung tab. :-)
I had a heck of a time doing this, spent ten or twenty minutes carefully prying, and I STILL cracked the case. At least on mine, the case was held in VERY well and required prying pretty much everywhere before it would let go. The tools I bought from iFixit really helped, but still a royal pain to open.
pacmanmaster - Contestar
a couple of obscure things that might help in opening:
guitar pick. get a few; they are cheap.
a prying device made for the sign industry: its called"lil' chizler". I have found that this to be the most helpful opening tool.
http://www.ebay.com/itm/like/16184595677...
also
https://www.qualitylogoproducts.com/trad...
you can use the broken screen unit to test.
Len Gorsky - Contestar
Add "remove the sim tray"...
Iain Lennon - Contestar
I echo the previous - a right royal pain to get the cover off! I started on the right side as seemed to be more give there… iFixit tools helped tho!
Steven Emery - Contestar
Just for the sake of clarity, I would add that you need to pry between the plastic bezel and the back casing. Not between the glass and bezel. Someone had already tried on the one I worked on and part of the bezel was missing in the top right corner. Made my job easier!
The best tools for this part are definitely something like the iFixit Jimmy and their opening tool, a few guitar picks and a spudger. Not too difficult once you get the first separation.
Cool_Breeze - Contestar
I managed to easily crack the screen, guess I’ll have to order a new one and “try” to put it in, in addition to the original job of replacing a dead battery on Nexus 7 2013..ahhhhhh, slow learner…
Gary Stamey - Contestar
Opened the case for the first time. It took me a while to find any gaps, but I found that the easy way to begin was using your fingernail to get into the sides. The middle left and middle right seemed a lot easier to…slip a nail in compared to the rest of the case, especially the corners and the top and bottom. With a small opening on both sides I used the opening tool to increase the gaps while using a couple of guitar picks to prop up the device against the back case. With most of the sides exposed, I worked on the bottom (create opening, leave a guitar pick to keep that part open, use the opening tool to get the rest out), and the opening was pretty much complete.
So far only the corners of the back case showed small cracks and my screen was pretty much unscathed.
Nam Lam - Contestar
This method worked best for me! Start opening on the middle left and right sides, then prop them open with guitar picks and use to the opening tool (carefully) prying up several times moving away from the middle towards the corners to pop off the back casing.
Frank's VR -