Saltar al contenido principal

Nerf N-Strike Firestrike LED Replacement

Qué necesitas

  1. Nerf N-Strike Firestrike LED Replacement, Blaster Casing: paso 1, imagen 1 de 1
    • Remove the seven 10-mm black Phillips screws from the blaster casing with a #1 Phillips Screwdriver.

  2. Nerf N-Strike Firestrike LED Replacement: paso 2, imagen 1 de 2 Nerf N-Strike Firestrike LED Replacement: paso 2, imagen 2 de 2
    • Slowly pull apart the blaster casing, starting at the battery location.

    • Keep pulling apart slowly until it separates completely. Be cautious as to not send the internal components flying.

  3. Nerf N-Strike Firestrike LED Replacement: paso 3, imagen 1 de 2 Nerf N-Strike Firestrike LED Replacement: paso 3, imagen 2 de 2
    • For reassembly, ensure that the chrome nut gets put back in the proper location, signified by the red box.

    • For reassembly, ensure that all the parts are lined up correctly on the dowels, signified by the four orange boxes.

    • For reassembly, note the location of the springs as highlighted in the second photo.

  4. Nerf N-Strike Firestrike LED Replacement, Remove battery cover: paso 4, imagen 1 de 1
    • Use a #1 Phillips screwdriver to remove the 10 -mm screw that secures the battery plate, then remove the battery cover using your hands.

  5. Nerf N-Strike Firestrike LED Replacement: paso 5, imagen 1 de 2 Nerf N-Strike Firestrike LED Replacement: paso 5, imagen 2 de 2
    • Slide out the two AAA batteries using your fingers.

  6. Nerf N-Strike Firestrike LED Replacement, Laser Trigger: paso 6, imagen 1 de 2 Nerf N-Strike Firestrike LED Replacement, Laser Trigger: paso 6, imagen 2 de 2
    • Remove the laser trigger by grabbing the trigger with your fingers and pulling it up and out.

  7. Nerf N-Strike Firestrike LED Replacement, Laser Assembly: paso 7, imagen 1 de 1
    • Gently pull up on the circuit board located near the gun handle until it separates from the gun.

    • The wire that attaches to the circuit board is also attached to the laser. Be careful not to use excessive force and damage or disconnect the wire.

  8. Nerf N-Strike Firestrike LED Replacement: paso 8, imagen 1 de 3 Nerf N-Strike Firestrike LED Replacement: paso 8, imagen 2 de 3 Nerf N-Strike Firestrike LED Replacement: paso 8, imagen 3 de 3
    • Grip the circuit board located at the base of the laser with your fingers; rotate it towards the ammo compartment on the blaster until the guide hole is clear of the guide pin.

    • Slide the laser assembly out.

  9. Nerf N-Strike Firestrike LED Replacement, LED: paso 9, imagen 1 de 2 Nerf N-Strike Firestrike LED Replacement, LED: paso 9, imagen 2 de 2
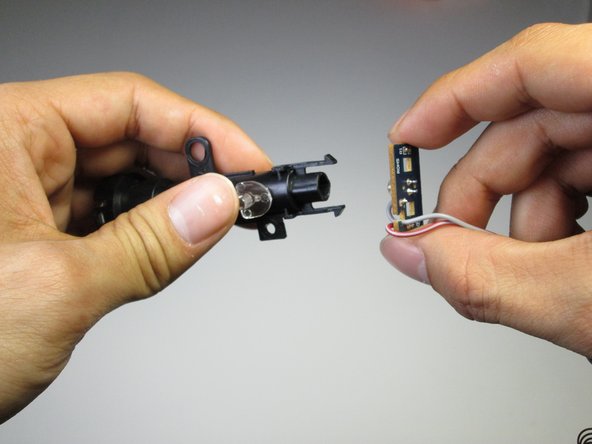
    • Pinch the clips holding the laser beam casing to the circuit board with your fingers. Slide off the casing revealing the LED.

  10. Nerf N-Strike Firestrike LED Replacement: paso 10, imagen 1 de 1
    • Use a soldering iron to heat up the two connections holding the LED to the circuit board. Remove the LED.

Conclusión

To reassemble your device, follow these instructions in reverse order.

6 personas más completaron esta guía.

Hayes Kimball

Miembro Desde 04/19/15

742 Reputación

5 Guías creadas

Equipo

Cal Poly, Team 15-6, Amido Spring 2015 Miembro de Cal Poly, Team 15-6, Amido Spring 2015

CPSU-AMIDO-S15S15G6

3 Miembros

8 Guías creadas

0 comentarios

Agregar Comentario

Ver Estadísticas:

Ultimas 24 horas: 0

Ultimos 7 días: 2

Ultimos 30 días: 7

Todo El Tiempo: 2,821