Esta versión puede contener ediciones incorrectas. Cambie a la última instantánea verificada.
Qué necesitas
-
Este paso está sin traducir. Ayuda a traducirlo
-
Flip the Mr. Coffee DW13 over so that the lid is facing away from you and the base is facing toward you.
-
-
Este paso está sin traducir. Ayuda a traducirlo
-
Remove the eight 11 mm screws that secure the base of the machine with a Phillips Head #2 screwdriver.
-
-
Este paso está sin traducir. Ayuda a traducirlo
-
Gently lift the base cover to expose the inside of the coffee machine.
-
-
-
Este paso está sin traducir. Ayuda a traducirlo
-
Locate the white tab that covers and holds the power cord in place. It has two screws on either side of it.
-
Use a #2 Philips Head screwdriver to unscrew the two 13mm screws holding the tab in place.
-
-
Este paso está sin traducir. Ayuda a traducirlo
-
Gently lift up on the white tab, removing it from the coffee machine.
-
-
Este paso está sin traducir. Ayuda a traducirlo
-
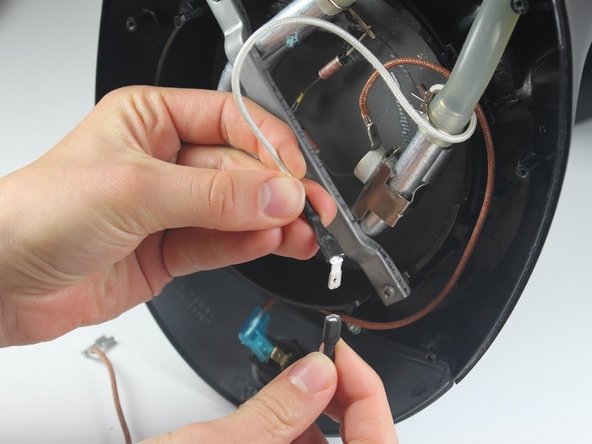
Locate the 2 electrical connectors running from the black plastic-coated power cord to the interior of the power switch.
-
One cord is copper colored and ends at the power switch in a silver metal square.
-
The other cord is white and ends at the power switch in a black plastic square.
-
-
Este paso está sin traducir. Ayuda a traducirlo
-
Grasp the copper cord close to the power switch. Lightly pull the silver end tab from the end to detach it.
-
-
Este paso está sin traducir. Ayuda a traducirlo
-
Lightly pull the white cord away from the power switch by grasping the black plastic-coated head.
-
There are two white cords attached to each other. Pull them apart by grasping the different black heads and separating them.
-
-
Este paso está sin traducir. Ayuda a traducirlo
-
Pull the power cord through the hole at the back of the base of the machine, followed by the two colored cords.
-


Cancelar: No complete esta guía.
3 personas más completaron esta guía.

Equipo

Cal Poly, Team 10-31, Maness Winter 2014 Miembro de Cal Poly, Team 10-31, Maness Winter 2014
CPSU-MANESS-W14S10G31
4 Miembros
6 Guías creadas