Esta versión puede contener ediciones incorrectas. Cambie a la última instantánea verificada.
Qué necesitas
-
Este paso está sin traducir. Ayuda a traducirlo
-
Locate the silver button on the back of the phone, near the bottom.
-
Depress the silver button with one hand and slide the back cover of the phone away from the antenna.
-
-
Este paso está sin traducir. Ayuda a traducirlo
-
Insert a plastic spudger near one corner of the battery (preferably one furthest from the phone's antenna).
-
Gently pry the battery up and away from the phone. The battery should easily raise out of its place.
-
Now that the battery is exposed, use your fingers to remove the it from the phone.
-
-
Este paso está sin traducir. Ayuda a traducirlo
-
Note the metal connections on the phone, which are now exposed with the battery removed.
-
There are corresponding metal connectors on the replacement battery.
-
When you install the battery, be sure both connectors are matched up. Otherwise, your battery will be unable to supply power to your phone.
-
-
Este paso está sin traducir. Ayuda a traducirlo
-
Use a spudger to remove the rubber plug from the upper left corner of the back of the phone.
-
-
Este paso está sin traducir. Ayuda a traducirlo
-
Use a Torx T6 screwdriver to remove the 4 screws that secure the back plate of the phone.
-
-
Este paso está sin traducir. Ayuda a traducirlo
-
Three tabs will hold the back plastic plate in.
-
To remove the back plate, pull the tabs towards the outside of the phone and lift the plate up simultaneously
-
-
-
Este paso está sin traducir. Ayuda a traducirlo
-
Use a spudger to remove the ribbon cable from the motherboard.
-
-
Este paso está sin traducir. Ayuda a traducirlo
-
Gently peel back the motherboard from the main part of the phone.
-
-
Este paso está sin traducir. Ayuda a traducirlo
-
Remove the keypad from the bottom half of the phone.
-
-
Este paso está sin traducir. Ayuda a traducirlo
-
Detach the bottom half of the phone by pulling out on the bottom half and pulling up on the top half.
-
-
Este paso está sin traducir. Ayuda a traducirlo
-
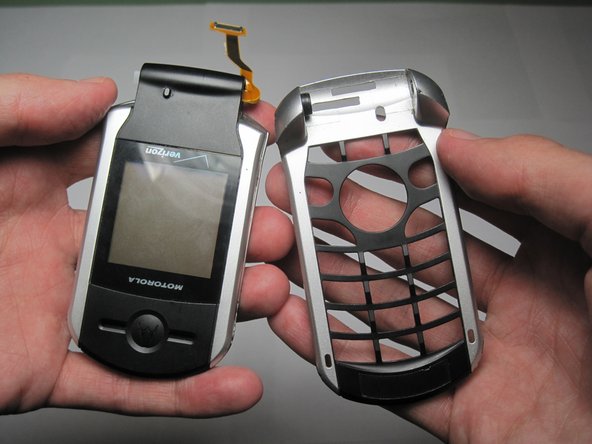
Use a plastic opening tool to remove the front cover of the phone.
-
-
Este paso está sin traducir. Ayuda a traducirlo
-
Use a spudger to remove the plastic protector case around the camera.
-
-
Este paso está sin traducir. Ayuda a traducirlo
-
Use a plastic opening tool to peel off the gold tape that holds the flex cable in place.
-
-
Este paso está sin traducir. Ayuda a traducirlo
-
Slide the ribbon cable through the tiny slit located in the hole on the side of the frame.
-
-
Este paso está sin traducir. Ayuda a traducirlo
-
Slide the ribbon cable through the rectangular hole in the bottom half of the frame.
-
-
Este paso está sin traducir. Ayuda a traducirlo
-
Remove the ribbon cable and the motherboard (still connected) from the frame of the phone.
-
-
Este paso está sin traducir. Ayuda a traducirlo
-
Use a spudger to detach the ribbon cable from the motherboard.
-


Equipo

Cal Poly, Team 27-96, Amido Spring 2010 Miembro de Cal Poly, Team 27-96, Amido Spring 2010
CPSU-AMIDO-S10S27G96
4 Miembros
15 Guías creadas