Saltar al contenido principal

Esta guía ha sufrido modificaciones. Revisa la última versión sin revisar.

Motorola Moto G5s Plus Display Replacement

Qué necesitas

  1. Motorola Moto G5s Plus Display Replacement, Display: paso 1, imagen 1 de 3 Motorola Moto G5s Plus Display Replacement, Display: paso 1, imagen 2 de 3 Motorola Moto G5s Plus Display Replacement, Display: paso 1, imagen 3 de 3
    • Power off the phone before you begin.

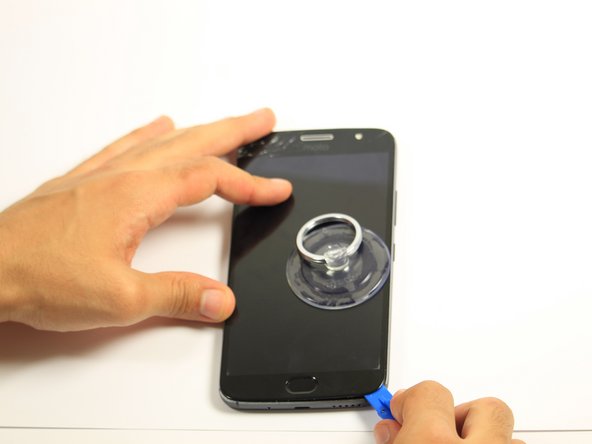
    • Bring the heat gun one to two inches from the edges of the display to melt the display adhesive.

    • Spend equal amounts of time applying heat around the entire edge of the phone.

  2. Motorola Moto G5s Plus Display Replacement: paso 2, imagen 1 de 2 Motorola Moto G5s Plus Display Replacement: paso 2, imagen 2 de 2
    • Attach the suction cup to the display slightly to the left of center.

    • Exert a moderate force to pull on the suction cup. The display will come loose.

  3. Motorola Moto G5s Plus Display Replacement: paso 3, imagen 1 de 3 Motorola Moto G5s Plus Display Replacement: paso 3, imagen 2 de 3 Motorola Moto G5s Plus Display Replacement: paso 3, imagen 3 de 3
    • Insert the opening tool inside the loosened edge.

    • Gradually work the opening tool around the edge of the entire screen to cut through the adhesive.

    • Do not wedge the opening tool too far beneath the screen. Using too much force can result in torn connector cables.

  4. Motorola Moto G5s Plus Display Replacement: paso 4, imagen 1 de 3 Motorola Moto G5s Plus Display Replacement: paso 4, imagen 2 de 3 Motorola Moto G5s Plus Display Replacement: paso 4, imagen 3 de 3
    • The display should now be entirely loose, attached only by the connectors at the top of the device and the fingerprint sensor connector at the bottom of the device.

    • Press down on the fingerprint sensor with the display slightly raised to disconnect it from the display.

    • If the fingerprint sensor does not come loose, use the heat gun to loosen its adhesive.

  5. Motorola Moto G5s Plus Display Replacement: paso 5, imagen 1 de 2 Motorola Moto G5s Plus Display Replacement: paso 5, imagen 2 de 2
    • The cables at the top of the device are fragile. If you are using this guide as a prerequisite for replacing another part, be careful not to tear the cables while lifting the screen.

    • Remove the one 5mm Torx-5 screw located by the connector cables in the top right corner of the device.

  6. Motorola Moto G5s Plus Display Replacement: paso 6, imagen 1 de 2 Motorola Moto G5s Plus Display Replacement: paso 6, imagen 2 de 2
    • Grab the unscrewed metal plate with your blunt tweezers.

    • Slide the metal plate to the left and then out to remove it.

    • Removing the plate will expose the display assembly's connection to the phone's motherboard.

  7. Motorola Moto G5s Plus Display Replacement: paso 7, imagen 1 de 2 Motorola Moto G5s Plus Display Replacement: paso 7, imagen 2 de 2
    • Disengage the two cable connectors by gently prying beneath the edge of the connector with the opening tool.

  8. Motorola Moto G5s Plus Display Replacement: paso 8, imagen 1 de 2 Motorola Moto G5s Plus Display Replacement: paso 8, imagen 2 de 2
    • Lift up the detached right connector from its housing using blunt tweezers.

    • The housing has light adhesive underneath it. Use a small amount of force to remove the connector from the housing.

Conclusión

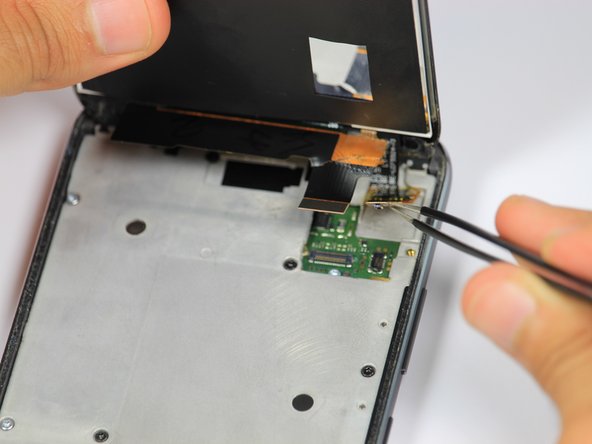
To reassemble your device, follow these instructions in reverse order.

8 personas más completaron esta guía.

Kevin George

Miembro Desde 10/08/18

1,072 Reputación

4 Guías creadas

Equipo

Cal Poly, Team S4-G5, White Fall 2018 Miembro de Cal Poly, Team S4-G5, White Fall 2018

CPSU-WHITE-F18S4G5

4 Miembros

5 Guías creadas

0 comentarios

Agregar Comentario

Ver Estadísticas:

Ultimas 24 horas: 2

Ultimos 7 días: 6

Ultimos 30 días: 28

Todo El Tiempo: 4,558