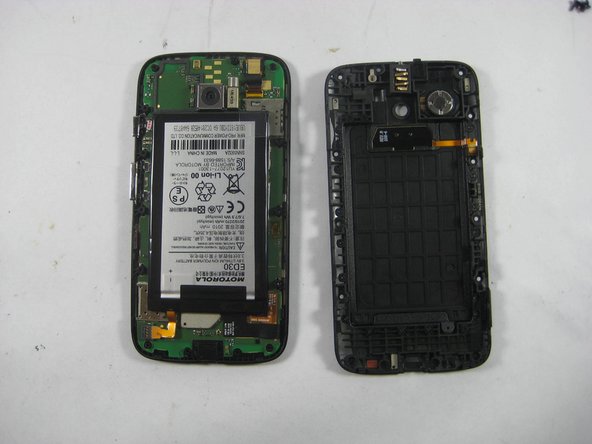
Saltar al contenido principal

Motorola Moto G 1st Generation Front Camera Replacement

Qué necesitas

  1. Aviso: los pasos 1-3 provienen de una guía que está marcada como "En progreso".

    Motorola Moto G 1st Generation Front Camera Replacement, Rear Panel: paso 1, imagen 1 de 3 Motorola Moto G 1st Generation Front Camera Replacement, Rear Panel: paso 1, imagen 2 de 3 Motorola Moto G 1st Generation Front Camera Replacement, Rear Panel: paso 1, imagen 3 de 3
    • Before you start following any of the steps of this guide, completely turn the device off.

    • Take the plastic back cover off by either using a plastic Pry tool or simply using your hands. Start from the bottom by the charging port

  2. Motorola Moto G 1st Generation Front Camera Replacement, Removing the Screws: paso 2, imagen 1 de 1
    • Unscrew the 3.5mm screws, total of 14, located on the back protective cover by using a T5 Torx screwdriver.

  3. Motorola Moto G 1st Generation Front Camera Replacement, Removing the Battery Cover: paso 3, imagen 1 de 2 Motorola Moto G 1st Generation Front Camera Replacement, Removing the Battery Cover: paso 3, imagen 2 de 2
    • Use a plastic opening tool to remove the protective cover.

    • Carefully work the plastic tool around all the edges of the phone.

    • The protective cover holds the Volume and the Home buttons which might fall off the assembly when the cover is removed.

  4. Motorola Moto G 1st Generation Front Camera Replacement, Disconnecting the Front Camera: paso 4, imagen 1 de 2 Motorola Moto G 1st Generation Front Camera Replacement, Disconnecting the Front Camera: paso 4, imagen 2 de 2
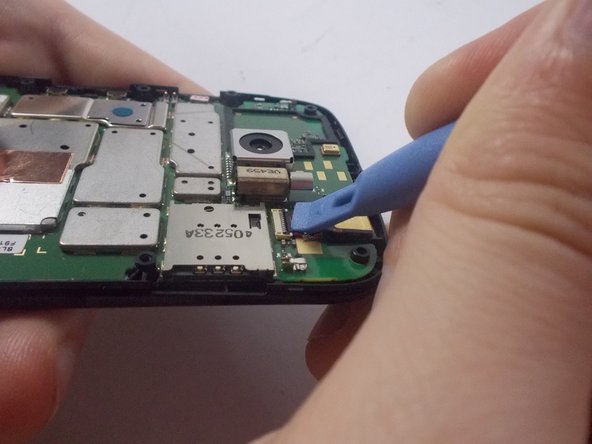
    • Use the Pry tool to disconnect the Front Camera, found in the upper right corner, from the motherboard.

    • You want to pry up the black tab that locks it in place. It may be under a protective sticker.

    • Though the battery is removed in our second photo, it is not required for removing the front camera.

  5. Motorola Moto G 1st Generation Front Camera Replacement, Removing the Front Camera: paso 5, imagen 1 de 2 Motorola Moto G 1st Generation Front Camera Replacement, Removing the Front Camera: paso 5, imagen 2 de 2
    • Remove the camera from the phone by using the tweezers.

    • To reassemble, follow the steps in reverse.

Conclusión

To reassemble your device, follow these instructions in reverse order.

4 personas más completaron esta guía.

Radostin Lobodov

Miembro Desde 10/16/14

2,904 Reputación

6 Guías creadas

Equipo

0 comentarios

Agregar Comentario

Ver Estadísticas:

Ultimas 24 horas: 0

Ultimos 7 días: 1

Ultimos 30 días: 1

Todo El Tiempo: 1,258